


Playing with beads has to be one of my favourite ways to relax and I think stacked beads is my current obsession. I have recently started to experiment with stacking beads and folding sequins and thought I would share what is on the hoop. (Click on the images if you want to see a larger version)

I started off with some fabric that I sun-dyed earlier this year. I took photos on the day and wrote a tutorial about it. You can find how to use sun dyes here. They are a lot of fun as the colours are so vibrant and the dyes are easy to use. I enjoyed the process so much that I got a bit carried away so I am still using the fabrics I dyed that day!
The colour of the fabric was quite strong and led the way in my design process. When I selected the threads and beads, I realised it would be a bright, strongly-coloured project. I am having fun being a bit more adventurous lately. The first thing I did was to make 3 Suffolk puffs or in America, people call them yo-yos. The fabric was a scrap of some very bright sari silk.
Once the Suffolk puffs were stitched into position, I added two pieces of hand-dyed lace. There are two bits of lace on the piece. The first you can see in the bottom half of the disk below the stacked beads. However, the second has been stitched over quite a bit so you might not find it! You can always tell when I am enjoying myself with a needle and thread, as things get a bit enthusiastic.

If you peer through the stitches at the top, below the top Suffolk puff, you can possibly discover the second piece of lace. To help you a little I have taken a very close-up detail. I hope you can see it covered in pink French Knots!
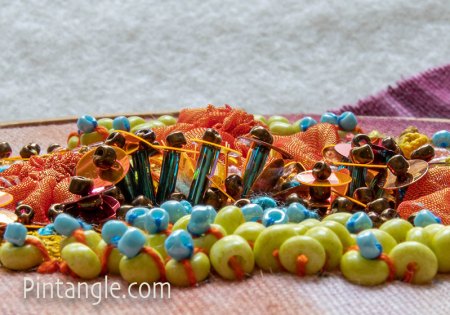
Then went to town with sequins and beads. I was interested in experimenting with stacking beads and really building up depth in the textures. Here, you can see that I had a lot of fun stitching little hats on bugle beads. I chose the complementary colour to add a bit of zing.
For those who are interested, the main stitches I used in between the stacked beads are French Knots, Cast on stitch and Oyster stitch. The threads are all scraps from making up my thread Twisties for the shop. I like to use what I sell and whenever I make up some twists there are always odd bits left over, so I am in luck as it’s a perfect excuse to experiment a bit.
Floral-themed Stitchers templates for hand embroiderers
With this set of stitchers templates, you can create your own floral-themed designs. You can easily combine petal and leaf shapes with the curved edges of the templates to create all sorts of floral and organic motifs. You will be able to create hundreds of different patterns to embroider. It is the ultimate mix-and-match fun for stitchers.

The set comes with an e-book with instructions and is filled with patterns and designs that you can create and use as jumping-off spots for your own designs.
They are available now in the shop here
Enjoy your stitching!


I also do embroidery, bed work and crazy quilt stitches and this is a treasure trove of ideas and beauty
Thanks I enjoy exploring stuff
Love seeing what you are up to! Always exciting!
Hello there, I followed you a few years back, then stopped and now am back, I love your layered work , using up sequins and beads with the stitches, its a lovely look, I always find something that is different here, thank you for being so creative and always thinking out of the box.
Thanks Marianne
Very exciting. I remember when you taught me encrustations when we taught at the crazy workshops out at the Cotter.
Margaret That retreat was so much fun
Could you tell us how you “fold” your sequins?
Thanks, love the design and colors!
Diana you simply fold them – I used the back of a spoon to press them firm but they are just thin plastic so not difficult to fold. Fiddly however!
I love what you did with the beads!
Thanks Annet waving – great to see you here
FANTASTIC! Burying the lace underneath beads, sequins and knotted stitches works really well – it’s really like pebbles on a sandy beach or leaves, small nuts and pine needles spread over moss…
I really like what you have done with the bugle beads, sequins and seed beads, too.
Thanks Queenie I have been burying lace on the last few things I have done – I think of it as being archeological.
It is an interesting and intricate looking piece. Curious as to how you are going to use it.
HI Susan I am in a creative embroidery group and we are each stitching/beading a 3 and half inch diameter circle (unfinished like the photo you see) and then swapping it at our Christmas lunch. So the one I recieve in return I will either turn it into a dramatic brooch/scarf holder – ie back it and put a brooch pin on the back or add it to the front of a small bag or turn it into a Christmas tree decoration as I collect them.
I simply love your work. Love beading and am going to have to try a go at sequins.
Thanks Sharon they are fun to do!