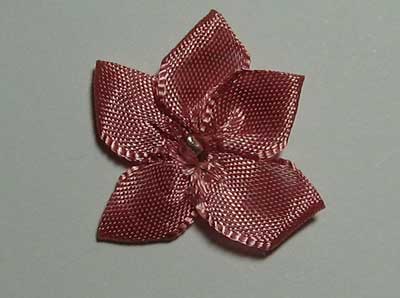
To make a Five point ribbon flower.
The sample is made from 13 mm ribbon but you can use ribbon from 8mm to quite large to make this type of flower. It looks good in silk ribbon, satin ribbon and ribbon made of organza.
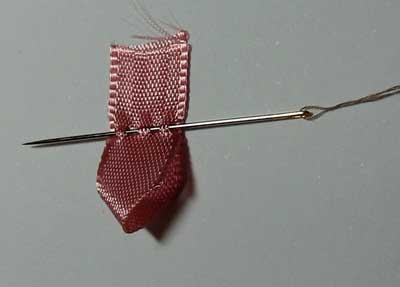
Cut a piece about 3/4 inch long and fold it at right angles so that it forms a mitre corner as illustrated.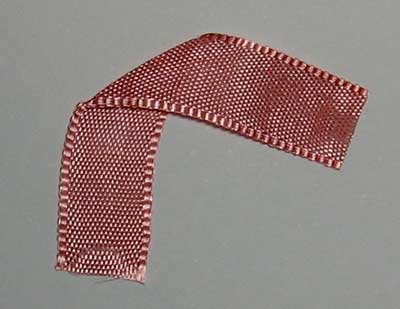
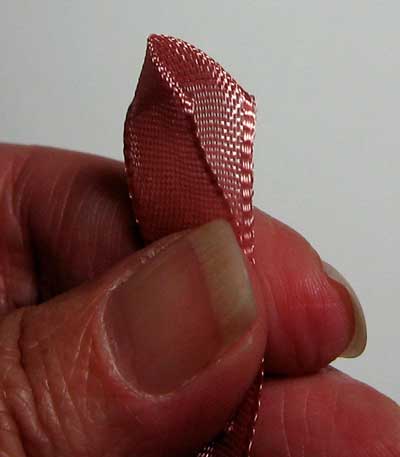
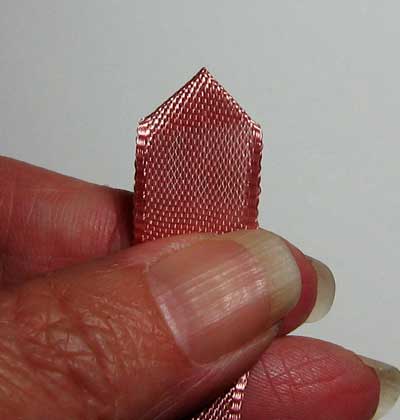
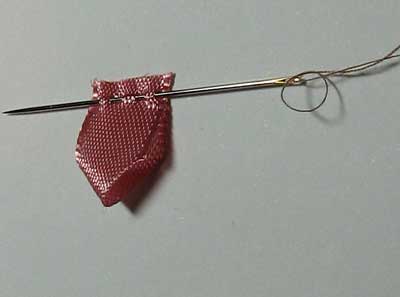
Fold the ribbon back on the mitre, so you are folding the ribbon back underneath itself.
Finger press the top edge.
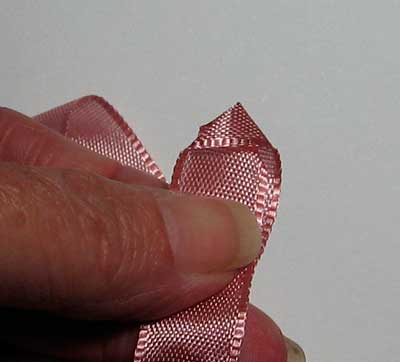
You will have a front and back.
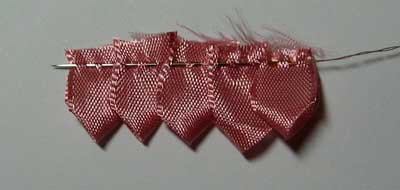
Make five petals and have them ready to thread together.
About half way down ribbon gather the first petal on the needle and then trim the excess ribbon off.
Do this with the five petals gathering them on the needle.
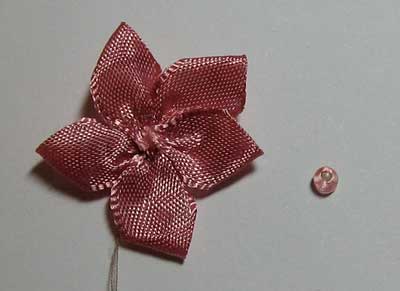
Pull the thread tight and finish off at the back.
You can use a little fray check if unravelling is problem
Add a bead for the centre.
You have a 5 pointed ribbon flower to add to your next project!
I hope you enjoy the tutorial.


This is beautiful! I have so much ribbon and was wondering what I could do with these. Time to make a field of flowers! Thank you!
Thanks Kathy – yes it is a very handy little technique
I'm from Malaysia.I just made one for my niece.It's so lovely,thanks a lot.
Thanks for this tutorial Sharon. I have purchased flowers like this but now I can make my own.
WOW! These are just stunning! TFS!
Thank you for a wonderfully clear and simple tutorial for a gorgeous flower. I'll just have to have a go at making some (for my handmade cards) yours turned out so well and they are not something that could suffer in transit!
{mwah, mwah, from Dublin, Ireland}
Mary Mac
Great tutorial : ) Thank you so much!,very good instructions : )
This is a great project! I love the ribbon flower, I think with the tutorial you have here, I can definitely make one for myself as well. Thanks a lot.
I have been looking for a way to do this for awhile now! THANK YOU SOOO MUCH!
Oh my gosh your flower is gorgeous! Thanks so much for sharing this wonderful tutorial!
Sharon,This is too much of coincidence as I am bumping into SRE.I joined the SRE group in stitching fingers and bumped into a blog in the same .Now I just wanted to check chain stitch variations and here again I am seeing this ribbon flower.Thanks a lot for the clear tutorial.
Oh, I love this tutorial! Simply beautiful.
Thanks! ?
Thank you very much to teach how to do this flower!
A kiss from Brazil! Jana
I’m SO delighted to have found your perfect ribbon flower tutorial! I linked to this post from my paper-crafting blog – your instructions are so easy and well organized! Thanks for the beautiful inspiration!
http://mamacowcreations.blogspot.com/2010/06/all-eyes-on-ribbon.html
thank you for sharing! i’m looking for how-to make ribbon flowers to put on bobby pins for Christmas gifts, and found you.
kudzu
kudzukween.blogspot.com
wow !!!!!! thank for left handers tips!!
I just made one of these. Your instructions were so clear and easy to follow. I used baby blue organza, and put a pearl in the center. It is sooooo pretty. Thank you for the great tutorial.
No worries Nancy you credited me as author of the tutorial, with the link and that is all that people ask – thanks
Hi!
Today I posted an entry on my blog with a link to this tutorial.
I’d appreciate your letting me know if that’s OK.
Thanks,
Nancy Ward
http://paperfriendly.blogspot.com
Very lovely and creative idea
Nice skills, thanks for sharing with us!
Have a nice day…
from Free Wedding Flower Guides
Thanks, terima kasih
untuk langkah-langkah ..thanks ..thanks
salam manis
From Meli. INDONESIA
Nice tutorial..will try it some time later….
Thank you so much!,very good instructions:)
Great tutorial, many thanks.
GREAT.that was very nice.
I think I want to make lots of these to “sprinkle” on the new curtains I made for my daughter’s room.
Thanks for the clear instructions with excellent sharp photos. I made a large one to adorn the front of my baby’s Christening dress as the store didn’t have any large enough nor in the ivory color I wanted. Plus mine is made with soft satin ribbon and not the scratchy stuff the store flowers use. Wonderful tutorial!
Thanks so much for this, just what I need.
So simple yet so beautiful! Thank you for sharing.
Hi Sharon
We are starting a challenge blog, for all forms of arts and crafts and would love to invite you to be a guest designer, for one challenge.
Each challenge has sponsored prizes and designers recieve a small pack of sample goodies to play with.
yours tracey
merci beaucoup de nous faire partager votre expérience et votre savoir faire
Oh, thank you very much. Fantastic!!!
Beautiful work Sharon!…even the lurkers like me are inspired…I finished a small quilt for my godson that I was making for his baptism and 2 quickie ones for his brothers so they will not be jealous. My best friend was shocked to see the floor of my sewing room… Keep that inspiration up!
CQMadhatter
p.s. My best friend was visiting because I am working on 2 4-tier skirts for her…most of the way finished. Hmmmm…maybe I will weigh all the projects that leave and see what it totals….
Sharon,
Please contact me off line. have an interesting site for you.
Bev
Great tutorial… thanks Ms. Sharon!!! Have a wonderful weekend!
Fantastic work and Very useful tutorial
Thank you so much – and thanks to Alison for asking
CA
Thanks this is beautiful. Very easy tutorial to follow.
Thank you for all the wonderful things you have taught us and inspired us to do. I took your encrusted class but did not participate in any of the discussions. I thought the class was excellent and enjoy crazy quilting even more with all the new ideas. Jayne
Indeed I did enjoy it. Love how sharp your photos are, too! Thanks, Sharon…
Thank you for the tutorial! I have always wondered how to do these despite trying various made up methods they never sat right..
thank you!!always is useful know how to make thisaccesories thank again
Merci beaucoup, très intéressant les “tuto” en images.