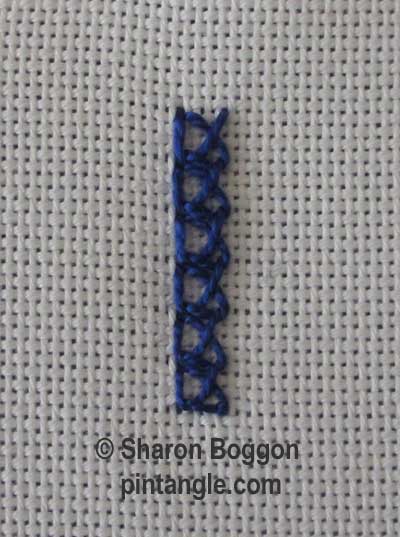
This stitch is called Inverted feather stitch but it is very unlike a feather stitch. I found this stitch in an old-fashioned stitch book by Anne Butler called Embroidery Stitches.
You can build up this stitch, line upon line to create pattern fills. It is also good to couch down ribbon, and thicker threads. The stitch looks good worked in a thread that has a firm twist to it such as cotton perle. For the sample, I used cotton perle #5. If you use thicker threads, it makes a wonderful braid-like edge which is good for projects such as the edge of fabric postcards, artist trading cards, or you can use it on the edge of things like needle books, fabric book pages etc.
The stitch follows a curve well and if you work it in an open manner, it can be combined with beads.
How to work Inverted feather stitch
This stitch is worked best between two parallel lines from top to bottom.
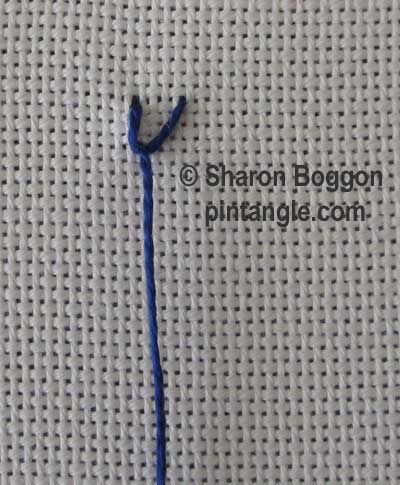
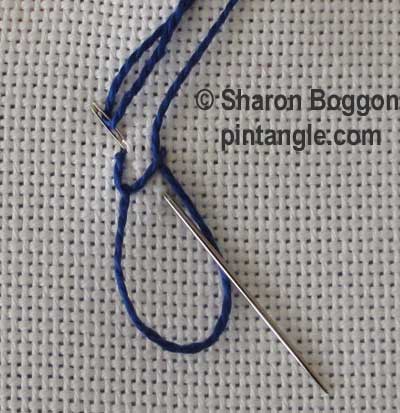
Bring your needle out on the right-hand side of the line. Take the needle across to the left-hand side, of the line and insert it as illustrated.
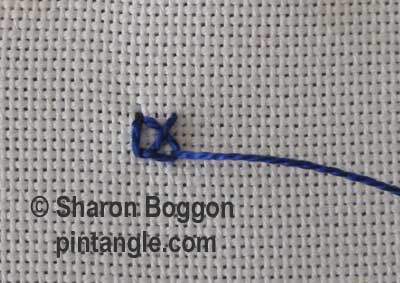
With the needle pointed straight down and emerging on the left line, have the thread wrapped under the needle and then pull the needle through the fabric to make a V-like stitch with the straight edge sitting on the left-hand side of your line.
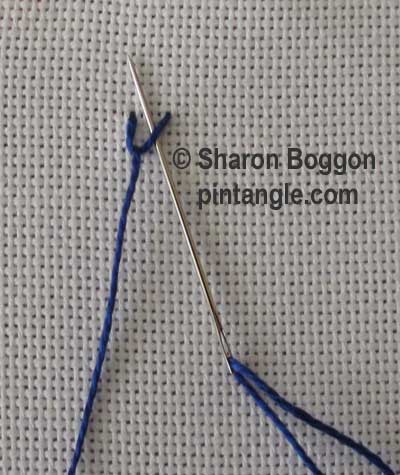
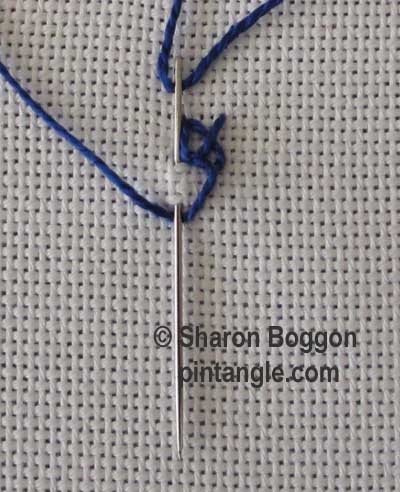
Move to the right-hand side of the stitch pass the needle under the right-hand side crossbar of the V.
Do not go through the fabric, just pass the needle under the crossbar. Pull most of the thread through, but not all — leave a bit of thread loose so that you can work the next part of the stitch with ease.
Insert the needle at the top left-hand side and angling the needle diagonally across the back of your work, have the needle emerge on the right-hand side and wrap the thread under the needle and pull the needle through.
You have made the first part of Inverted Feather stitch.
Continue in this way down the line
I hope you enjoy the stitch.
Follow Pintangle and have it delivered to your inbox
You can have Pintangle delivered to your inbox by using the ‘follow’ feature in the sidebar. Just enter your email address, and when you get the confirmation email make sure you say yes and you are all set!
If you are on a mobile or tablet, just scroll to the bottom to find the ‘follow’ feature.
Have you seen my Stitchers Templates?
Create your own designs with Sharon’s easy-to-use stitchers templates. Combine shapes to create hundreds of patterns and designs to embroider. It is the ultimate mix-and-match fun for stitchers of all skill levels. I created them to be as versatile as possible. I include four multi-patterned templates in each set. You will find them easy to use, totally clear to help you position them on your work, and they are nice and compact to fit in your sewing box. Each set comes with an e-book filled with patterns and designs that you can create and use as a jumping-off spot for your own designs. They are available now in our shop here!
Happy stitching!




Thanks for this stitch – a new one for me to learn. My samples are here.
http://hobbysewing.blogspot.com/2020/09/tast-10-beyond-tast-10.html
I joined TAST in 2016 for about half a year, and then put it aside when I started my RSN Certificate. But I want to finish my sampler, so am back at doing ad hoc, whatever I feel like TAST stitches! Here’s my elephant with this stitch added in
https://hillviewembroidery.com/tast-stitch-60-inverted-feather-stitch/
Finally have the time to work on TAST 2013 – only 10 stitches to catch up! Here you can view my Knotted Feather stitches and Inverted Feather stitches.
http://debbies-doings.blogspot.ca
HI Sharon,
I started to learn and attempt this stitch. my sloppy samples are here-
http://jizee6687.wordpress.com/category/tast-2013/02-50-inverted-feather-stitch/
Thank you,
Chitra
I’m a little late posting, but completed the stitch. I posted it on my Flickr page http://www.flickr.com/photos/susie_w/8447402359/in/photostream with details on the stitching.
SusieW
Catching up on posting my stitch samples — I am working through the list starting with Stitch 1. Here are 1, 2, and 3.
http://tast2012rerun.wordpress.com/2013/02/03/my-feather-stitch-samples/
http://tast2012rerun.wordpress.com/2013/01/28/my-buttonhole-stitch-samples/
http://tast2012rerun.wordpress.com/2013/01/21/my-fly-stitch-samples/
And they are truly just samples! I admire the efforts that stitchers put into their projects with the new stitches, but for now I won’t be attempting that style of learning!
Good evening, everyone. It looks a little fuzzy – I think I’ve get to get a new camera.
http://theworkingneedleandpen.wordpress.com/2013/02/03/sunday-3-feburary-2013/
My sample is here
http://linsartyblobs.blogspot.co.uk/2013/02/tast-50.html
Hi Sharon and all, I want to make a stitch book with all the stitches from TAST. I just have covered 11 stitches from TAST 2012 . I hope that every stitch announced in 2013 will become part of my stitch book. Stitch 49 and 50 are here:: http://fabricfusion.blogspot.co.at/2013/02/freie-maschinstickerei-und-tast-2013.html
hello,
this stitch is very interesting
http://pierrespapiersciseaux.blogspot.fr/2013/02/tast-50-point-depine-inverse.html
I experimented a little with the inverted feather stitch. I wrote about it on my blog:
http://fat-quarter.blogspot.nl/2013/02/inverted-feather-stitch.html
This stitch is a thread eater!
Hi Sharon
Happy New Year! I know it’s Feb but this is my first comment here this year. Good to be TASTing again.
Haven’t done this stitch yet but here is my catch up for stitches 44-49 http://berrybakewell.blogspot.co.uk/2013/02/you-me-home-tast-44-49.html
http://stitchinfingers.ning.com/photo/you-me-home-embroidery-01?context=album&albumId=2105845%3AAlbum%3A606714
Here’s my effort on the inverted feather stitch. I used 6 strands of thread and included some curves – both of which proved a bit tricky! Wouldn’t recommend doing either of these things for anyone else trying this stitch!
http://www.flickr.com/photos/thestitchsmith/8439051659/in/pool-56846286@N00
Hi Sharon,
Thanks for introducing this stitch to me. I really liked this stitch. My trial of this stitch is here.
http://hobbysewing.blogspot.in/2013/02/tast-50-inverted-feather-stitch.html
Here is my simple Inverted Feather sample:
http://queeniepatch.blogspot.jp/2013/02/tast-50-inverted-feather-stitch.html
http://stitchinfingers.ning.com/photo/tast-stitch-50-inverted-feather?context=user
I’ve finished my stitch for this week and also the drizzle stitch, which I didn’t get done last year. You can see them here: http://cantheleopardchangeherspots.blogspot.com/
Thanks so much.
Hi Sharon & Friends,
my post for the stitch 50. Thank you all!
http://embroiderland.blogspot.com.br/
No more stitch book for me this year, but I tried the two last stitches in my current CQ http://j-en-revais.blogspot.com/2013/02/tast-points-49-et-50.html
Have a nice week end
Third try to leave a comment at this post. I wrote about my progress here:
http://fat-quarter.blogspot.nl/2013/02/tast-49-50.html
and my last TAST 2012 progress is here:
http://fat-quarter.blogspot.nl/2013/01/black-sampler.html
A late start for me. Here is my sample with last week’s stitch and this week’s.
http://playfulstitching.wordpress.com/2013/01/31/take-a-stitch-tuesday-2013/
I am glad to be back into the embroidery again.
Thanks Sharon
Here’s my attempt… http://210920746822434353.weebly.com/1/post/2013/01/take-a-stitch-tuesday-2013-inverted-feather-stitch.html
Second try to leave a comment here. No weekly post from me with old stitches, it’s a new stitch for me! But there’s some stitching to see on my black sampler, the last one for 2012. I wrote about the details here:
http://fat-quarter.blogspot.nl/2013/01/black-sampler.html
The complete sampler is on my Flickr-page:
http://www.flickr.com/photos/28957501@N04/8416262965/in/photostream
Hello. I just found your site, how is beautiful. Would like to know if there is possibility to may inscribe to receive your news ? Many thanks. Best regards. CathyBelgium
Cathy I have sent you an email but you can subscribe using the “pintangle via email” link in the right hand side bar
Big smile again, this stitch is new to me! It looks like a combo of feather and crossed buttonhole stitch, should be fun to play with. So no post with old stitches from me this week. But I finished my black sampler, the last one for TAST 2012. I wrote about the details on my blog:
http://fat-quarter.blogspot.nl/2013/01/black-sampler.html
The sampler is on my Flickr-page:
http://www.flickr.com/photos/28957501@N04/8416262965/in/photostream