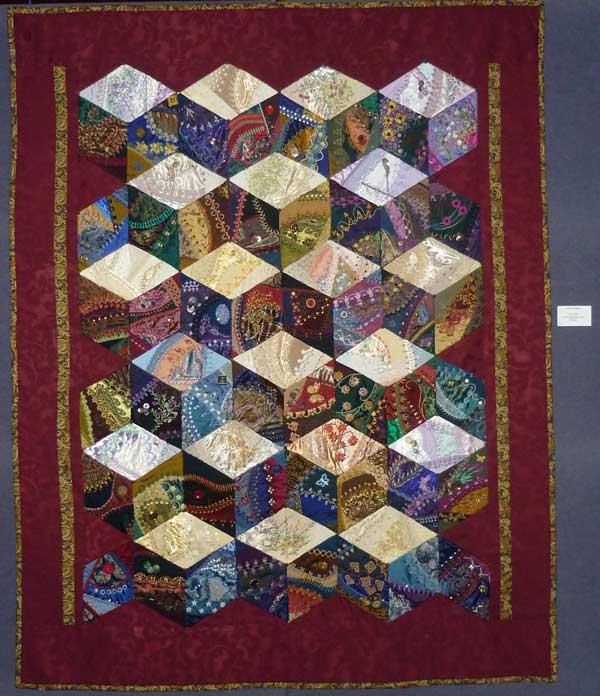
 As I promised in my last post about my diamond quilt here is a photo of the diamond quilt on the wall.
Click on the image and you will be taken to a larger photograph.
The ACT Embroiderers’ Guild had a lovely evening with the exhibition being opened by Senator Kate Lundy.
I will be back there on Saturday morning demonstrating crazy quilting for anyone who is interested. So if you are local and feel like some free tips look for me in the demonstration area at the back of the hall and feel free to say hello.
Today I start planing the next crazy quilt!
The back story
If you are interested in the back story of this quilt you will find it all in the Diamond block crazy quilt category
This series of posts on How to assemble a Crazy Quilt includes
- Assembling a crazy quilt part 1 – Trimming the blocks, joining and a construction technique that means the seams sit flat.
- Assembling a crazy quilt part 2 – Working in Sections
- Assembling a crazy quilt part 3 – Tying the quilt sandwich with no stitches visible from the front and adding a border
- Assembling a crazy quilt part 4 – Adding a false back
- Assembling a crazy quilt part 5 – Catching the false back and binding.
Online Crazy Quilting Classes:
Just a quick reminder for those who are interested in taking a class with me. You will find all my classes listed under the top tab imaginatively titled Classes online you will also find information on how online classes are run.


That is one really awesome CQ!
OMG Lady … you ROCK!
And this guys and gals is why I love Sharon’s work! Awesome is the word that comes to mind! Inspiration is what she shares!
Good on ya, girl! Be proud … it is a work of art!
Thanks a million for sharing with the world!
Wow! Absolutely incredible!
Wow! That is beautiful! Add me to the list of those who say "thank you!" for sharing each block as it was made. I enjoyed seeing how much thought/work/time goes into one of these blocks, not to mention making a whole quilt.
This quilt is beautiful! I enjoyed reading about the making. Thanks for sharing how you pieced it together. It will be very helpful when I have to piece my first crazy quilt blocks together.
Sharon, the quilt is stunning! Oh I do wish I could be at the Guild exhibition to see both the quilt and your demonstration…I’ve learnt so much already from your blog and stitching tutorials, but to see your work in person would be the icing on the cake!
This is fantastic! I loved seeing each of the blocks as you were stitching them but I have an even greater appreciation seeing them pieced together. It really is spectacular.
I have enjoyed following the progress of your quilt, and it is just lovely Sharon, beautiful work!
Applause!!! Truly stunning! I can’t wait to see the next one come into focus. 🙂
Sharon, absolutely gorgeous, out of this world. Now it’s finished, you can start to enjoy it! Look forward to the next one.
Your quilt is gorgeous! Thank you so much for sharing your progress along the way. It has been wonderful to see each block and then see the finished quilt. It would not have been as enjoyable to just see the finished quilt, because we would have missed all the details of the blocks. It is slow art on the viewers side. We got to take time to see the intricacy.
Thank you!
Ohhhh sharon it is very beautiful!!!!!!!!!!!!!!!!!!!!!!!!!!!!!!!!!!!!!!
Awesome!
Sharon this looks incredible! You must be so pleased that you finished this in time for the show 🙂
That is just awesome! I’ve really enjoyed following along while you stitch this.
Sharon, That is AMAZING. Just gorgeous!
Judy in Indiana
There are absolutely NO words in the English language to even begin to do justice to the piece of art you have created Sharon – I know I can’t think of any. Wow!