

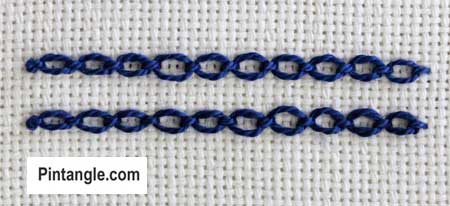
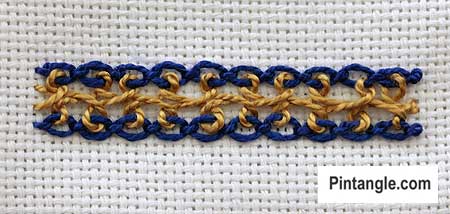
Interlaced Cable Chain is an interesting variety of Chain stitch that quickly creates a pretty textured border. Better still, it is not hard to work. You need to know how to work cable chain stitch, but other than that, Interlaced Cable chain is a simple lacing pattern.
I have worked this stitch in two different colours so you can see clearly the foundation rows of cable chain and the lacing. For the demonstration, I have used cotton perle #5. Use a tapestry needle for the lacing in order to avoid splitting the thread on the foundation rows.
How to work Interlaced Cable Chain Stitch
Start by working two parallel lines of cable chain stitch.
Work your lacing from right-to-left. At this stage, you are lacing the cable stitches, not going through the fabric — so use a tapestry needle to avoid splitting the foundation row of stitches.
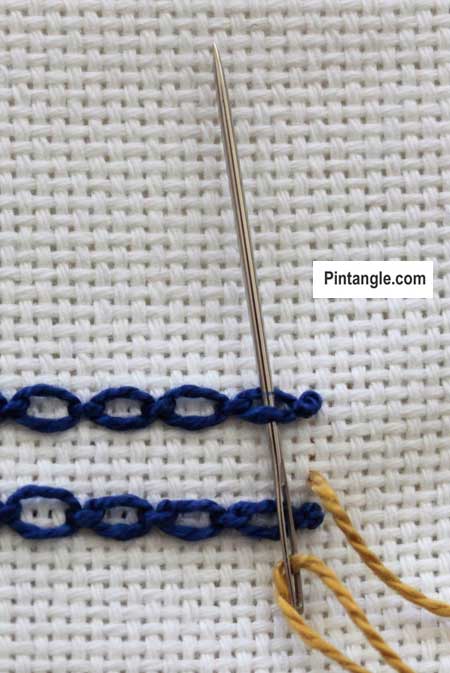
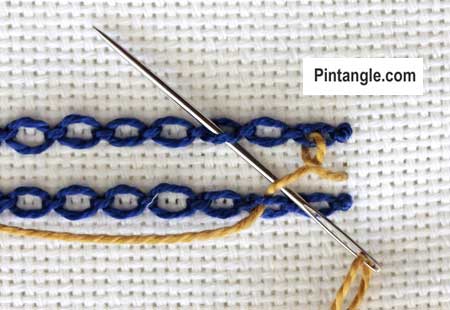
Bring your needle up through the fabric at the mid-point of the two foundation rows on the right-hand side.
Slide your needle under the chain stitch on the top row. Have the needle pick up just half of the chain, so that the needle emerges in the middle of the chain stitch as illustrated. Take your needle through the loop of the stitch.
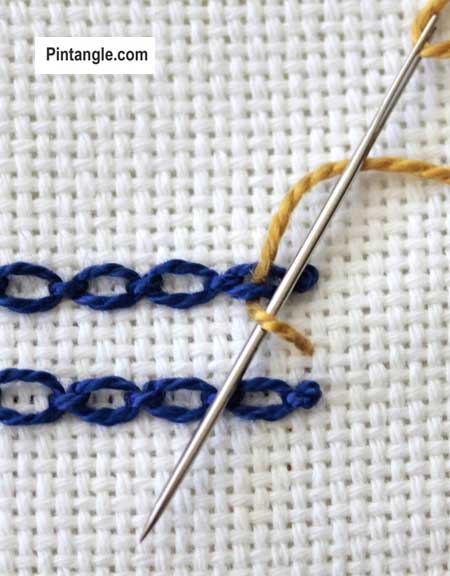
Slide your needle under the lacing thread on the right-hand side of the foundation chain and, as illustrated, angle your needle towards the bottom foundation row of stitches. Pull your needle through.
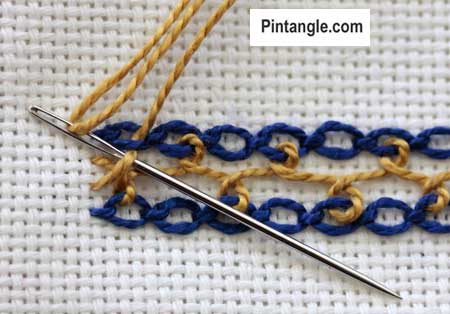
On the bottom line, skip a chain stitch and slide your needle under the inside loop. Point your needle downward picking up the loop of the chain. Pull your thread through.
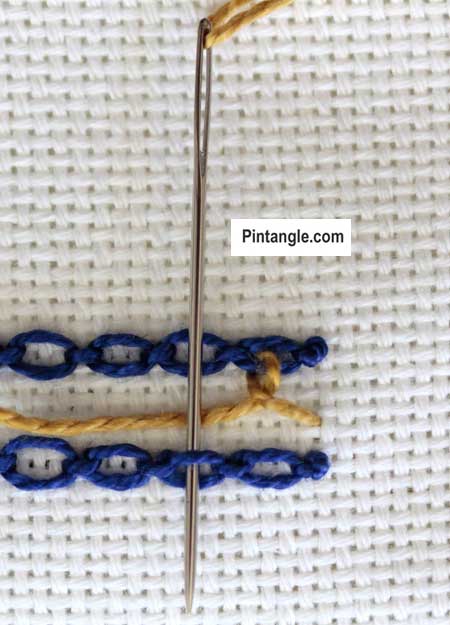
As illustrated, slide your needle under your lacing thread on the right-hand side of the foundation chain. Angle your needle towards the top foundation row of stitches, skip a chain stitch before passing your needle under the inside loop of the next chain stitch, on the top line. Pull your needle through.
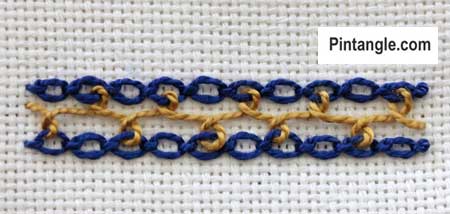
Lace every second chain stitch in this manner until the line is complete. Take the lacing thread to the back of the fabric.
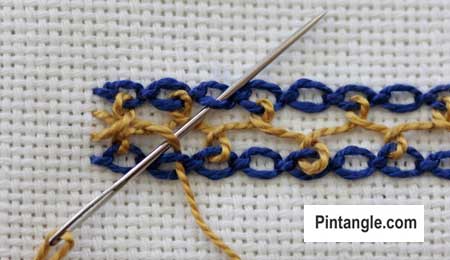
Bring your lacing thread out of the fabric, just below where it entered your fabric, and make a return journey, lacing every second chain stitch so that you lace the stitches that you didn’t lace on the first journey.
Take your thread to the back and tie it off, and you have created an interesting line or border for your projects.
Further suggestions
This stitch is great fun to work in variegated threads. But you can also play with the spacing or work the lacing between two wavy lines. Or you can work the foundation cable chain stitches along the edge of thin ribbon and then lace the stitches. You can also add beads. It is a very quick, easy, and yet dramatic stitch. Hope you have fun with it!
Bead Soup

Add zing to your embroidery with Sharon’s bead soup! Check them out in the Pintangle Shop. These bead soups are not for jewelry, I’ve selected the beads specifically for use in creative embroidery and for working in an encrusted embroidery style. The types and sizes of beads are better suited for stitching to fabric, rather than for making jewelry. With the exception of a few feature beads that you can stitch to fabric as a point of emphasis, there are not many large beads in this mix.

Thanks for this fun and great stitch. My samples are here.
http://hobbysewing.blogspot.com/2020/09/tast-23-beyond-tast-23.html
2018 TAST stitch 22: https://www.thecrafties.com/2018/11/tast-roundup-2/ 🙂
Loving the look… I tried interlacing Run stitches and Back stitches. Never thought of this one… Amazing work…
Thank you!
I am catching up on stitches I have missed – and taken the liberty to re-number them to fit my own TAST collection.
http://queeniepatch.blogspot.jp/2017/02/tast-142-interlaced-cable-chain-stitch.html
My first TAST stitch! And the first time I have tried anything different to normal chain stitch! I need to work on getting both the chain stitch and the interlacing even, but I really enjoyed working this stitch. My full journey on my blog if you are interested: http://hillviewembroidery.com/
Probably one of the best stitches you have done.
Pleased you like it so much Sue
Thank you Sharon – happy New Year – and thank you for such clear instructions for the interlaced cable stitch.
Hi Andy – hope you and yours have a good year too
Very pretty and quick. Thank you
Hi Sharon,
This interlaced cable chain stitch looks like a braid. very beautiful and interesting,
Thank you,
Chitra
Chitra if you lace with something like chainette it really does look like a braid
This is so pretty!
Thanks Angela I agree I think it is nice variety and it is quick!
Hi. Your work is beautiful! I’m a beginner and want to give it a try. I’m just concerned about the spacing. How far apart did you stitch the two cable chains?
Pijq I used the weave of the fabric as a guide – so about 4 threads of the material