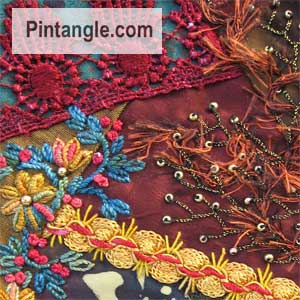
 Day 9 of 100 details for 100 days is a more complex detail on a piece of my crazy quilting. The advantage is that there is a simple idea and a more complex idea on this one.
First the yellow braid along the bottom has been decorated with straight stitch and laced with a fine knitting ribbon along the top.
In the right hand area feather stitch has been used over the top of a hairy yarn. This hairy knitting yarn was first couched down to hold it in place. Next I worked feather stitch over the top in a metallic yarn that DMC produces. It comes in a reel and called Antique Gold. Its weight is about the same as a single strand of DMC cotton floss and in this case I used two strands together and topped the feathers stitch arms off with beads. This thread always adds a nice touch to my crazy quilting.
Feather stitch would have to be one of my favourite stitches as there is so much you can do with it. To return to the detail today, the floral spray is only partially seen on the left. It was created using a hand dyed silk thread. I do much of my own dyeing. I dye threads, lace, ribbon, braid and shell buttons. I love this silk thread because it is the same weight as DMC perle #5 and has a firm twist to it. The flowers were worked in Bullion stitch with each petal surrounded by a detached chain stitch.
Bullions are not easy for beginners. I recommend milliners or straw needles because they have an eye and shaft that are the same width which makes sliding the wrapped bullion knot along the needle easy. If you look at a regular embroidery needle you will see a the eye creates a bulge which makes it difficult to slide all those wraps of thread past the eye. Try a milliner or straw needle it as it does make a difference.
If you try it out, start with only 4 wraps and as you master them build up from there. These flowers have 8 wraps, which is not many wraps as some flowers in Brazilian embroidery where it is nothing to have 30 – 40 wraps on a bullion. If you want to make bullion roses you need to be able to work 12 wraps at least. So start with 4 wraps and build up.
If you are just swinging by, or a search engine has landed you here, this is day 9 in a series of articles that aim to give you embellishment ideas that you can use in your crazy quilting. If you want to print out this series 100 details for 100 days they are listed under that category.
Have you enjoyed this series? If so you may be interested in a tutorial I have written on how to work decorative crazy quilt seams. The tutorial is a comprehensive tutorial that I converted to a pdf file (a link to the download is in the article) When I converted it I realised how comprehensive it was. At 19 pages of information it is a resource worth investigating!

Have you seen my Stitchers Templates?
As someone who loves crazy quilting and embroidery I designed these templates with other stitchers in mind. With my templates you can create hundreds of different patterns to apply to your stitching and crazy quilting projects. They are easy to use, totally clear so you can position them easily and they are compact in your sewing box.
Templates set 1 you will find here
Templates set 2 you will find here


Thats great Christina as bullions are one of those tricky stitches to master just add a wrap time, practice that for a while then increase again – practice and so on – you will be able to brag with a 20 wrap bullion in no time
Sharon, just to let you know- your tips continue to be helpful.
The tip about beginners starting with 4 wraps for bullions was great. I worked on it last night and voila- I made a good looking(if small) bullion stitch. I will keep practicing.
Thanks
Christina
Sharon, you’ve already answered my question. Thanks!
Alison I use procion dyes for shell buttons and mother of pearl buttons – hope this helps
What a terrific momentum this “movement” has! What a great learning experience.
I have a question about dyeing the shell buttons…which dye do you use, and how do you manage to retain the button’s luster? I’ve tried acid dyes and the buttons get dull.