If you like to customise gifts and home decor items with hand embroidery PicMonkey will help you design just the right thing. What is PicMonkey? It is a free easy to use photo editor online. (Since writing this Pic Monkey is no longer free but offers a free trial and subscription) An obvious way for a quilter or fiber artist to use PicMonkey is to enhance photos before printing them on fabric. Most quilters have encountered the idea of printing a photo on fabric in order to add it to quilt or project. But I was curious to discover otherways Picmonkey as design tool that would be useful for fiber practitioners. I came up with ideas to make personalised gifts or embroidered cards, labels for your hand made projects or are working a modern sampler with a contemporary feel using PicMonkey as a design tool. I thought I would share with readers what I have learnt today.
A tutorial on using PicMonkey as a design tool.
 The first step once you have gone to PicMonkey click on “design” This will give you the option to choose a canvas for your design. I chose 8×10.
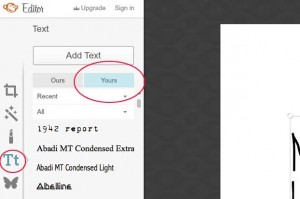
 On the left hand side bar menu click on the T icon to select the text options. (Click on the image for a larger view)
Then Click the Add Text button before choosing the font you want to use.
In the main work area type your message or quote into the text box.
 If the text is all you want select the crop tool from the left hand side bar.
A square with corner points will appear. Drag these corner points to size and crop you require.
Then save your work to your computer.
From this point you can print it out to use it as pattern to transfer to fabric.
 You can do more that simply arrange text. as You can add a graphic element to your work too.
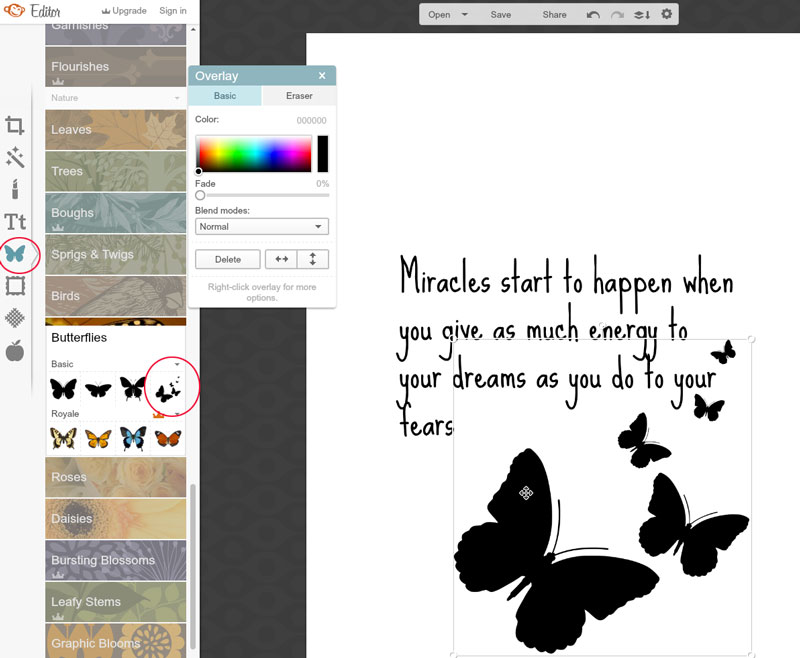
 Click the butterfly icon. (Click on the image for a larger view)
Once selected you will see many different options all of which can involve hours of fun.
Select clip art that is suitable for your piece and click and drag the corner of the box to resize.
Things to keep in mind while creating a design!
If you want to embroider this design keep in mind that anything too small will be extremely fiddly and anything too complex will difficult to stitch. So in the case of these butterflies in this design I would leave out the smallest butterflies. I would simply not transfer the design for them to fabric. Keeping things simple is very hard for most people. Think in terms of outlining design elements using stitches such as stem stitch.
Once you are happy with it save it, print it out and transfer for embroidery. If you are unsure how to do this I have a tutorial on how to transfer a design to fabric here.
 Additional tips and ideas
There are standard fonts offered in theprogram under the Ours button. If you select Yours you can use any font you have on your computer.
There are many free font sites online which host fonts personal use. You can download them and install them on your computer. Two sites that come to mind are Font Squirrel and DaFont.com But they both come with a warning that they will keep you busy for hours!
 The same applies to using clip art. PicMonkey allows you to load your own images which means you can add them to a design.
You can load photographs and tinker with those as that is what Pic Monkey is made for! Obviously when I speak of using photos I assume you are using your own or using photos that are open source and legal to use.
Using your photos as design source
Other ways to use your photos however is to choose a photo which is something like silhouette where the shapes are easily defined you could use that shape as an outline pattern. But do remember that outline has to be stitched. That will depend on your skill level, so make sure the outline is simple enough to be able to work a needle around it.
I am looking at this software as a way of working out a design for embroidery. So how can we apply this import your own image feature in a useful way? Off the top of my head if you doodle about with zentangles in your studio journal you could photograph a section and add it to your design. It would make for some very interesting embroidery designs particularly if you contained them in a shape. Another idea is that you could trace simple motifs and include them in a design.
An obvious option is to use copyright free clip art and images. There are many sites online that host imagery that is legal to use for personal use. One of my favourites is The graphics Fairy and another is Clip Safari
What stitches do you suggest?
It is up to you what stitches to use but my tip would be to keep to the simple. Choose stitches that will follow a curve well such as stem stitch or whipped stem stitch if you want a firmer line that stands proud. Back stitch and whipped back stitch also produce a clear line and chain stitch is slightly thicker but follows curves very easily. All these stitches are suitable for text too! For areas you want to block in with colour use Satin stitch.
Combine photos and text and printing on fabric
One idea I had was to incorporate text and photos, print on fabric and incorporate these as elements in a fabric book. Fabric postcards could be fun too. Or for a fabric travel journal make pockets in the book for fabric postcards!
Another way to tell a story would be on family history quilt as you could easily combine photos, flourishes, frames, and text. You could easily add small written stories as to who is who and where they were, and when an event happened. In fact you could go all out and create quilt blocks that have photos text and add memorabilia such as lace, hankies, buttons, belt buckles, mens ties etc .You could easily make labels for hand made items. If you want them in fabric use one of the pretreated fabrics on the market and print them.

Print your images to fabric
Once you have the image you want you could use any of the products that allow you print on to fabric with your home printer. I have used bubble jet set but also there are many pre-cut and pretreated sheets of fabric that are available. I have also used freezer paper to back fabric as it helps feed it through the printer. The Graphics Fairy has tutorial on how to print on fabric using freezer paper . My tip if you use this method is to make sure you trim perfectly as a loose thread can snag and cause a paper jam.
How would you use this and what would you design?
If you have found this useful let me know. How would you use PicMonkey? What would you design with it? I really would like to hear in the comments below.
Subscribe to Pintangle and never miss a post
You can have Pintangle delivered to your inbox by using the subscribe feature in the sidebar.


Thank you Sharon for all this information, I would love to give it a try. I just wonder if you can transfer onto fabric using a laser printer: does anybody know? When I looked at transfer sheets they were only suitable for ink jet printers, but perhaps there are others now.
Marly have you googled it? I think with a laser printer you can print direct to fabric -just back it with freezer paper so it feeds through the printer OK and choose a fabric like a cotton homespun –
coucou
merci pour ce tutoril très intèressant et très simple d’utilisation
bonne journéee.
amicalement
TT
Hi Sharon,
thank you for this tip and tutorial. This is just what I am looking for. I experimented with PFD cotton for ink jet printer on the last weekends and now I wish to enhance the possibilities without using a huge software. So your hint fits in perfectly.
Barbara
HI Sharon,
I have to use this tool and see for myself. will get back to you soon.
Thank you,
Chitra
Sharon, that is fantastic. I am just planning a fabric book with my favourite quotations in and Pic Monkey may be just the tool. Thank you so much.
HI Andy the fabric book idea sounds brilliant – in fact I should I have thought of it for TAST pages!
Thank You!! I have been researching how to do just this process on Office Libre and here it was on Pic Monkey right under my nose. Pic Monkey has been my choice of photo manipulation for a few years now.
Thanks Sharon……more things to play with! So much to do…..so little time.
I may have missed it, does it work from an iPad?
HI Sandy I googled the requirements here is the info
http://www.picmonkey.com/help/articles/1065428-what-are-picmonkeys-system-and-browser-requirements
look like since it is flash driven you need a computer
Ooh, another new toy to play with! Thanks Sharon!
It is quite addictive jules so take care!