
Wave stitch is a bit similar to Cloud filling in the sense that it is a waved patterned filling stitch. You work the stitch row upon row to fill an area and build up a pattern. When worked in different shades this stitch is also known as Looped shading stitch.
Note with this sample I have spaced each ‘wave’ a little apart so that you can see what is happening but normally the gap between the feet of the stitch would not be so large.
How to work Wave Stitch
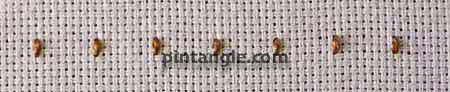
You start this stitch at the top row.
With the first row work a line of evenly spaced small straight stitches that stand vertically

Bring your needle out at the base of the first row and pass the needle under the first straight stitch. Pull the needle through to thread your yarn under the straight stitch.

Insert your needle at the base of the row to the left so that the yarn forms an inverted V shape.
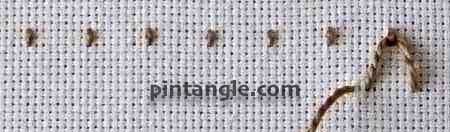
Bring your needle out to the left close to where it entered the fabric (this is the step I have worked further apart so that you can see what is going on)

Continue in this manner to work the first row.
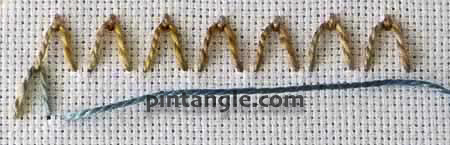
On the second and following rows bring your needle out at the base of the row and working in the opposite direction along the row, thread your yarn through the feet of the inverted V stitches made on the previous row.
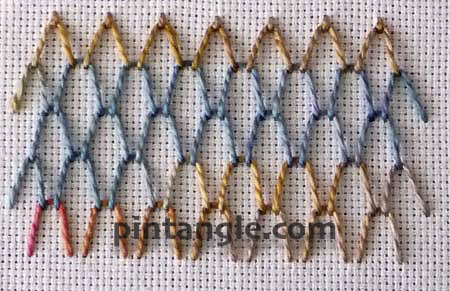
Continue in this back and forth manner until the area is filled with Wave stitch.
As you can see Wave stitch looks good worked in a space dyed thread. This is some hand dyed perle #5 thread.
Worked in a traditional manner Wave stitch is evenly spaced but if you change the spacing and heights of the rows it can look and become a very contemporary filling stitch. As with all patterned stitches beads looks good stitched in the gaps or at the feet of the wave.
I hope you enjoy Wave stitch!
My book for creative stitchers
If you enjoy my site you will gain real value from my book: Creative Stitches for Contemporary Embroidery: Visual Guide to 120 Essential Stitches for Stunning Designs
Feeling stale? Wondering how to add sparkle to your embroidery? I have aimed Creative Stitches for Contemporary Embroidery to be suitable for both beginners and seasoned embroiderers. It introduces techniques to encourage your creative interpretations of stitches. I guide you towards discovering play-points in your embroidery by varying the height and width; by stacking stitches; or by filling multiple rows with the same stitch. With creative variations and demonstrations of tiny tweaks, You will be ready to head off down your own creative path and, of course, illustrated with plenty of eye candy!
Please note if you buy one of my books via this link as an Amazon Associate, I earn from qualifying purchases.

My wave stitch sampler is on my blog:
http://fat-quarter.blogspot.com/2010/09/wave-stitch.html
My trials of this wave stitch are posted on my blog-
http://jizee6687.wordpress.com/2010/08/14/tast-2010-18-wave-stitch/
My fickr page-http://www.flickr.com/photos/22818176@N07/4891336702/
Thank you,
Chitra
I tried this stitch and posted on my blog and Flickr .My blog Address is
http://umacheenu.blogspot.com
I’ve completed and posted # 15 to 18 on my blog:
vivian-institches.blogspot.com
Sorry Sharon..
Late again but not because I am disinterested in TAST2. I enjoy and complete my stitching on time but have much bother with the computer and photo program.
Why do they break down at the wrong time?
I have seen some very nice examples, by members, of the Sword stitch but my brain was on the blink along with the computer.
Week 19 is one of my favourite stitches.
http://www.flickr.com/photos/crazyqstitcher/
http://crazyqstitcher.wordpress.com/
A little late, my wave stitch: http://textileexplorations.blogspot.com/2010/07/tast2-wave-stitch.html
okay, i know this is a simple stitch but for some reason i just could not get it to happen.
so i’ve posted my best attempt on my blog. if anyone has any helpful advice i would love it if you shared.
http://www.simpletosublimepapernapkinpoetry.blogspot.com
🙂
libbyQ
Woops, this went on my blog last night and I forgot to post here.I made lots of mistakes, even though it is a simple stitch but really liked it. Penny
weave stitch has already been posted at my blog.it is a fun stitch and i need to come back to it
please have a look. http://amovablefeast.blogspot.com
I’ve completed a couple of small samples & put them on my blog.
http://linsartyblobs.blogspot.com/2010/07/tast-week-18-wave-stitch-rose.html
I like this stitch and I did two samples which can be seen at:
http://www.flickr.com/people/stitchinwoman/
I uploaded my Wave Stitches to my flickr site: http://www.flickr.com/photos/38196082@N05/4753406508/
Yes – many thanks for sharing. This is a wonderful stitch, and has triggered my imagination once again. I need to keep needlepoint backgrounds stitched and ready so that I can get right to the embellishing stitches I see here. I can already "see" this one on a tree ornament with DMC Memory Thread and Kreinik metallics.
I’ve posted the Wave Stitch on my blog.
Me again …. Decided to summarize things on one post to make it a bit easier to find, http://myfirstbambina.blogspot.com/2010/06/tast2-wave-stitch-week-18.html.
Thanks so much for all the work and time you give to share your knowledge with all of us !
I had given a trial of this stitch and upload it in the flicker group.
viji
Finished on Tuesday, there must be some thing wrong.http://carorose.typepad.com/my_weblog/2010/06/i-went-to-the-embroiderers-guild-today-and-talked-with-friends-and-doodled-this-stitch-no-plans-just-difference-thicknesses.html
I just recently worked this stitch on a sampler I’m slowly working on ! It was easy and fun to work !
You can see it on the 2nd picture on the post on link below:
http://myfirstbambina.blogspot.com/2010/06/sampler-3-2nd-phase-and-dds-science.html
I need to catch up with many of the TAST2 stitches , so glad that I happened to have
this one covered ;-). I really need to catch up !