
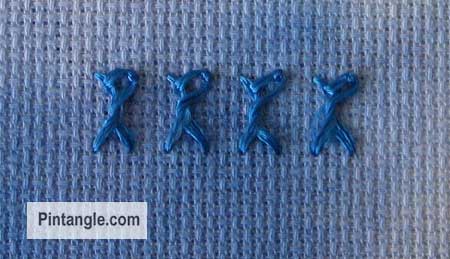
The Bonnet stitch is a variation of buttonhole that forms a line of stitches with upright twisted, looped prongs.
When you first look at the directions, some stitches look distinctly uninspiring. Bonnet stitch is such a case. It looks like a double buttonhole (I call it a herringbone with its knickers in a twist). However, I urge you to try it out. I think it will surprise you. You can use this stitch on even-weave or plain fabrics. It is quick and easy to work, and it can follow a curve well.
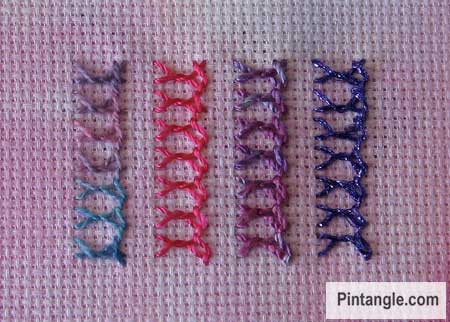
Bonnet stitch looks best in a thread with a firm twist. So if you are one of those folks using up old stranded embroidery threads to test your stitches, I can only encourage you to buy some perle thread. You are doing yourself a huge disservice if you don’t try other threads. Many of the surface stitches look like nothing in stranded threads — but work them in a thread with a firm twist, and they come alive.
The sample below shows Bonnet stitch worked in different threads. The first row is cotton Perle 8, next comes rayon thread, followed by silk, and the last row is a metallic thread.
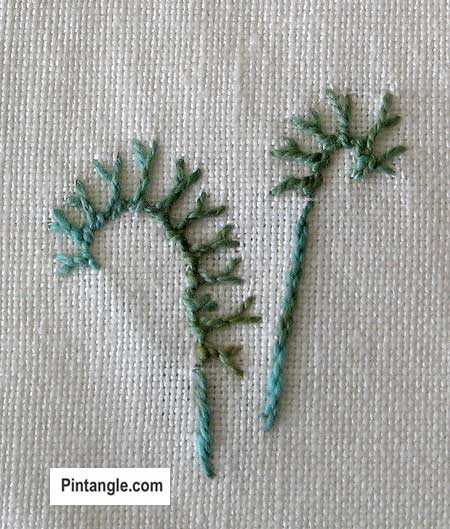
Since Bonnet stitch is a member of the buttonhole family, it can be worked easily on a curve. Worked in a freeform manner, you can produce organic textured lines.
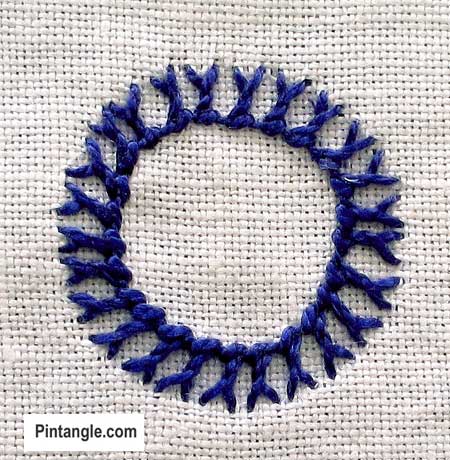
Also, you can easily work this stitch in a circle.
How to work Bonnet Stitch
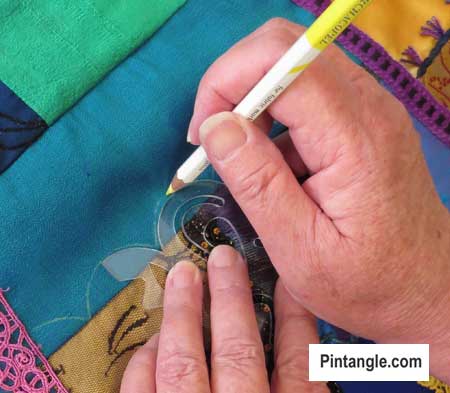
Work bonnet stitch from right to left between two imaginary lines. If you need to mark the line, use a pen that will dissolve when moist or one of the quilter’s pens that disappears after a few days.
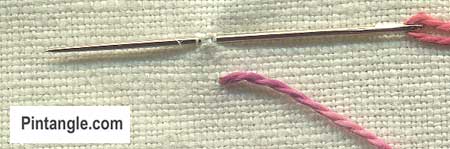
Bring the needle out on the bottom line. Make a small stitch on the top line with the needle pointing left.
Pull the needle through the fabric.
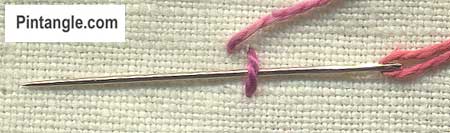
Slide the needle under the straight stitch you just made. You are not taking the needle through the fabric, just slide it under the stitch with the needle pointing left. Pull the needle through.
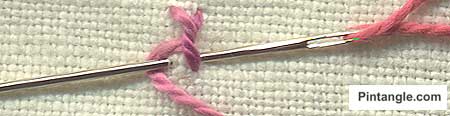
On the bottom line, insert the needle where you started to stitch. With the needle pointed left and the thread wrapped under the needle as illustrated, pull the needle through.
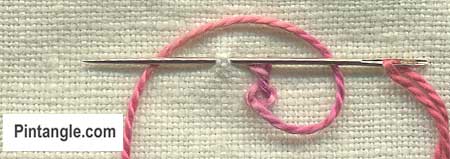
Take the needle to the top line and take a bite of the fabric as illustrated. This is the start of the next stitch.
Continue along the line.
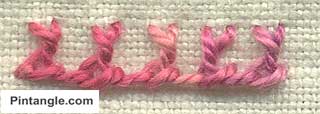
Bonnet stitch can be worked in rows or at different heights. Think of all the patterns you make with Buttonhole stitch, as you can adapt many of these to Bonnet stitch too. It is a case of experimenting a little. It is also interesting if you work Bonnet stitch at different angles or use it to couch heavy threads to the fabric.
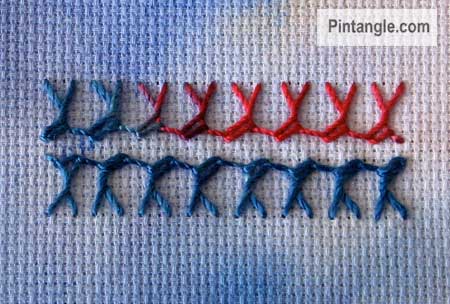
You can create patterns if you work this stitch row upon row, or in this case, in rows back to back.
Follow Pintangle and have it delivered to your inbox
You can have Pintangle delivered to your inbox — In the side bar use the Subscribe to Pintangle box or If you are on a mobile scroll to the bottom the of the page to find the Subscribe to Pintangle option. In either case type in your email address and click on the Subscribe button below. Then check your email inbox for a confirmation email and click the link to confirm your subscription. If you don’t see a confirmation email, check your spam folder — sometimes the computer puts it there.
Have you seen my Stitchers Templates?
Create your own designs with Sharon’s easy-to-use stitchers templates. Combine shapes to create hundreds of patterns and designs to embroider. It is the ultimate mix-and-match fun for stitchers of all skill levels. I created them to be as versatile as possible. I include four multi-patterned templates in each set. You will find them easy to use, totally clear to help you position them on your work, and they are nice and compact to fit in your sewing box. Each set comes with an e-book filled with patterns and designs that you can create and use as a jumping-off spot for your own designs. They are available now in our shop here!
Happy stitching!

A new stitch to learn for me. Thanks. My trials are here.
http://hobbysewing.blogspot.com/2020/09/tast-20-beyond-tast-20.html
2018 TAST Stitch #27: https://www.thecrafties.com/2018/12/tast-roundup-3/
I’m getting caught up finally!
-C
I was not very successful but this is my attempt.
http://eclecticlamb.com/2012/07/26/week-27-tast-bonnet-stitch/
Enjoyed learning this stitch. Used the stitch to decorate the space around my initials. Put the samplers in my journal that includes a reflection, gratitude list, and collage of images:
http://harvestmoonbyhand.blogspot.com/2012/07/take-stitch-tuesday-bonnet-stitch-week.html
terminé ce point mais j’ai pas été inspiré
Here is my little sample. I had trouble at first, but finally got the hang of it. http://karrinscrazyworld.blogspot.com/2012/07/tast-week-27-bonnet-stitch.html
Here is my try on bonnet stitch.
http://withbrushandneedle.blogspot.in/2012/07/tast12-week-27-bonnet-stitch.html
-preethi.
Bonnet Stitch:
http://thetruevine.wordpress.com/2012/07/08/take-a-stitch-tuesday-bonnet-stitch/
very late this time..my trials on bonnet stitch is here..
http://leelashobbies.blogspot.in/2012/07/tast-2012-week-27-bonnet-stitch.html
http://www.flickr.com/photos/stitchinwoman/7527751512/in/photostream
I love that stitch and it is fast to make!
Fun to learn a new stitch, thanks Sharon. I may have twisted it the wrong way though? Here’s my post http://needlecase.blogspot.com/2012/07/bonnet-stitch.html
Hi Sharon
Thank you again
http://pippaquilts.blogspot.co.uk/
also on stitchinfingers
http://stitchinfingers.ning.com/photo/bonnet-stitch-3
Hello Sharon,
Here is my attempt on this week’s challenge http://nalinihandwork.blogspot.in/2012/07/tast-week-27-bonnet-stitch.html
Tried the bonnet stitch… how did it get that name?
http://yarngoddess.wordpress.com/2012/07/07/bonnet-stitch/
Managed to do the Bonnet stitch. I thought I would have a difficult time with it but it actually went quite well.
On Stitchin Fingers http://stitchinfingers.ning.com/photo/bonnetstitch2
On Flickr http://www.flickr.com/photos/bigislandrosedesigns/7523957116/in/photostream
Managed to do the Bonnet stitch. I thought I would have a difficult time with it but it actually went quite well.
On Stitchin Fingers http://stitchinfingers.ning.com/photo/bonnetstitch2
On Flickr http://www.flickr.com/photos/bigislandrosedesigns/7523957116/in/photostream
and on Facebook https://www.facebook.com/groups/128698983911229/
A very interesting stitch. It has a lot more potential than is obvious at first glance.
http://playfulstitching.wordpress.com/2012/07/07/bonnet-stitch/
Hi Sharon & Friends,
my post for the week. Thank you all.
http://embroiderland.blogspot.com.br/
or
http://stitchinfingers.ning.com/photo/bonnet-bouquet?context=latest
Hi,Sharon
Her´s my weekly post with Bonnet Stitch
http://stitchinfingers.ning.com/photo/miscellany?youcontext=latest
Hi Sharon,
I am practicing this stitch and folllowing your suggestion, this stitch is fine to work with pearl cotton and the details of this sampler is here-
http://jizee6687.wordpress.com/category/tast-2012/27-bonnet-stitch/
thank you,
Chitra
Hello Sharon, hello everyone,
again the stitch was new to me but from the beginning I liked Bonnet stitch. Here is my attempt: http://fabricfusion.blogspot.co.at/2012/07/tast-week-27-bonnet-stitch.html
Happy Stitching!
Cheers Claudia
Hi,
Late as usual! But it is posted to my blog,
http://www.carorose.typepad.com
and to the Flickr group,
http://www.flickr.com/photos/carorose/7520124598/in/pool-56846286@N00/
Cheers
Carolyn
Palestrina and bonnet stitch . A very nice stitch!
http://6stem5.canalblog.com
I tried to make some lace:
http://queeniepatch.blogspot.jp/2012/07/tast2012-week-27.html
http://stitchinfingers.ning.com/photo/tast2012-week-27
I am combining two weeks – not because I was behind, but I needed more embroidery cloth. My Palestrina and Bonnet stitches are here:
http://debbies-doings.blogspot.ca/2012/07/tast-weeks-26-27.html
hello,
the last week, I was too busy to do the stitch. but I catch it this week :
http://pierrespapiersciseaux.blogspot.fr/2012/07/tast-26-point-de-palestrina-et-tast-27.html
I stitched a few rows on my Aida sampler. The bonnet stitch is here:
http://fat-quarter.blogspot.nl/2012/07/bonnet-stitch.html
My unfinished Aida sampler is here:
http://www.flickr.com/photos/28957501@N04/7516051670/in/photostream
Sharon – This was a fun stitch that I hadn’t tried before. There is a lot of variation potential in this stitch and playing with it inspires creativity. Here is my example:
http://stitchinfingers.ning.com/photo/thistle-tast-bonnet-stitch?context=user
I enjoy doing this stitch. My trials are posted here
http://viji-crafts.blogspot.in/2012/07/tast-2012-week-27-bonnet-stitch.html
My bonnet stitch samplers are in my blog
http://www.sadalas.blogspot.in/2012/07/tast-2012-week27-bonnet-stitch.html…
dear sharon, i enjoyed this stitch. lovely loopy feel. tho not so easy to get regular. xx liz xx
http://stitchinfingers.ning.com/photo/bonnet-stitch-bijou?context=latest
I agree with Chris – the more you explore, the more you realize the potential of the stitch
http://wwwhopscotch.blogspot.o.uk/
here’s my sample
I wish I had more time to play with this stitch, it was fun 🙂
http://fanaticalseamstress.wordpress.com/2012/07/05/bonnet-stitch/
I enjoyed working this stitch and my stitching can be seen here
http://linsartyblobs.blogspot.co.uk/2012/07/tast-27-and-pansies.html
I finished my bonnet stitch sample.
You can see it here: http://cantheleopardchangeherspots.blogspot.com/
Thanks.
My bonnet stitch sampler is here:
http://dufall.blogspot.fr/
Thanks
This is another experiment on mirror/shisha – http://letslearnembroidery.blogspot.in/2012/07/mirror-work-5.html
http://christinaroland.blogspot.nl/2012/07/tast-week-27.html A lovely stitch, one to remember and very usefull. I will try to use it on a bonnet, I feel it’s the perfect simple enhancement for a hat like that.
Sharon,
My trials for this week challenge is here and a mirror work is also included.
http://shamiatcraft.blogspot.in/2012/07/tast-2012-week-27-bonnet-stitch.html
My bonnet stitches are here: http://thatyankstitches.multiply.com/journal/item/332/Take-a-Stitch-Tuesday-2012-week-27
One more stitch in my little stitches’book. I didn’t find the french name for Bonnet stitch, doesn’t it exist ? If interested, you can see my weekly exercice here : http://j-en-revais.blogspot.com/2012/07/tast-27.html
Hi Sharon, my work for today is here :
http://homemadebyme.tumblr.com/post/26493761516/tast-2012-week-27-bonnet-stitch-point
I think that : the bonnet stitch, is called “point bigouden” or “point de deuil” in France.
http://latha-mycreations.blogspot.com/2012/07/tast-week-27-bonnet-stitch.html
My sampler for the TAST week 27-Bonnet stitch.
I found the information on this stitch a little difficult to follow until I tried to stitch it, then it made perfect sense. The information you have posted is much clearer than other tutorials or my encyclopaedia of stitches. I made quite a few mistakes in my practice piece but will work on it over the week. I am sure I will use this stitch at some point in the future. Thanks for introducing the stitch to me.
Hi Sharon, Yet again, I am blown away……….the more I stitched, the more I could see potential for ‘manipulating’
The stitch ! I have done this in my sample…..Thank you Sharon, I got such a buzz out of this one !!!
You can see my sample here………………….
http://ellascraftcreations.blogspot.co.uk/2012/07/tast-2012-week-27-bonnet-stitch.html
hugs
chris richards
xxxx
Well I am not sure if I did this right but gave it a whirl!
I am so hesitant to post being such a new stitcher… I have crossed stitch for years but never learned embroidery……soooo as I make this journey I would greatly appreciate tips and feed back…
Wishing all of you a great 4th!!
I’m left-handed, so these directions, initially, seem very complicated. I think I finally figured out the stitch right-handed, which has my brain in a twist, so later I will try the stitch ‘right side up’, in other words, left-handed. I’m not ready to post yet. I just had to make my frustration known.
Smiling,
jeanne-marie
Voici mon petit travail de la semaine et mon Bonnet stitch”, je n’ai pas trouvé le nom de ce point en français. bonne semaine à toutes et encore merci Sharon pour nous permette de découvrir de nouveaux poinrs;
http://carrementcrazy2.canalblog.com/archives/2012/07/03/24633591.html
Well, I attempted this stitch. Can’t say that I succeeded with it though. http://princessbubblescreates.blogspot.ca/
Here’s my weekly post with old bonnet stitch samples:
http://fat-quarter.blogspot.nl/2012/07/old-bonnet-stitches.html
It will be fun to experiment with this stitch again, I always used stranded floss for this stitch!