
Cloud Filling stitch, at first looks like a ho-hum filler, but if you add it to your skillset, I am sure you will find it amazingly useful.
This stitch is simple, quick and easy to work (I have taught it to children). Cloud Filling stitch is adaptable for all sorts of stitching situations.
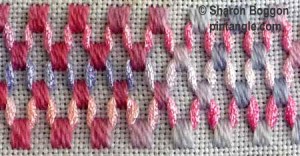
Changing the threads can be very interesting and give a contemporary twist to a classic stitch. I have used it on things like Christmas decorations, crazy quilting to block in areas, cushions and bags in a simple band with a few beads, and even as a band for a border stitch!
The grid that you lay down first is traditionally a simple straight stitch, but if you want to take it into the realm of contemporary embroidery, you can use other stitches.
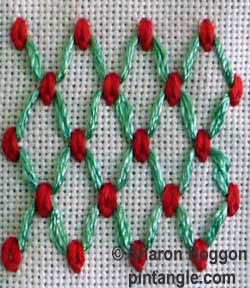
For instance, I have used detached chain stitch as the foundation stitches in the sample above. Other stitches you can use include bullion knots, blocks of straight stitches or even things like beads. Anything that will act as a loop for the lacing will work.
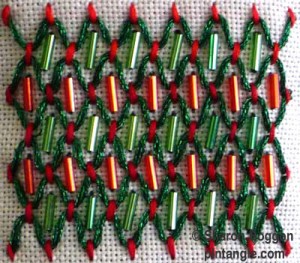
If the contemporary touch is your style, you can also add beads in the spaces between the laced thread.
How to work Cloud Filling Stitch
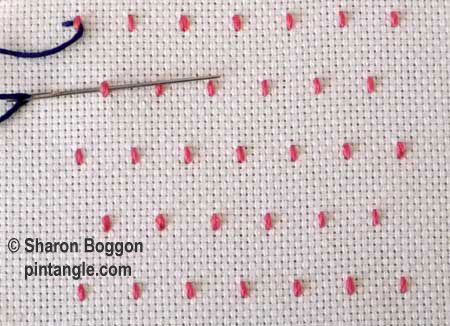
Cloud Filling Stitch is usually worked on even-weave fabric. The trick is to count the threads to keep the foundation stitches evenly spaced.

Work lines of small vertical straight stitches in a grid-like manner, with every alternate row offset as in the illustration. Do not work these stitches too tightly, as you will be threading another thread under these stitches.
Thread your second thread in a blunt needle. For Cloud Filling Stitch, you can use the same thread or a one of a different colour or thickness.
Bring your needle up on the top row as illustrated. Pass the needle under the first stitch and pull it through. Then pass the needle under the first stitch on the row below and pull it through.
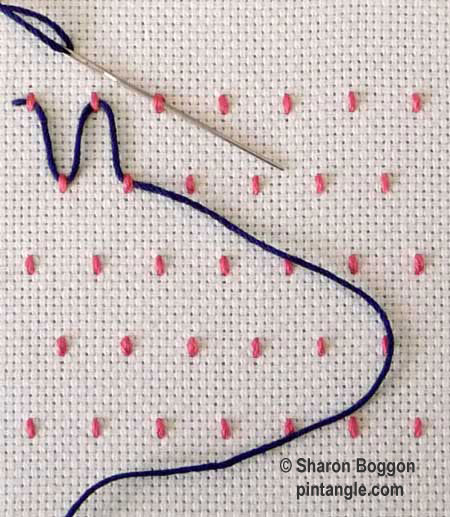
Note you are not taking the needle through the fabric but threading the thread under the foundation stitches.
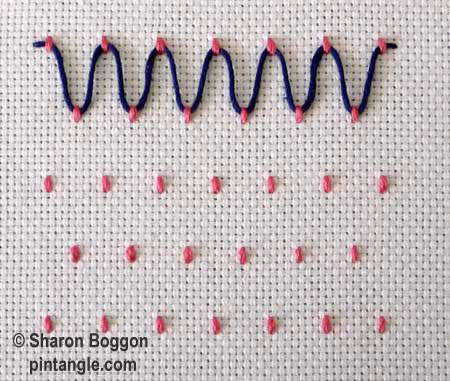
Continue in this up and down manner until the row is laced.
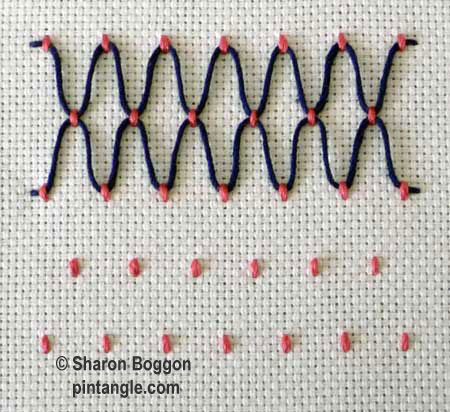
The second row of lacing is the mirror image of the first.
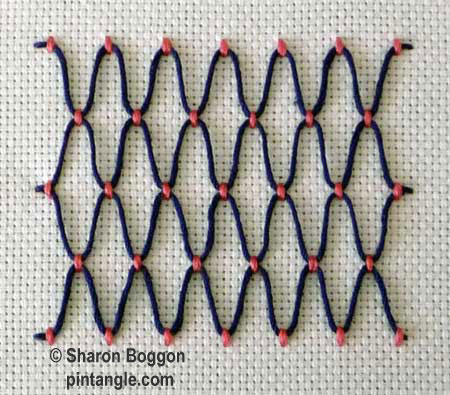
Continue this lacing row upon row until the area is done.
I hope you enjoy Cloud Filling Stitch.
My book for creative stitchers
If you enjoy my site you will gain real value from my book: Creative Stitches for Contemporary Embroidery: Visual Guide to 120 Essential Stitches for Stunning Designs
Feeling stale? Wondering how to add sparkle to your embroidery? I have aimed Creative Stitches for Contemporary Embroidery to be suitable for both beginners and seasoned embroiderers. It introduces techniques to encourage your creative interpretations of stitches. I guide you towards discovering play-points in your embroidery by varying the height and width; by stacking stitches; or by filling multiple rows with the same stitch. With creative variations and demonstrations of tiny tweaks, You will be ready to head off down your own creative path and, of course, illustrated with plenty of eye candy!

A fun stitch to learn. Thanks. My samples are here.
http://hobbysewing.blogspot.com/2020/09/tast-33-beyond-tast-33.html
2018 Stitch #42 – Check out the pennant I made at https://www.thecrafties.com/2018/12/tast-roundup-4/
Thanks, Sharon! I am almost there! 😀
Cloud Filling Stitch added as texture on paper pieced gnome design: https://chasehandcraft.com/2018/11/14/cloud-filling-stitch-tast-42/
My woven cross stitch from last week….
http://www.flickr.com/photos/thestitchsmith/9597835134/
turned itself into raindrops… so it was cool that this week’s stitch was Cloud Stitch!
http://www.flickr.com/photos/thestitchsmith/9595044883/
Thanks Sharon for reminding us to link back
Have a wonderful holiday and hope you enjoy those delicious croissants and that fabulous wine!
My humble, and very late, contribution:
http://queeniepatch.blogspot.jp/2013/08/tast-78-cloud-filling-stitch.html
I had fun experimenting with this stitch:
http://fat-quarter.blogspot.nl/2013/08/cloud-filling-on-aida.html
Hi Sharon,
I started with this week’s stitch here-
http://jizee6687.wordpress.com/category/tast-2013/30-78-cloud-filling-stitch/
Thank you,
Chitra
Here are my four samples for Stitches 37 to 40.
http://todayinkenogami.blogspot.ca/2013/08/take-stitch-tuesday_22.html
Terry
My version of cloud filling, in two shades of purple #5 perle cotton: http://210920746822434353.weebly.com/1/post/2013/08/take-a-stitch-tuesday-2013-stitch-78.html
Here is my sample and I’m now officially up to date!!
http://morecoldtea.wordpress.com/
Barbara
TAST #2 – Buttonhole 🙂
well done Michelle!
Here’re my samples http://hokkaidokudasai.blogspot.jp/2013/08/tast-78-cloud-filling-stitch.html
Thanks!
I have done this stitch before but only once. I gave it another try and really do like it. http://princessbubblescreates.blogspot.ca/
I used this lovely stitch in 2010 on 2 projects and forgot all about it! I wrote about it in my weekly post with old cloud filling:
http://fat-quarter.blogspot.nl/2013/08/old-cloud-filling.html
I love this stitch. So many possibilities … color ways, embroidered on print fabrics. This one is great! Thanks xo karen
Such a pretty stitch! It almost gives the look of smocking. I can’t wait to try it.
Hi Sharon,
I did this stitch as a line stitch during the earlier challenge.
http://jizee6687.wordpress.com/category/tast2/10-cloud-filling-st/
Thank you,
Chitra
You really had fun with this stitch, Chitra. Well done!
p.s. I couldn’t seem to find the comment box on your page?
Barbara
Barbara,
Thank you. I did enjoy it. The comments segment are below the title, categories and tags on my blog.
Chitra