
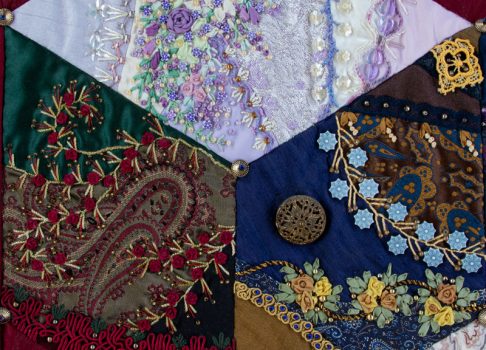
Welcome to my Diamonds are Forever Crazy quilt stitch along. Block 1 is the start of our journey together. I hope you enjoy it as much as I think you will. This is the first block of three diamonds.
You can download the pattern for the diamonds. Here is light tone diamond 1, mid tone diamond 2, dark tone diamond 3. The pdf file is to scale, but it has no seam allowances. (If I added the seam allowances I would not have fitted the block easily on an A4 page.) Be sure to set your printer to print to the actual size. Do not use the ‘fit to page ‘ option as it will reduce the diamonds by half an inch or so. When you print them out, they should have 6-inch sides. I advise you to use Acrobat as a PDF reader (its free).
A few tips before starting the Diamonds are forever Crazy quilt stitch along
Remember there are no rules in Crazy Quilting! As trad techniques go, crazy quilting is a remarkably easygoing, freeform style.
You can paper-piece the block or just roughly follow the pattern and use the sew-and-flip method. When embellishing, you can follow what I have done, or adapt my ideas to your liking. Embellish the blocks as you see fit and have fun. That is the key — to relax and enjoy yourself. Along the way, I will give loads of tips but they are just my way of doing things — you may meet other crazy quilters who have developed different ways of working. Different is OK! Crazy quilting celebrates invention and creativity. Crazy quilters constantly adapt or take an idea and turn it into something else. That is part of the joy of crazy quilting.
Links in the article go to stitch tutorials here on Pintangle, but in some cases, information about a stitch or technique will be in my books. The quilt is on the front of two of my books: The Visual Guide to Crazy Quilting Design and my new book Crazy Quilting for Beginners Handy Pocket Guide. You do not need my books to join in on this stitch along but I strongly recommend that you have at least the pocket guide, if not the full Visual Guide to Crazy Quilting Design.
I recommend you have some scrap cloth to test stitches and threads. Just work an inch or so to find out how things behave before working them on your block.
Ok, here we go… On with the Diamonds are forever Crazy quilt stitch along for 2023!
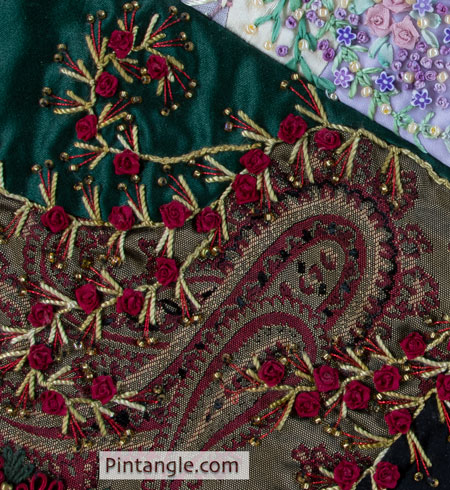
Stitching details about the light-toned diamond block

The light-toned diamond has a huge spray of silk ribbon flowers that tumbles over pieces of fabric. On the PDF pattern sheet, you will see some dotted circles that situate the silk ribbon roses on the block. If you want to explore creating something similar on your block, the larger circles are to represent the 3 large purple roses which were made using a Woven rose stitch using 7mm silk ribbon. This stitch is on page 135 of my book The Visual Guide to Crazy Quilting Design.
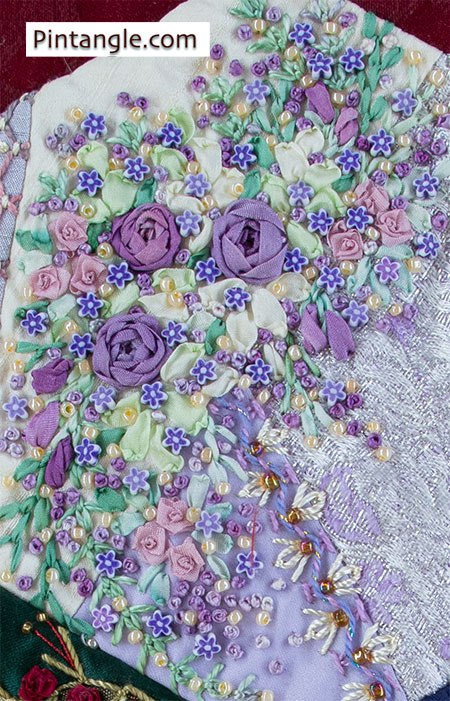
The smaller roses are Fargo roses. You will find a tutorial on how to work them here The stems are feather stitch worked in 2 mm silk. In between the feather stitches, I have tucked Leaf stitches using 7mm silk ribbon (page 133 of my book The Visual Guide to Crazy Quilting Design). At the top and bottom of the spray, you will see some Tulip Stitch or Slipped Detached Chain Stitch worked in a pale green silk thread. I also sprinkled around many French Knots.
In amongst the Foliage
In amongst the foliage, I added many pale yellow seed beads alongside little purple 5-petal flowers that are plastic beads. They look quite cute —as you can see they are only about twice to three times the size of seed beads.
You do not have to repeat these stitches, as other stitches that would work in this floral spray are Raised Cross Stitch Flower Stitch, and Woven Cross Stitch make great small flowers, particularly if you use silk ribbon. Another stitch you could incorporate is Whipped wheel stitch. A silk ribbon flower that would substitute for the silk ribbon roses is a 5-pointed flower. I have a tutorial for a 5 pointed flower here.
The Floral Spray
To the side of the floral spray, on the seam between pattern piece 1 and piece 2, I embellished a line of Chevron stitch using the same hand movements as the threading in Laced Herringbone Stitch. The lacing thread is actually a knitting yarn I sell in my Thread Twisties in the Pintangle shop. Tucked in the V of the Chevron stitches, worked in white rayon thread is a detached chain stitch between 2 straight stitches. I finished these off with a seed bead at the base.
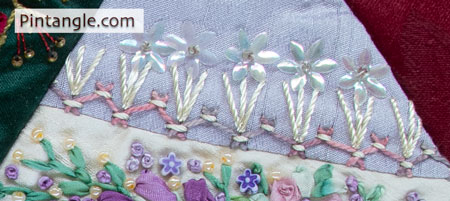
Between pieces 4 and 3, I embellished the seam with tied herringbone. You will find directions for this on page 107 of my book The Visual Guide to Crazy Quilting Design. I used a hand-dyed cotton perle thread #5. The flowers are actually sequins with a seed bead in the middle to secure them. I worked the straight stitches in a white rayon thread.

Piece 2 and 5 has the seam embellished with barred chain stitch worked using the same kitting yarn with which I laced the chevron stitch. On the arms of the barred chain, I added a little white flower-shaped bead secured with a seed bead.
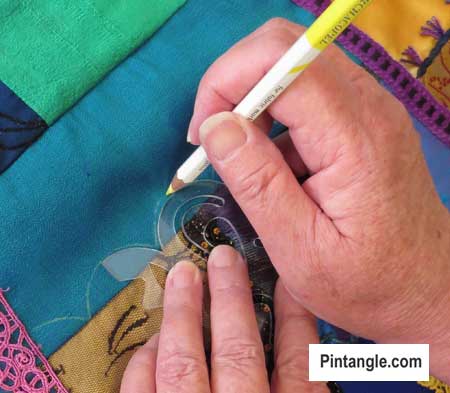
The next seam down in the photograph is the seam between pieces 5 and 6. The curved lines were marked out using my stitcher’s templates that I sell in the shop. I worked the lines in Chain stitch using a hand-dyed cotton perle #8. The heart-shaped beads are plastic and between the V created by two straight stitches, I used a bugle bead.
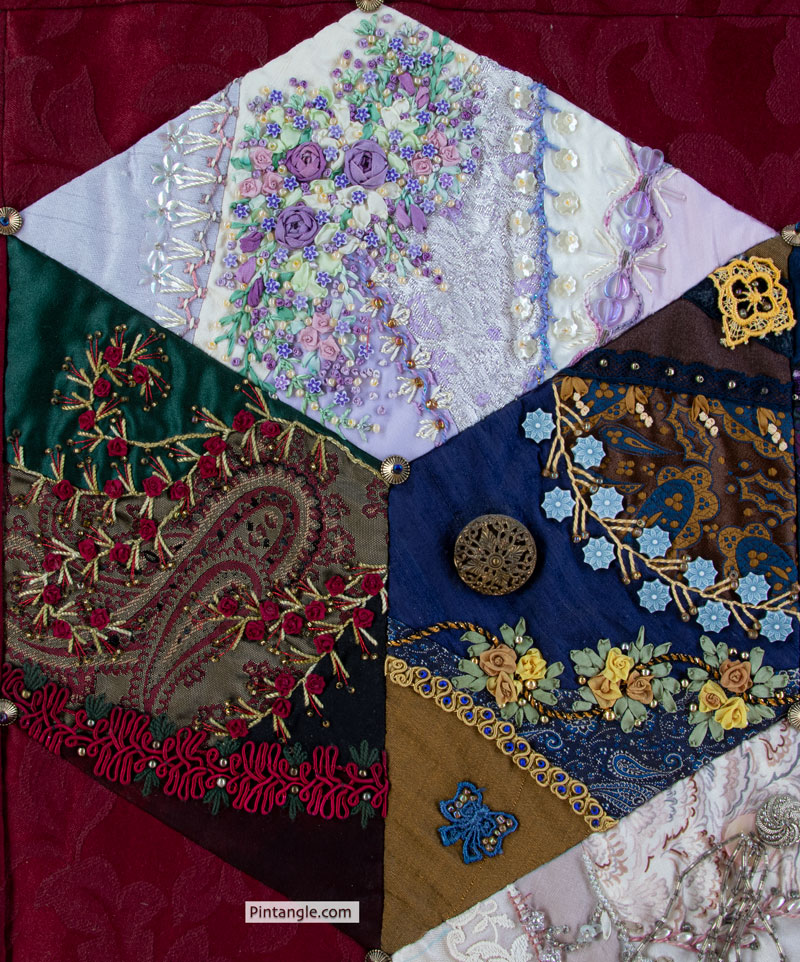
Stitching details about the mid-toned diamond block
This mid-tone diamond block is actually very dark! It works on the quilt but I have only just now realised how dark it actually is. Against the dark block, it does sit back a bit so, as with everything in Crazy quilting, if it works it’s OK. The paisley patterns fabrics are from men’s ties. In fact, in this whole quilt there are only paisley patterned fabrics and many of them came from men’s ties!
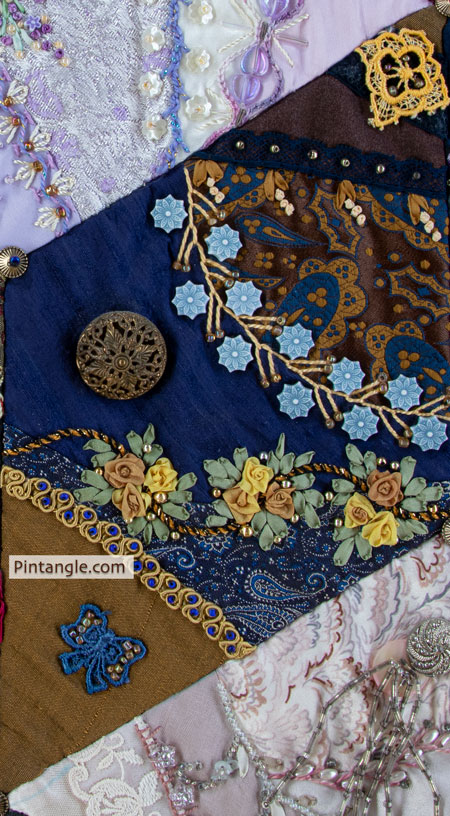
The large curved seam between piece 1 and piece 2 is embellished with a feather stitch variation in a #5 perle thread. I added the flower-shaped plastic beads and seed beads after working the feather stitches.
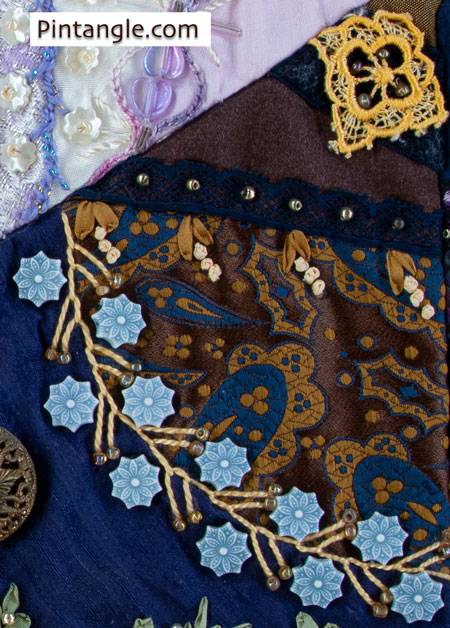
Piece 1 and piece 4 dark blue lace with gold seed beads. On piece 4 I used a hand-dyed square of lace and further embellished with seed beads.
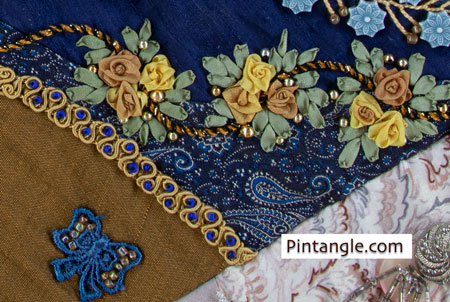
Pieces 2 and 3 have clusters of roses worked along the seam. Each cluster uses Fargo Roses and Leaf stitch (page 133 of my book The Visual Guide to Crazy Quilting Design). I marked out the line of stitching behind the clusters using one of my templates and then worked it using whipped chain stitch. I worked the chain stitch in cotton perle #5 and the whipping thread was black yarn that had a metallic thread twisted through it.
The seam between piece 5 and 3 was really easy, as I simply covered it with a braid, then added some blue seed beads. I hand-dyed the blue lace bow motif with Procion dyes and stitched it on before adding seed beads. I added the vintage button last.
Stitching details about the Dark diamond block
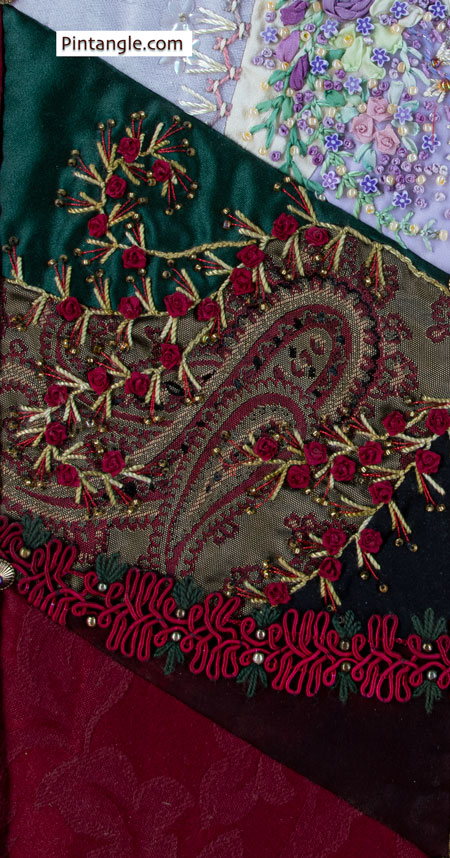
The dark-toned block is possibly the easiest of the three to reproduce if you want to. There are 4 pieces of fabric on the block. Between pieces 2 and 4, I simply stitched a braid onto the block using very small stitches. I then added units of 3 detached chain stitches in green #8 cotton perle thread. At the base, I added a gold bead.
I covered the other seams with Alternating Up and Down Buttonhole Stitch worked in hand-dyed silk thread. The curved lines come from my templates. The roses are once again Fargo Roses. Between the V-shapes before adding a gold seed bead, I worked 2 straight stitches in a red metallic thread. The stitches married with the paisley pattern. The fabric came from a man’s tie.
If you are doing the Diamonds are forever Crazy quilt stitch-along, share what you have done in either of the Crazy Quilt Divas and Crazy Quilt International groups on facebook
I hope you enjoy stitching these blocks. Once again, you can download the pattern for the blocks, here is light tone diamond 1, mid tone diamond 2, dark tone diamond 3. The blocks are to scale but have no seam allowances. February 9 will be the next block of the month.
Have you seen my Stitchers Templates?
Create your own designs with Sharon’s easy-to-use stitchers templates. Combine shapes to create hundreds of patterns and designs to embroider. It is the ultimate mix-and-match fun for stitchers of all skill levels. I created them to be as versatile as possible. I include four multi-patterned templates in each set. You will find them easy to use, totally clear to help you position them on your work, and they are nice and compact to fit in your sewing box. Each set comes with an e-book filled with patterns and designs that you can create and use as a jumping-off spot for your own designs. They are available now in our shop here!
Happy stitching!

I have just started this project. I felt it was necessary for me to eliminate the curved seams as I just find them very difficult and frustrating. My goal is to have fun with this project. So I’ve eliminated any curved seams and am working on make my second block. I’ve made my first set but haven’t been able to start doing any embroidery as life has gotten in the way. If the curved seams are bothering you, make them straight seams. It made me happy to do that! Right now I don’t need what I consider a difficult challenge before I get to the more fun part of doing the stitching and embellishments. Sharon, I have all your books and use them all the time. I love your templates too. Thank you so much for introducing me to crazy quilting!
Hi Cassandra – yes crazy quilting can be what ever you want it to be. So have straight seams if you want them straight – you will still have differntly proportioned fabrics on each block so all is good and you don’t even have to explain yourself as its your fun and your stitching. Enjoy the challenge, relax and just go with what is right for you!
I posted this on facebook divas page as well. Following up from my question about using ribbons and laces I have decided to do the diamonds are forever quilt along. I hope this doesn’t sound like a dopey question but how do you apply the curved edged pieces. I am accustomed to piecing like Judith Baker Montano with straight edges sewed on and then folded back. Do you turn the edge under and applique or just do a raw edge and cover it with embellishment.
Hi Pam – have fun with the diamonds and here is tutorial on how to do curved seams – you don’t need to be spot on with crazy quilting. You could even straighten the lines out and do straight seams.
http://alliesinstitches.blogspot.com/2009/05/curved-foundation-piecinga-tutorial.html
Hi Sharon, thank you so much for this post. I am such an admirer of your stitching, love your Creative Stitches book, and have ordered your Crazy Quilt complete book which is expected to arrive any day now. I have thanked you before for continuing with TAST yearly and will be continuing with that as well as this Crazy Quilt project… except the base of mine will be rolled on a 4” wooden spool. Your books are on my bedside table and I refer to them almost daily
Hi Kathleen thanks for your compliments. I am not sure if you mean that you are doing crazy quilting or TAST on a 4 inch wooden spool roll – but I htought I would share a few links that may spark your interest. If you are thinking of doing a crazy quilt roll – have a look at this section of my band sampler
it was done in 2007 so a bit old now but it may give you some ideas
https://pintangle.com/2010/04/22/introducing-section-25-on-the-for-love-of-stitching-band-sampler/
Or if you are thinking of a snippit roll and combining TAST this section was stitched in 2009 – also a bit early for a fullblown snippet type thing but it may spark a few ideas for you
https://pintangle.com/2013/07/04/section-46-on-the-love-of-stitching-sampler/
I have more about my band sampler/story roll here
https://pintangle.com/faq-pages/sampler-faq/
I had a similar problem with sizing of the printed blocks using my HP Envy Photo 7855. When I chose paper size “letter” (which is the US is 8.5″x 11″ possibly with some built in margins I don’t know about), the printer created 5 3/8″ sides. I never use the “fit to page” setting. When I changed that to A4, I got 5 7/8″ sides and I’m going with that since I didn’t think it would matter as long as you didn’t change the pdf in such a way that the A4 won’t work.
Thank you for this and I am looking forward to doing it.
Cassandra you are right the size of the diamonds do not matter as long as they are consistent throughout the project
Hello from am American living in Germany! First of all THANK YOU for doing this sew along! I am making my first block now. I love how with crazy quilting a person can bring their own “flavor” in and it looks fantastic in the end. I am going to try and keep up but as the very proud wife of a veteran and as a working woman ( I am working on one of the bases here that support our troops) I might fall behind. Again Many Many thanks as I have used your stitch dictionary for quite a few years!
Thank you Rebecca – lovely to know people like yourself are enjoying it
Hello Sharon. I love the little purple flowers you used on your light triangle. You say they are tiny and plastic. Do you know where you got them. I’ve searched several places and cannot find them.
Sharon I probably got them at some discount place. I liked them because they were so small. I really dont think they will be available. Sorry
Thanks Sharon. I was afraid that you’d not be able to remember. I know because I have lots of beads and have no memory of where they come from. Thank you for the Diamonds are Forever. I am so going to enjoy following along and have already had reason to use some of your stencils.
Hello there, I am putting my diamond together with paper piecing. How do I make the curves? I am stumped. Could someone help me out? thanks.
Hi Margaret here is tutorial on how to do it – you don’t need to be spot on with crazy quilting. You could even straighten the lines out and do straight seams.
http://alliesinstitches.blogspot.com/2009/05/curved-foundation-piecinga-tutorial.html
Thanks for the super fast reply! I figured it out ;). I basically went back to my quilting techniques for when I sew curves. I cut the paper apart and incorporated a seam allowance. My diamonds are completed! Now for the fun part. I will check out Allie’s blog. Since I am here, what do you use to stabilize the back of the diamond? Muslin? Thanks!
Hi Margaret -great to hear you have it sorted – yes Muslin to stabilize
I also had that printing problem but I figured it out and I measured my blocks with 6″ sides as I will do for all the rest. I have completed the first diamond and starting on the second one.
I will post a pic on the Facebook group divas site.
When i printed out the diamonds they printed out 3 pages with all printed on each page on top of each other
Nancy try downloading again as I corrected the file
my copy measures 6 1/2 is that ok?
Tania that is fine to be honest the diamonds could be anything from about 4 inches to 7 inches and the look of the quilt in the end would be fine but the size of the quilt would be different of course.
Thank you 🙂
I want your books later when I have money. I need your name
Hi Rebecca my name is Sharon Boggon – links to my books are in the side bar or if you are on a mobile scroll to the bottom
Will there be other blocks? Or do we just use the general shape to create our own blocks? Thanks for your creativity and generosity of spirit! Love your work!
Mary There will blocks each month for the whole quilt
Hi! Can Sharon or anyone else in group help me with printing the foundation diamond for my muslin? When I printed it last week, I forgot to measure sides, mine are 5 & 3/4 ” not six inches. I used A4 white stamping cardstock from UK on each attempt, feeding one sheet at a time. I am in the US, using a new HP 2700 series Desk jet all in one printer. I tried printing the file from clicking on Sharon’s link, at custom 100%; at actual size; also tried downloading .PDF and printing at 100% ( I used ‘actual size’ whenever it was an option) from Adobe Acrobat using HP Smart app on my Windows10 HP laptop this came at 5 & 11/16″. I also tried using the web based ‘HP print from anywhere’ site. I tried using 102%, this printed cutting off one diamond point. I don’t know what to do. I have not even cut out my muslin foundation diamonds as I am unable to drive temporarily and ordered white bleached muslin because I am using some translucent light yellow fabrics and did not want natural muslin to muddy the color. It just arrived, I hemmed edges and prewashed, then read Sharon’s post reminding me about the 6″ sides, so I tried unsuccessfully to print new diamonds. Thank you for reading this tome.
Hi Marianne Thanks for the full details it is very helpful to trouble shoot this. Sorry for the frustration – tech problems can spoil the fun very quickly! 5 and 3/4 would still work just fine – in fact I have often thought of doing this quilt again with smaller blocks. That said I should be able to offer a file that is the correct size – or PDF file format should be able to do that as that is what that file format was invented to do! So I am working on it and will email you privately.
Thank you so very much, Sharon. You are incredibly kind and generous.
Oh thanks Marianne I have just sent an email to your other email addy – I hope it is still current
Thank you for letting me know
I will download the blocks and make a copy of the instructions and together with your book that I bought last year, I should be able to come up with something when having more time 🙂
Hi Sharon, I’m thrilled to be starting this project. Thanks so much for generously sharing it. Unfortunately I’m having the same issue as Kim with printing from the pdf.
Sue
What Kim says is true. The three blocks divisions are the same but the piece numbers are in different places. The circle positions for flowers are same on each diamond. The hue ID’s are printed on top of each other. The computer gremlin is against us again! Would changing the color on the lines in each diamond clear up the problem? Does the A4 Aussie paper size affect printing the diagram on American paper? Thanks for your instructions! Barb
Thanks Barbara for letting me know because on our machine it prints out just fine. After trying to figure out what the gremlin might be I have divided the file up into 3 pages – as a pdf it should not make any difference re paper.
Hi Sharon. CQ newbie here. Do I sew each block of 3 pieced diamonds together first and then begin embellishing? Or do I piece and embellish 1 dark, 1 medium and 1 light diamond separately and then stitch them together? And the crazy quilting stitches are over the seams within a pieced diamond but not over the seams between the diamonds, in order to have nice crisp tumbling blocks? Thank you!
HI Paula – it is really up to you .Either way is OK. But I made up and embellished each diamond as I went. At the end I stitched them together to form the block. You are right I wanted crisp tumbling blocks so I did not embellish the seams between the diamonds.
Just found out about you. Diamonds are forever looks like fun and challenging.
Hi,
I’m new to the crazy quilting, do I make up the three diamond block and embellish it as a single unit? In the photos it looks like it has been joined to other blocks.
Thanks
Sarah
Sarah you can do it either way but I made up each diamond- then embellished then stitched them together to form the block. I did not embellish the seams between the diamonds as I wanted the tumbling block pattern to be very clear. I hope that makes sense.
Hi Sharon me again; it looks like all three copies are superimposed. When I look at the pages on the printer set up page everything looks fine it’s when I hit the print button everything comes out superimposed. Do you have any suggestions for me thanks again Kim
Kim Give me an hour or so to re-compile the file and see if I can fix it for you. One thing are you using acrobat? Its free. Are you printing from a desk top. mobile phone or tablet? I will let you know when I have loaded a new file.
Ok Kim try now and see if it works for you
Hi Sharon: Happy New Year !. I just thought I’d let you know that I did have some trouble printing off the 3 blocks. On my printer the spot where it tells you the light diamond and the medium and dark diamonds is all jumbled together on all 3 pages; and the bottom points are all cut off on all 3 pages as well. This is easily fixed but I thought you should know. I am looking so forward to trying this thanks a lot Kim
Kim when I print it out it comes out fine – but I will look at the file and compile it again. I hope it fixes the problem.
It is so beautiful
Will the information remain available for next year as well? I am too busy with work, houshold tasks, the TAST and the TAST design challenge, that I would drown if I take this one now also
Loes I can’t promis at the moment it will remain for maybe 6 months then I might put the series together and charge for the pattern but there is no reason why you cant just print off the blocks and put them to one side until you are able to do it.
Thank you for this information.
I will download the pdf’s and make a copy of the instructions for later, together with the book that I bought last year, I should be able to give it a try later.
It is on my project wishlist