
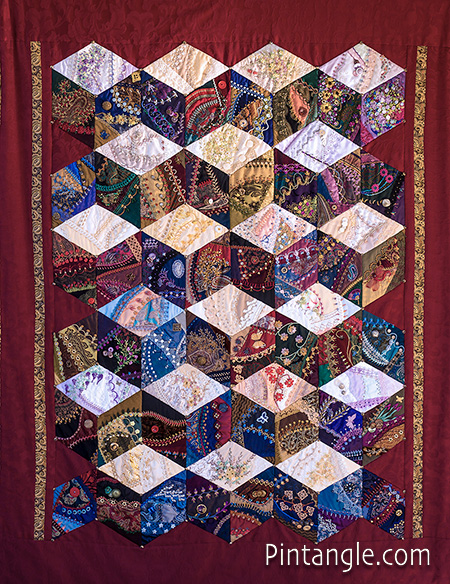
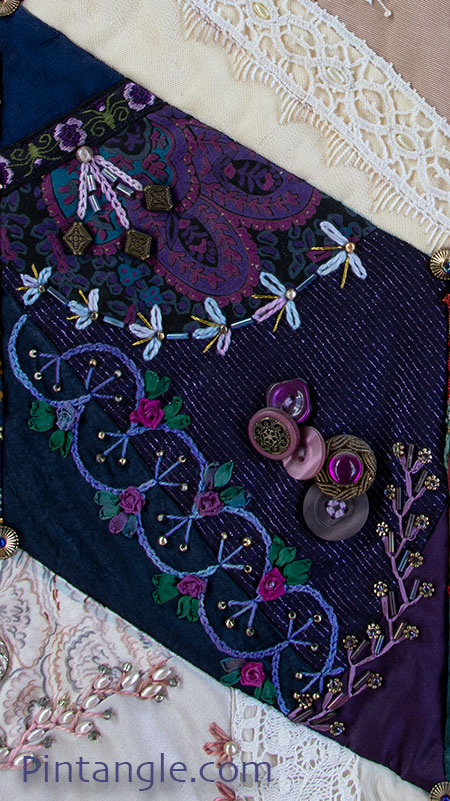
The Second tumbling block in my block of the month is to be found in the top left hand corner in the top row of my Diamonds are Forever Crazy quilt. I have included a photo of the quilt so people get a sense of where they are headed. The quilt is on the front of two of my books: The Visual Guide to Crazy Quilting Design and my new book Crazy Quilting for Beginners Handy Pocket Guide. You do not need my books to join in on this stitch along but I strongly recommend that you have at least the pocket guide, if not the full Visual Guide to Crazy Quilting Design.
You can download the pattern for the diamonds that make up the second tumbling block. Here is light tone diamond 1, mid tone diamond 2, dark tone diamond 3. The pdf file is to scale, but it has no seam allowances. (If I added the seam allowances I would not have fitted the block easily on a page.) Be sure to set your printer to print to the actual size. Do not use the ‘fit to page’ option as it will reduce the diamonds by half an inch or so. When you print them out, they should have 6-inch sides. I advise you to use Acrobat as a PDF reader (its free).
Tips before starting the Second tumbling block
People have been sharing their blocks in the facebook groups. They look fantastic and I am having a wonderful time over my morning coffee seeing what people have done. But I have a few tips.
Tip 1. Piece using a foundation cloth as this will help prevent lots of puckers and wobbly pieces. There are no rules in crazy quilting but some of us become disappointed if there are too many interesting puckers. If you don’t understand the flip and sew method and using a foundation cloth for each diamond I strongly recommend my book, The Visual Guide to Crazy Quilting Design or Crazy Quilting for Beginners Handy Pocket Guide. or ask in the facebook groups. There are many experienced crazy quilters in these groups who are only too happy to advise. Both groups are warm and friendly I have made some life long friends there.
Tip 2. When piecing your diamond I strongly advise that you run a line of stitching on the seam line, around the outside of each diamond. This helps as a reminder not to stitch into your seams. When you assemble your block if you have beaded into your seam, you stand to break a sewing machine needle. So keep the hard embellishments clear of the seam line.
Tip 2. A second reason for running a line of stitches around the edge is that the nature of crazy quilting means that many pieces are cut on the bias of the fabric and will stretch as you embroider them. Run a line of stitching around the edge and it keeps it in control.
Tip 3. If you embellish first then assemble the diamonds into the second tumbling block (which is the way I did it, stitch from the middle out as this will make for a less bumpy center.
Tip 4. When are assembling embellished diamonds to make up second tumbling block use a zipper foot as then you are not trying to sew over embroidery.
Tip 5. Some people were thrown by curved seams. As I have said before this is an easygoing, freeform style so don’t fret too much. Curved Foundation Piecing – A tutorial that has helped many people over the years is written by Allison Aller (another C&T author).
These are the main issues I have seen this past month.
No Rules!
You are free to paper-piece the block or just roughly follow the pattern and use the sew-and-flip method. When embellishing, you can follow what I have done, or adapt my ideas to your liking. Embellish the blocks as you see fit and have fun. That is the key — to relax and enjoy yourself. My aim is to give loads of tips along the way but these are my way of doing things — you may meet other crazy quilters who have developed different ways of working. Crazy quilting celebrates invention and creativity so being different is OK. Crazy quilters constantly take an idea, adapt it and turn it into something else. That is part of the joy and freedom of crazy quilting.
Links in this article go to stitch tutorials here on Pintangle, but in some cases, information about a stitch or technique will be in my books. I recommend you have some scrap cloth to test stitches and threads. Just work an inch or so to find out how things behave before working them on your block.
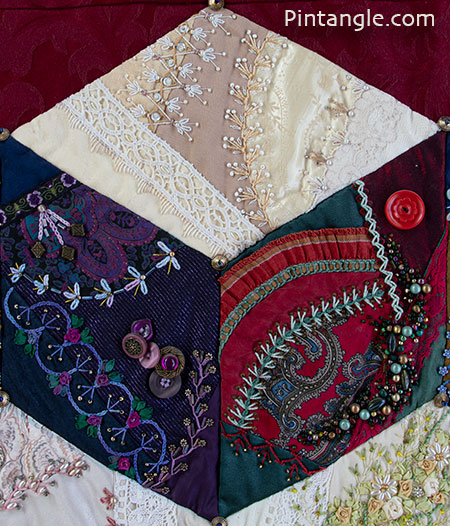
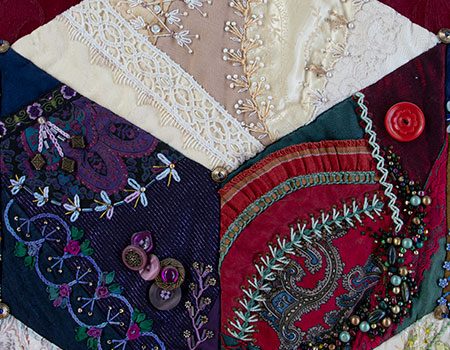
Stitching details about the light-toned diamond on the second tumbling block
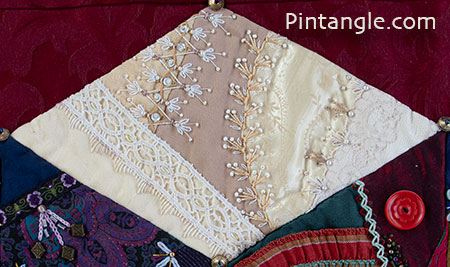
The first detail I would like to draw attention to is the seam between pieces 1 and 3 which is covered with a double line of Tied herringbone (directions are in my book Creative Stitches for Contemporary Embroidery). I worked a line of widely spaced large Tied herringbone using a cotton Perle #5 thread and I tied the stitches with a crossed stitch using a light brown cotton perle #5 thread. The next line of stitching is also Tied herringbone worked along the middle of the first. Along the top and bottom of both rows using white cotton perle #5, I worked 3 detached chain stitches arranged in a quarter fan shape. These small motifs were finished off with two straight stitches worked between the detached chain stitches. These were topped with a seed bead and at the base of the motif I added a small pearl bead. Down the centre of the band I added some sequins secured with a bead and 2 straight stitches.
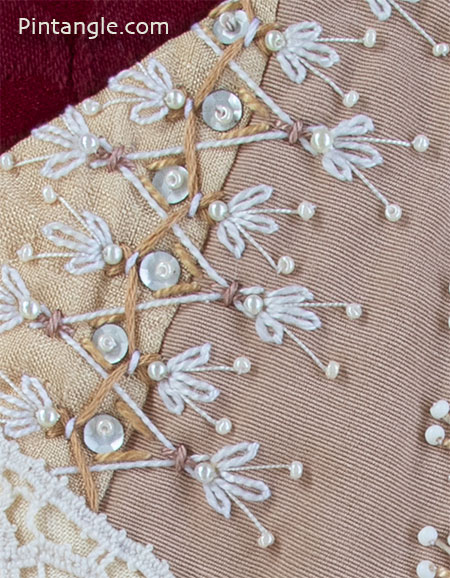
This next detail is Alternating up and down stitch worked at an angle in cotton perle #5. Tucked between the forks of the stitch is a straight stitch topped with seed beads. Small detached chain stitches were added using cotton perle #8.
The seam between piece 4 and piece 2 was covered in some lace that I embellished using detached chain stitch in the same threads and beads used on the rest of the diamond block.
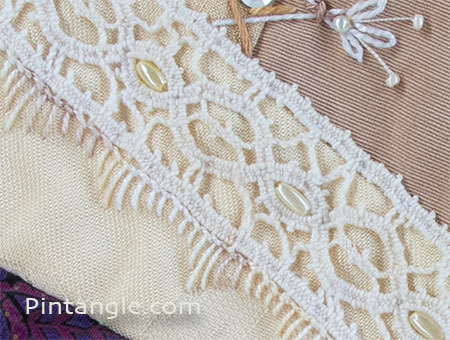
Buttonhole stitch is used along the side of the cotton lace that covers the seam between pieces 3 and 5. As you can see I also added some beads to the lace.

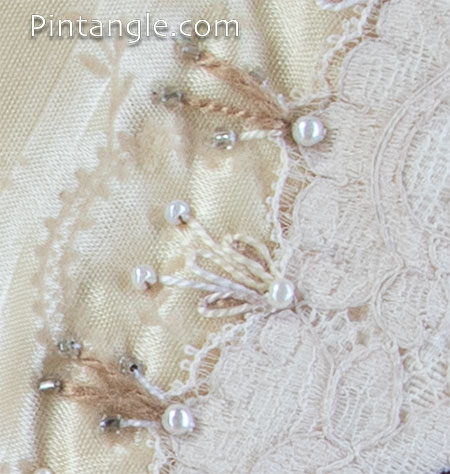
Stitching details about the mid-toned diamond on the second tumbling block
This mid-tone diamond block is mainly made up of reds and greens. Along the edge of piece 5, I covered the seam with red lace. I then ran a trail of beads along that area. I let the beads trail in a curved freeform way, letting the seed beads stray into other areas of the block.

The curved seam between pieces 1 and 2 is covered with a version of Slipped Cable chain stitch. Instead of Cable chain as the core line of stitches I used Knotted Cable chain. The arms are worked in cotton perle #5 and they were topped off with seed beads. It is worth exploring Slipped Cable chain stitch as you can create lots of varieties with this stitch.
Along the edge of piece 4, I stitched down a piece of ric-rac. It is dark ric-rac so not easily noticed. The secure it further I held the ric-rac down with a line of zig-zag chain before adding black seed beads to each of the hills on the ric-rac.
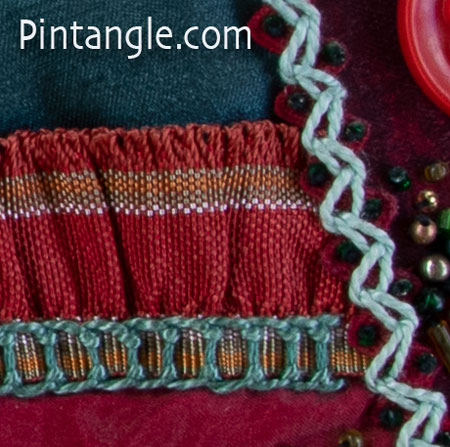
The vintage ruffled ribbon on the block was edged with a line of Reversed Buttonhole Bar which I adapted. I used a greenish cotton perle #5. On the buttonhole ladder I worked a first looped line of stitches then I worked a second line of stitches on the other side of the bar. The second line is fairly secure and I can not remember if I secured the line with any extra stitches. I can not see any, but I may have used a fine thread and very small stitches to do so!
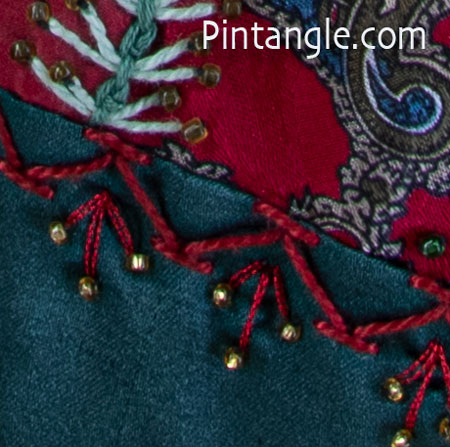
The last detail on this diamond is a line of red Chevron stitch. Using a red metallic thread I tucked 3 straight stitches into the V of the chevrons and then topped them with a seed bead.
Stitching details about the Dark diamond on the second tumbling block
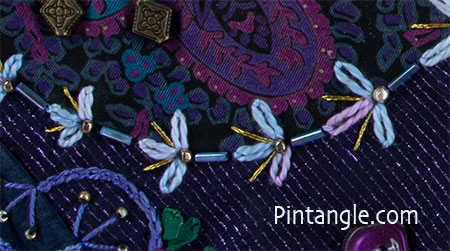
The dark-toned block is mainly purple in tone. The seam that joined pieces 5 and 1 was covered with a woven ribbon. From the centre of the seam I stitched 3 radiating lines of Chain stitch. That is it! I then added some beads and called it done.
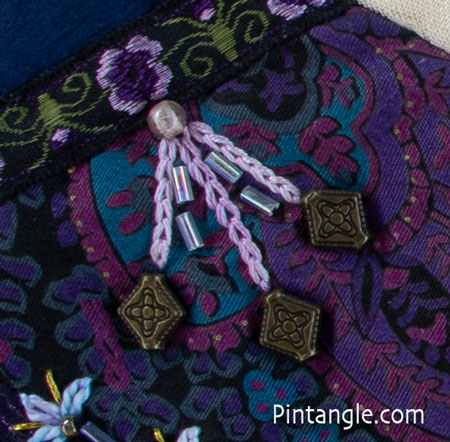
On the curved seam, I worked an arrangement of 3 detached chain stitches worked in a hand-dyed cotton perle #5. Between the chain stitches, I worked 2 straight stitches in gold metallic thread. At the base of each motif is a small gold bead. A bugle bead was stitched between the motifs spaced along the length of the seam.
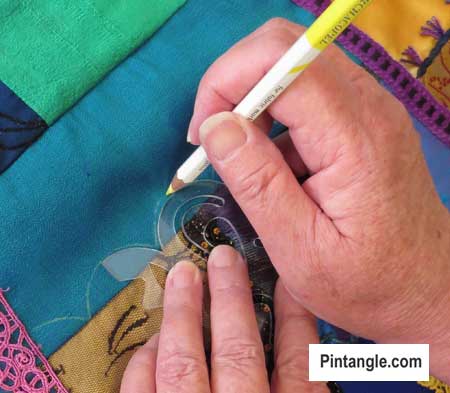
For the double scallop line I marked it out using a white chalk quilters pencil. I used my templates for the scallops then worked them in chain stitch. At the dip of each scallop I worked some Fargo roses using 4mm hand dyed silk ribbon. I tucked Leaf stitches using 4mm hand dyed silk ribbon (page 133 of my book The Visual Guide to Crazy Quilting Design) around the edge of the rose. Hanging from the base of each V is 3 straight stitches topped with a gold bead.
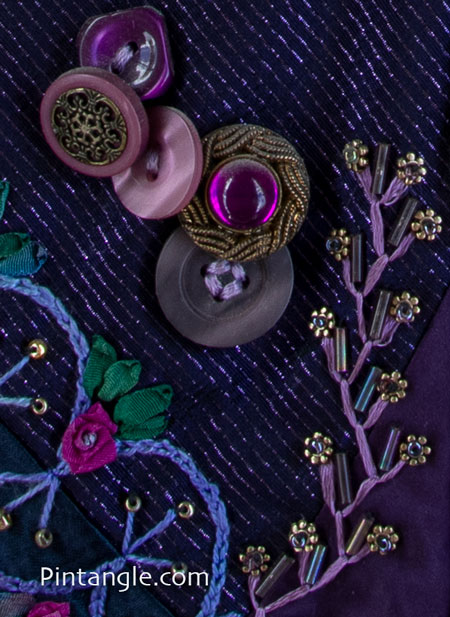
The last detail is a line of Feather stitch worked in rayon ribbon floss. Each arm of the feather stitches is topped with a small metal flower shaped bead that is secured with a seed bead. Between the arms of the feather stitches is a bugle bead. As you can see on this block, I also have a button cluster made up of vintage and modern buttons.
I hope you enjoy stitching these diamonds for the second tumbling block in this series. Here is light tone diamond 1, mid tone diamond 2, dark tone diamond 3. The pdf file is to scale, but it has no seam allowances. Be sure to set your printer to print to the actual size. Do not use the ‘fit to page’ option as it will reduce the diamonds by half an inch or so.
Please share what you do with second tumbling block in either of the Crazy Quilt Divas and Crazy Quilt International groups on facebook
March 9 will be the day I share next block of the month. If you want an email reminder subscribe to Pintangle the subscription field is in the sidebar or if you are on mobile device scroll to the bottom – yess its a bit of scroll but the subscription option is there. Once you subscribe answer the email that is sent you to confirm and the service is set up.
Have you seen my Stitchers Templates?
Create your own designs with Sharon’s easy-to-use stitchers templates. Combine shapes to create hundreds of patterns and designs to embroider. It is the ultimate mix-and-match fun for stitchers of all skill levels. I created them to be as versatile as possible. I include four multi-patterned templates in each set. You will find them easy to use, totally clear to help you position them on your work, and they are nice and compact to fit in your sewing box. Each set comes with an e-book filled with patterns and designs that you can create and use as a jumping-off spot for your own designs. They are available now in our shop here!
Happy stitching!

Love the generous sharing you are doing, Sharon. Am I supposed to join the three diamonds BEFORE doing the stitching on them, or do I do one at a time and then join the three diamonds together? Thank you again for sharing your gifts and talents with so many.
Lori King
Lori you can do it either way – I embroidered each diamond then stitched them together but seeing people stitch them together first I think I would do it that way if I did the quilt again.
Could you please give a quick description of how you are sewing your curved pieces in the tumbling block diamonds? I have only done straight lines. Are those pieces cut to shape and hand sewn?
Aura check out tip 5 as it answers your question
I have subscribed about five times and am not recieving the emails. I have checked my junk mail too.
Hi Gayle I am not sure why the subscription is not working for you – when You subscribe you will receive an email asking you to confirm- have you confirmed too?
i am not getting your posts anymore?
HI Nancy Nothing has changed my end – check your Spam box your security settings may have changed
Buenas tardes, estoy interesada en sus curso i el libro
Deseo información, gracias
Neus What do you want to know?
Printed out the diamonds for this second block and in the process of tracing onto my muslin I realized this month’s blocks are an inch longer on each side (6 inches as opposed to 5 inches) than last month’s. I printed them out at regular size. Please advise. Thanks so much.
Hi Arlene Sorry I am not sure why this has happened – I have just checked the files they print OK on my machine. You need to keep working with the dame size blocks as you have started with. The blocks are really simple patterns – make sure they are all the same size – for the whole quilt. To do this draw in the design on the size blocks you have started with. ie fit the pattern of the the pieces to fit your sized block. Crazy quilting is a very forgiving and you don’t have to have every block the same for this quilt to work.To be honest I would eyeball it! The key thing is that the diamonds are the same size and each diamond is worked either light, medium or dark. You might have printed out the last block and forgotten to set your printer to print to the actual size. If the ‘fit to page’ option is not used it will reduce the diamonds. Perhaps that is what happened.
Thank you. That’s what I did. Still not sure what happened, but will be on the alerg to keep them all the same size.