

Linked Double Chain is an interesting variety of chain stitch. If you are a beginner you might like to make sure you are familiar with chain stitch and with twisted chain stitch since Linked double chain consists of two chain stitches worked side by side which are then linked with a twisted chain. This combination is worked to form a line.
How to work Linked Double Chain stitch
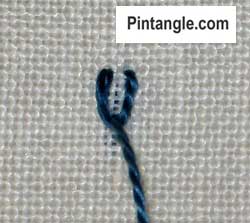
To work the stitch, start with a single very open chain stitch. It is a bit sloppy-looking as you can see.
Next, work a second chain next to the first. Make the stitch so that the two stitches are side-by-side.
At this stage, they look a little like buttonhole stitches.
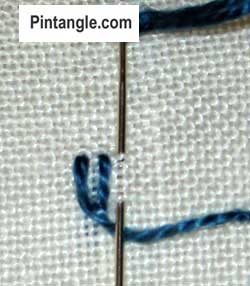
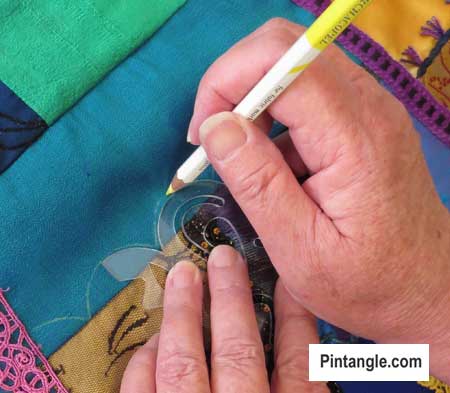
Bringing the point of the needle out a short space down the line to be stitched. Cross the thread over the needle, then wrap the thread under the needle’s point.
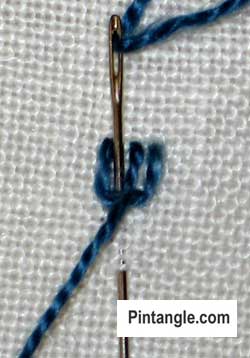
Pull the needle through the fabric.
What you are doing is working a twisted chain stitch into the base of the first two stitches.
If you are unfamiliar with twisted chain stitch you will find the directions here
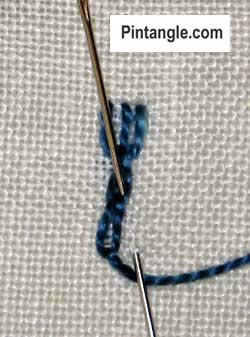
At this point, it should look like this.

Next work two chain stitches side by side emerging from the base of the Twisted Chain.
Continue along the line in this manner.
This is a marvellous stitch, as it will follow a curve well and lends itself to all sorts of interesting experimentation.
You can widen the chain stitches and play with spacing
It looks particularly effective if you use a thread with a firm twist.
Silk ribbon also works well with this stitch. Why not try embellishing it with beads too!
I hope you enjoy experimenting with this stitch.
Have you seen my Stitchers Templates?
Create your own designs with Sharon’s easy-to-use stitchers templates. Combine shapes to create hundreds of patterns and designs to embroider. It is the ultimate mix-and-match fun for stitchers of all skill levels. I created them to be as versatile as possible. I include four multi-patterned templates in each set. You will find them easy to use, totally clear to help you position them on your work, and they are nice and compact to fit in your sewing box. Each set comes with an e-book filled with patterns and designs that you can create and use as a jumping-off spot for your own designs. They are available now in our shop here!
Happy stitching!

This stitch was easy to learn. Thanks.
My samples are here.
http://hobbysewing.blogspot.com/2020/09/tast-26-beyond-tast-26.html
Hi Sharon,
Having missed this stitch, I just now started working on this stitch sampler, the detaisl are being posted here-
http://jizee6687.wordpress.com/category/tast-2012/34-linked-double-chain-stitch/
Thank you,
Chitra
i forgot to link up last week.
this post contains my stitch practice for weeks 31 through 34.
http://simpletosublimepapernapkinpoetry.blogspot.com/2012/09/tast-week-3134-and-15-minute-challenge.html
🙂
libbyQ
Do we have many more stitches that include the twisted chain? Anyway, here is my little sampler.
http://eclecticlamb.com/2012/08/30/week-34-linked-double-chain-stitch/
http://www.flickr.com/photos/stitchinwoman/?saved=1
Here are my samples for Pekinese stitch and for the Linked Double Chain stitch.
I have finally arrived with the linked double chain example of mine! This was fun!
http://asucculentlife.blogspot.com/2012/08/my-linked-double-chain-cactus-in-bloom.html
http://harvestmoonbyhand.blogspot.com/2012/08/take-stitch-tuesday-linked-double-chain.html
Sorry! I’m late in posting due to computer problems. Here are my ‘tulips’:
http://queeniepatch.blogspot.jp/2012/08/tast2012-week-34_28.html
It’s been a busy week, but I finally had some stitching time this morning. I wrote about my sampler on my blog:
http://fat-quarter.blogspot.nl/2012/08/linked-double-chain-stitch.html
http://stitchinfingers.ning.com/profile/JeanneMarieMellor
From the beginning I thought, “finally a stitch I don’t like.” I struggled to find inspiration for it all week. And so what do I do?–Sink myself in way too deep. Borders, leaves, branches, a bird…..trying different threads and fibers. I just wahted to be done with this—until I got to the beading. Then I decided I like this stitch. Maybe it was in seeing the finish line, I don’t know. Each week I’m challenging myself to do 1 whole sampler using just that stitch. Some stitches just aren’t made for this, but I want to make a fabric book of stitches, at least one page per stitch. So there you have it……sinking myself in week after week now.
sorrry, pressed send before i said hello xx
http://stitchinfingers.ning.com/photo/across-the-universe-linked-double-chain-stich?context=user
Hello
My sample for this week is here:
http://dufall.blogspot.fr/
I enjoy very much this stitch ,new for me
Thanks
Loved this stitch .
Blogged about it here:
http://carorose.typepad.com/my_weblog/2012/08/tast-2012-august-21st.html
And added it to Flickr Group:
http://www.flickr.com/photos/carorose/7861420554/in/pool-56846286@N00
Have a nice week.
Carolyn
Hi Sharon & friends
this week, I could not finish my work for the group TAST 2012 due to a work emergency hydraulics in my apartment. Next week I recover. I take to post a work I made in the course “Sumptuous Surface Embroidery”, of Sharon B, I used several stiches already studied along the year . Thank you all!
http://embroiderland.blogspot.com.br/
I think I spent almost as long on the post as on the stitching! http://airynothing.net/Blogs/anblog/2012/08/25/this-week
It seems I’m always a little slow to get this finished. Here’s my sample for the week.
http://playfulstitching.wordpress.com/2012/08/25/linked-double-chain-stitch/
Thank you, Sharon, for digging out this stitch and sharing with us, was in none of my books. Here is my exercise: http://stitchinfingers.ning.com/photo/fall-is-in-the-air-tast-34-linked-double-chain?context=latest
Claudia
Wasn’t a fan of the linked double chain at first, but it grew on me once I realized the potential. I’ve been remiss in uploading photos the past several weeks, but you can see linked double chain, pekinese and cast on stitches and my notes on Flickr: http://www.flickr.com/photos/playswithfibers/
Hello Sharon and fellow embroiderers! I am so glad to learn this new stitch!
http://kippyssomature.blogspot.com/2012/08/tast-34.html
Sorry about the quality of photograph, but here’s my effort for this week’s stitch
http://stitchinfingers.ning.com/photo/week-34-linked-double-chain?context=latest
Barbara
I have done a little sample of this stitch, you can find here
http://pierrespapiersciseaux.blogspot.fr/2012/08/tast-34-variation-sur-le-point-de.html
Hi,Sharon
Here is my sampler for this week.
http://stitchinfingers.ning.com/photo/sunny-day?context=latest
Have a nice weekend.
Despite being away on vacation, I was able to complete this week’s challenge. A new stitch for me (and I’ve done a lot of chain variations!), I like the “bling” it adds to a piece. You can find it at:
http://stitchinfingers.ning.com/photo/tast-double-chain-stitch?context=user
my sampler for linked double chain…
http://leelashobbies.blogspot.in/2012/08/tast-2012-week-34-linked-double-chain.html
my sampler for pekinese stitch..i know this time i was too late..:((
http://leelashobbies.blogspot.in/2012/08/tast-2012-week-33-pekinese-stitch.html
Hi Sharon, I wasn’t keen on this one……I scrapped my first effort, but it all went well the second time around !!
Thanking you again for keeping me focused……..
You can see my sample here………….
http://ellascraftcreations.blogspot.co.uk/2012/08/tast-2012-week-34-linked-double-chain.html
hugs
Chris richards
xxxxxx
http://latha-mycreations.blogspot.com/2012/08/tast-week-34-linked-double-chain-stitch.html My sampler for linked double chain stitch.
http://carrementcrazy2.canalblog.com/archives/2012/08/22/24944396.html
voici le lien vers mon point de la semaine; amicalement
J’ai fait mon exercice… Bien amusant!
http://6stem5.canalblog.com
My Linked Double chains are posted to
http://crazyqstitcher.wordpress.com/
Until I read Annet’s comment, I’d forgotten I had used this stitch in Tast 1 . link below -It’s the top lot..
http://crazyqstitcher.wordpress.com/2007/10/12/tast-weeks-40-linked-double-chain-and-41-lace-border-stitch/
A very strange stitch, indeed.
http://stitchinfingers.ning.com/photo/linked-double-chain?context=latest
A new stitch to me too.
http://linsartyblobs.blogspot.co.uk/2012/08/featuredtast-34-jewellery.html
Sharon
Two more projects using Week 32’s stitch – Algerian eye stitch.
http://shamiatcraft.blogspot.in/2012/08/plastic-canvas-pen-holder.html
http://shamiatcraft.blogspot.in/2012/08/plastic-canvas-photo-frame.html
Sharon
I am little behind. Here is the post for Week 32 – Algerian Eye stitch.
http://shamiatcraft.blogspot.in/2012/08/algerian-eye-stitch.html
Little pitchforks, just in time for Halloween stitching!
I’ve combined Week 33 with Week 34. I’d never done either of these stitches before. Here’s the link: http://debbiesfiberwork.blogspot.co.il/2012/08/tast-weeks-33-and-34.html
Hi, I’m new to all of this but thought I’d give it a go this week!
Here is my attempt: http://aprayerin-everystitch.blogspot.co.uk/2012/08/love-heart-pin-cushion.html
I really enjoyed trying out a new stitch, especially as I am fairly new to embroidery, and I loved that it came from the Anne Butler book, as that is one of the old texts I have been looking at to inspire my work! 🙂
Here’s my weekly post with old linked chain stitches:
http://fat-quarter.blogspot.nl/2012/08/old-linked-double-chain-stitches.html
Flipping through my photo’s and reading my old notes gave me more idea’s to experiment with this stitch!
Reminds me of a trident or one of those decorative wall forks from the ’70s. Is this one new to you, too? I ask because you have no eye candy and you usually show some.