
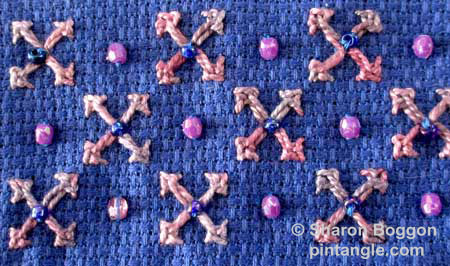
Eastern stitch is also known as Egyptian buttonhole. I guess the buttonhole part of the name comes from the loop made between the two bars as the same hand movement is required to make buttonhole. I have seen it classified as part of the buttonhole family. Usually this stitch is seen worked as a filling particularly in canvas work embroidery.
This stitch works with any grid like pattern. I have seen Eastern stitch as it is worked row upon row but first pointed in one direction and then on the next row point the stitch in the other direction it works because as a stitch each unit will sit neatly within a square. The beaded version is the same for the same reason.
Since it sits so firmly with in a square any grid like pattern can be created by treating it like cross stitch and simply counting the squares. You can also spin it around to create patterns. It is just a case of looking at each unit and thinking slightly differently.
 Many people think of this stitch as an evenweave stitch that has to be worked on a grid but it will follow a softly curved line too.
How to work Eastern Stitch
Work this stitch from left to right. When working this stitch it needs to kept at a fairly loose tension.
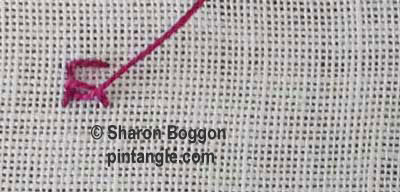
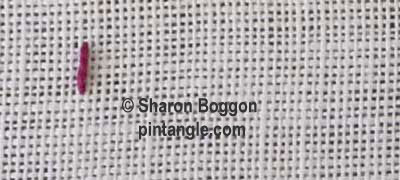 Make a vertical straight stitch at the left side of an imaginary square.
 Make a horizontal straight stitch at the top of an imaginary square.
These two stitches are the foundation bars of each unit of eastern stitch.
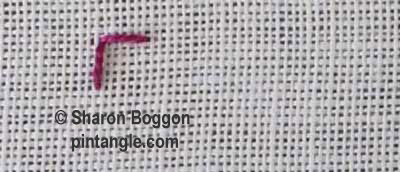
 Taking the needle diagonally across the back of the fabric, bring the thread up to the front the fabric, in the bottom right-hand corner as illustrated.
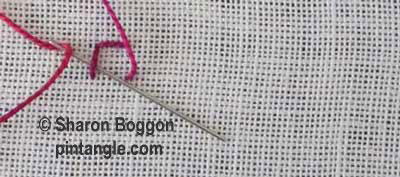 Take the needle over the top and then slide it under the vertical stitch. When you slide the needle under the bar make sure it points towards the bottom of the square. Pull the needle through so that it forms a loop over the vertical bar stitch as illustrated. You are not going through the fabric but lacing the bar.
Move to the horizontal bar and slide the needle under the horizontal stitch.
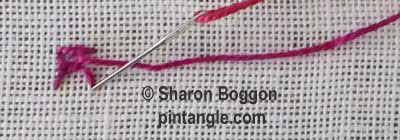 Make sure the thread is kept to the right of the needle so that when you pull it through it forms a loop over the horizontal stitch as illustrated
Take the thread through the fabric at the bottom right-hand corner.
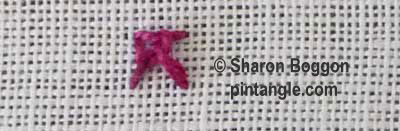 Bringing the needle out at the top left corner of the next stitch and repeat the process along a line or to fill an area.
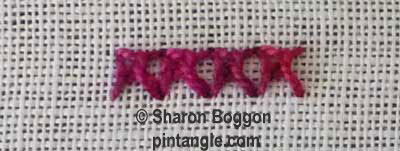 You can work along a line or a curve or as individual units to create patterns.
Thread Twisties!
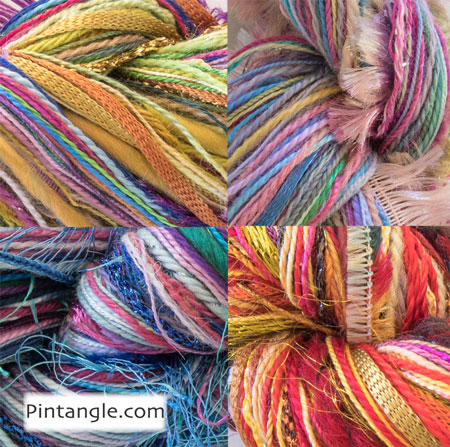
Experimenting with different threads can be expensive, as you would normally have to buy a whole skein of each type of thread. So I have made up my thread twisties which are a combination of different threads to use in creative hand embroidery. These enable you to try out stitching with something other than stranded cotton. For the price of just a few skeins, you can experiment with a bundle of threads of luscious colours and many different textures.
These are creative embroiders threads. With them, I hope to encourage you to experiment. Each Twistie is a thread bundle containing silk, cotton, rayon and wool. Threads range from extra fine (the same thickness as 1 strand of embroidery floss) to chunky couchable textured yarns. All threads have a soft and manageable drape so that twisting them around a needle makes experimental hand embroidery an interesting journey rather than a battle. Many are hand dyed by me. All are threads I use. You may find a similar thread twist but no two are identical.
You will find my thread twisties in the Pintangle shop here.

Thanks for including this stitch in TAST 2020. My sample is here.
http://hobbysewing.blogspot.com/2020/11/tast-40-beyond-tast-40.html
Hi Sharon,
This stitch is easy and interesting. the sampler-
http://jizee6687.wordpress.com/category/tast-2014/5-99-eastern-stitch/
Thank you,
Chitra
Thank you so much for granting my wish and teaching us this most wonderful stitch!
http://queeniepatch.blogspot.jp/2014/02/tast-99-eastern-stitch.html
It’s my pleasure Queenie!
Two stitches today; shell chain stitch and beaded shell chain stitch:
http://fat-quarter.blogspot.nl/2014/02/shell-chain-stitch-and-beaded-shell-chain-stitch.html
I have fallen behind, but hope to catch up with my stitches soon. My samples of the linked chain and beaded linked chain stitches are here. http://hokkaidokudasai.blogspot.jp/2014/02/take-stitch-tuesday-linked-chain-95-and.html
Thanks!
Hello from Pasadena, MD.
I really had fun with this stitch. I hope you like it.
Mary
http://theworkingneedleandpen.wordpress.com/2014/02/08/saturday-8-february-2014/
I’ve posted my Eastern stitch on Flickr at http://www.flickr.com/photos/56800620@N03/
Here’s my post with beaded linked chain stitches:
http://fat-quarter.blogspot.nl/2014/02/beaded-linked-chain-stitch.html
Here is my attempt at the Eastern Stitch: http://img.photobucket.com/albums/v29/thatyank/thatyank%20siggies/Blog%20photos%20from%20Multiply/February%202014/99-EasternEgyptianButtonholeStitch.jpg
Sharon, this is a lovely stitch, especially as shown in the top photograph. I’m afraid you have me on the stitch dictionary book hunt now too and my collection is growing although not in the same league as yours, lol.
Belinda Bear indicated it was your birthday (which I admit I didn’t know), so happy birthday from us, hope it was everything you wanted it to be.
A Happy Birthday to you Sharon!
I have updated my blog with the progress on 2 projects I am working on. You can find them on:
http://wilmagoescrazy.blogspot.com
Sharon thank you for the stitch this is a really beautiful stitch, its so pretty when you do it in a line of them but the ones above where its used as a individual pattern is such a lovely pattern really love it!!
Btw happy burfday to u n many many more love the bear
Love n hugs belinda xxoo
Sharon! You said there wouldn’t be a new stitch this week! I am hoping that I can get it done before next Tuesday. Right now you can see my beaded shell chain stitch on my blog. I really like the beaded stitches! http://princessbubblescreates.blogspot.ca/
Today I planned to write about my beaded linked chain stitch. I will post that later this week, because I had a few nice old samples of the Eastern stitch:
http://fat-quarter.blogspot.nl/2014/02/old-eastern-stitches.html
THANK YOU, Sharon! I love the look of the stitch and I don’t think it is too complicated. I did not imagine it as a ‘cross stitch’ but see from your picture that it would make a very rich structure (similar to the Swedish Twist Stitch).