
Pistil Stitch
Pistil stitch is really a French Knot with a tail. It is ideal for the centres of flowers, or arranged in a circle as a flower motif. The weight of the thread will determine the size of the finished stitch. You can also work this stitch using silk ribbon.
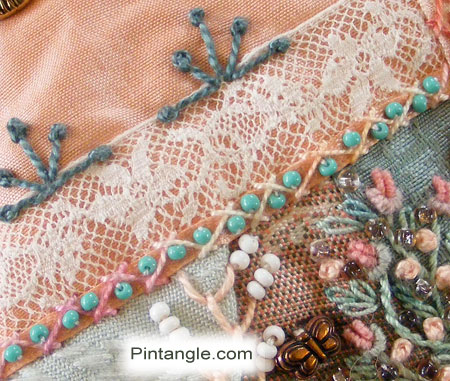
Pistil stitch is also known as long tack knot stitch, and Italian knot stitch. But the most common name is Pistil stitch, perhaps because of its resemblance to the pistils and stamens in flowers.
Some people find it better to work this stitch with the fabric stretched in an embroidery hoop. I recommend that you use a milliner’s needle, as they are the secret weapon in creating many of the knotted stitches. Most embroidery needles have an eye that is wider than the shaft of the needle. Milliner’s or straw needles have the eye and shaft at the same width. This makes sliding off any of the knotted stitches easier. It works for any stitch where part of the process involves wrapping the thread around the needle and then moving the thread along the needle in order to complete the stitch.
How to work Pistil stitch

Bring the thread to the front of your fabric. Wrap the thread twice around the needle, as you would a French knot. Then insert the needle back into the fabric a little distance from where it emerged, holding the ‘tail’ of the knot taut and flat to the fabric.
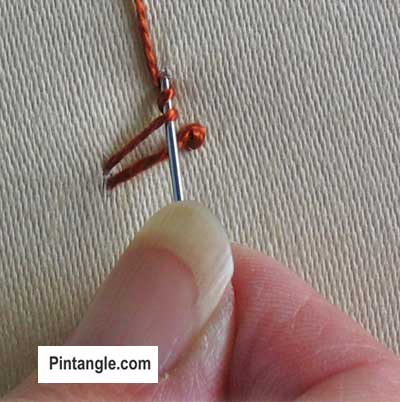
Take the needle and thread through to the back of the fabric.
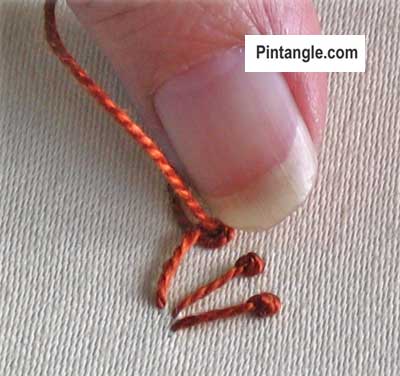
At this point, it is sometimes helpful to brush the knot down the shaft of the needle with the left thumbnail so that it is sitting firmly on the fabric.
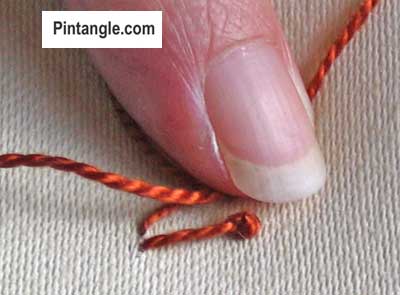
Hold the knot with your thumb as you pull the thread through to the back of the fabric.
And that’s it!
Follow Pintangle and have it delivered to your inbox
You can have Pintangle delivered to your inbox by using the follow feature in the sidebar. Just enter your email address, and use the confirmation email and you are all set!
If you are on a mobile or tablet, scroll to the bottom to find the ‘follow’ feature.
Have you seen my Stitchers Templates?
Create your own designs with Sharon’s easy-to-use stitchers templates. Combine shapes to create hundreds of patterns and designs to embroider. It is the ultimate mix-and-match fun for stitchers of all skill levels. I created them to be as versatile as possible. I include four multi-patterned templates in each set. You will find them easy to use, totally clear to help you position them on your work, and they are nice and compact to fit in your sewing box. Each set comes with an e-book filled with patterns and designs that you can create and use as a jumping-off spot for your own designs. They are available now in our shop here!
Happy stitching!

This stitch was easy to work out. I tried creating a mandala with this stitch.
http://hobbysewing.blogspot.com/2020/09/tast-11-beyond-tast-11.html
j’ai fini mon point de pistil merci
Hi Sharon,
my pistil stitch sampler details are here-
http://jizee6687.wordpress.com/category/tast-2012/37-pistil-stitch/
Thank you,
Chitra
I really enjoyed this stitch and would definitely use it again.
I made a trio of flowers using the pistil stitch. The link shows the flowers as well as the embroidery journal I’m keeping the little samplers in.
http://harvestmoonbyhand.blogspot.com/2012/09/take-stitch-tuesday-pistil-stitch-week.html
http://www.flickr.com/photos/anotherrealm/
This is a wonderful stitch. It’s been so much fun to spend the week with pistil stitch exploring it’s possibilities.
Here is the link to my Pistil Stitch – thank you Sharon, I thoroughly enjoyed this stitch!
http://debbies-doings.blogspot.ca/2012/09/tast-week-37.html
Here is the short link to my Pistil Stitch blog:
http://wp.me/p1GXVK-i4
I also uploaded a couple photos to Stitchin Fingers!