

Italian border Stitch is perfect for borders and edges. You can work this stitch where you would normally use buttonhole to finish an edge. Worked in a compact manner, it forms a neat line, with the knot reinforcing the edge.
Since this stitch is actually a variety of fly stitch, it is very versatile. Italian border stitch can also be worked in a line, arranged in patterns, or worked in a circle to create disk-like flowers.
You can easily add beads with this stitch. Since you can open the stitch out to form a V, there are also countless geometric patterns available to you. You can also use it to hold down a thicker thread or ribbon, or weave a thin ribbon through the spokes.

How to work Italian Border Stitch
Italian knotted border stitch is actually a variety of Fly stitch, and you begin the stitch in the same way.
As you would with Fly stitch, make a V with your thread ( if you need a little reminder of how to work Fly stitch, you will find a tutorial here)

With the thread wrapped under the needle, pull it through the fabric.

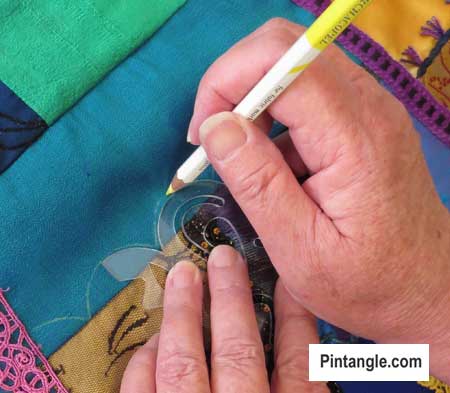
To do this, you need to wrap your working thread once around the needle and insert the needle at the base to tie down the stitch.

As you pull the needle to the back, keep the tension of the working thread even by guiding the thread under your left thumb like you would a French knot.

Continue along the row in this manner, and you will soon have a row like this…
Have a play with it, and enjoy!

Have you seen my Stitchers Templates?
Create your own designs with Sharon’s easy-to-use stitchers templates. Combine shapes to create hundreds of patterns and designs to embroider. It is the ultimate mix-and-match fun for stitchers of all skill levels. I created them to be as versatile as possible. I include four multi-patterned templates in each set. You will find them easy to use, totally clear to help you position them on your work, and they are nice and compact to fit in your sewing box. Each set comes with an e-book filled with patterns and designs that you can create and use as a jumping-off spot for your own designs. They are available now in our shop here!
Happy stitching!

This is a new stitch to me. Thankyou for introducing me to this stitch. My samples are here.
http://hobbysewing.blogspot.com/2020/08/tast-2-beyond-tast-2.html
Thank-you Sharon, I am now embarking on TAST 2 and am very excited by the interesting possibilities and variations. I enjoy working with felt and wool and can see many ideas which I can use. thank-you for your generosity in sharing your expertise. Oh and a VERY HAPPY NEW YEAR TO YOU.
Thanks Marilyn – that is a lovely comment to open up at the beginning of my day
Italian Border and some catch up stitches:
http://textileexplorations.blogspot.de/2012/10/some-tast-2012-stitching.html
this stitch was quick and easy and i decided to “double” mine in a sort of mirrored way . . . which produced a zipper like effect.
http://simpletosublimepapernapkinpoetry.blogspot.com/2012/10/tastweek-42-dolly-quiltalong-flimsy-15.html
🙂
libbyQ
Yes Sharon I would love TAST to continue I have learnt so much from doing a new st each week an really look forward to Tuesday. Thankyou for sharing your knowledge and all the great instructions each week.
Doreen Parker
My Italian Border stitch sampler can be seen at:
http://debbies-doings.blogspot.ca/2012/10/tast-week-42.html
Juste quelques points pour cette semaine. je ferai mieux la semaine prochaine….
http://carrementcrazy2.canalblog.com/archives/2012/10/21/25390764.html
I’m still plugging along. Seems like I get caught up to the current week but before I can get pictures taken I’m three behind again. I have added some new photos but I have three to stitch yet.
http://stitchinfingers.ning.com/photo/photo/listForContributor?screenName=12ny08081qa3v
I enjoyed this stitch!
http://eclecticlamb.com/2012/10/21/week-42-italian-border-stitch/
Hiya Sharon and all, I do hope I managed to get in in time this week ! Here’s my contribution. Hope you like it. 🙂
xx Liz xx
http://stitchinfingers.ning.com/photo/ode-to-autumn?context=latest
A lovely and easy stitch. My samples are at
http://www.flickr.com/photos/crazyqstitcher/
and blogged at
http://crazyqstitcher.wordpress.com/
Hi Sharon & Friends, my post for week 42. Thank you all!
http://embroiderland.blogspot.com.br/
Sharon- You can find my example of the Italian Border stitch here: http://stitchinfingers.ning.com/photo/poinsettia?context=user
I have learned so many new stitches in this challenge – it is wonderful! Thank you!
My PC was broken and I was afraid of not being able to post my work this week. But my husband has repaired it quickly. Phew!
http://pierrespapiersciseaux.blogspot.fr/2012/10/tast-42-le-point-de-bordure-italien.html
Hi Sharon,
Leaves and flowers again. Here is the flower spray: http://threads-and-patches.blogspot.com/2012/10/tast-week-42-italian-border-stitch.html
I also did some cathing up on the cast on stitch and oyster stitch: http://threads-and-patches.blogspot.com/2012/10/back-to-crazy-violets.html
my sampler for week 42 is posting here..
http://leelashobbies.blogspot.in/2012/10/tast-2012-week-42-italian-knotted.html
I truely enjoyed making this Mandala:
http://queeniepatch.blogspot.jp/2012/10/tast-2012-week-42.html
http://stitchinfingers.ning.com/photo/tast2012-week-42?context=latest
I like this stitch too.
http://linsartyblobs.blogspot.co.uk/2012/10/mushroom-stamp-tast-42-blue-book.html
I stitched a 2 x 2 inch sampler on Aida:
http://www.flickr.com/photos/28957501@N04/8102781176/in/photostream
I wrote about the details on my blog:
http://fat-quarter.blogspot.nl/2012/10/italian-knotted-border-stitch.html
Here is my sample of Italian Border stitch, using some scraps I hand dyed and couldn’t bear to throw away!
http://www.flickr.com/photos/36140279@N03/8102705720/in/pool-56846286@N00
Barbara
Love this stitch — didn’t want to stop. I’ve Flickr’ed up and included some detail. http://www.flickr.com/photos/playswithfibers/
Here’s my catch up with 40, 41 and 42 together. http://debbiesfiberwork.blogspot.com/2012/10/tast-weeks-40-41-42.html
http://latha-mycreations.blogspot.in/2012/10/tast-week-42-italian-border-stitch.html My this week’s sampler.
Hi Sharon,
I enjoy working with this week’s stitch, the details are here-
http://jizee6687.wordpress.com/category/tast-2012/42-italian-border-stitch2/
Thank you,
Chitra
Hi Sharon and all,
again I enjoyed the new stitch. here is my attempt: http://fabricfusion.blogspot.co.at/2012/10/tast-42-italian-border-stitch-cqjp-und.html
Cheers Claudia
here is my sampler for the italian knotted border stitch:
http://dufall.blogspot.com/2012/10/tast-semaine-42-point-de-bordure.html
Thanks Sharon
This stitch is great for more than just borders. I like it a lot. It’s one I’ve never seen before. Thanks!
http://playfulstitching.wordpress.com/2012/10/17/italian-border-stitch/
here is my weekly post.
http://nalinihandwork.blogspot.in/2012/10/tast-2012-week-42-italian-border-stitch.html
Thanks Sharon! Here’s my post
http://flowerkaleidoscope.blogspot.com/2012/10/tast-2012.html
I really loved this stitch which was new to me! Thanks Sharon for broadening my horizons!
http://karrinscrazyworld.blogspot.com/2012/10/tast-week-42-italian-border-stitch.html
I am almost caught up. Completed week 41. Enjoyed it.
http://eclecticlamb.com/2012/10/16/week-41-knotted-loop-stitch/
Thanks for this fun new stitch! I really like it!
http://princessbubblescreates.blogspot.ca/
Because I was so late last week, I got right on this one and here is my small attempt. Nothing fancy, just five different arrangements in perle cotton: http://210920746822434353.weebly.com/1/post/2012/10/take-a-stitch-tuesday-2012-week-forty-two.html
Here’s my weekly post with old Italian knotted border stitches:
http://fat-quarter.blogspot.nl/2012/10/old-italian-knotted-border-stitches.html
This is one of those stitches I forgot, so it will be fun to rediscover it again!
Hi Sharon ! I think I had experimented this stitch twice (TAST W1 and TAST w16), so I didn’t stitch my weekly sampler. http://j-en-revais.blogspot.com/2012/10/tast-42.html Have a nice week.
I thought this week was week 42 🙂
Yes you are right! I have fixed the Title and thanks for noticing. It is because I decided to add it to TAST and was not working from my list. I move away from my list and make mistakes. EEks!
Hi Sharon,
After seeing your samples of this stitch, I have been hoping that you would make this stitch as a part TAST 2012. and Iam eager to work on this stitch samples .
I had worked a few samples of Italian border stitch during your earlier challenge. the details are here-
http://jizee6687.wordpress.com/category/tast2/16-italian-border-stitch/
Thank you,
Chitra
Sharon
Here is my sample for this week.
http://www.shamiatcraft.blogspot.in/2012/10/tast-2012-week-41-italian-knotted.html