Buttonhole Picot
These are two versions of Buttonhole Picot Stitch that I use.
The first version — and the one most often documented, has a picot made of a bullion stitch. The second version is easier to work, as the picot is made of three chain stitches.
The second version interests me, as I was shown the second version when young and I often wonder if this is an Australian / New Zealand variety. I think it is easier to do, but that could be because I learnt it as a child.
I worked all the samples using cotton perle # 5.
Most often, this stitch is worked along an edge so the buttonhole stitches are usually worked close together. For the purposes of demonstration, I have spaced them a little apart, so you can see how the picot stitches are worked.
In all versions, you space the picot knots as required along a line of buttonhole.
Version 1 Buttonhole Picot made with a bullion knot
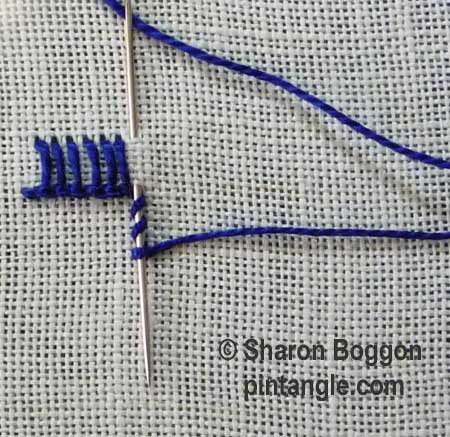 Start with buttonhole stitches. When you reach the point where you want to add a picot, begin with the thread under the needle, and wrap the needle 2 or 3 times to create a bullion knot.
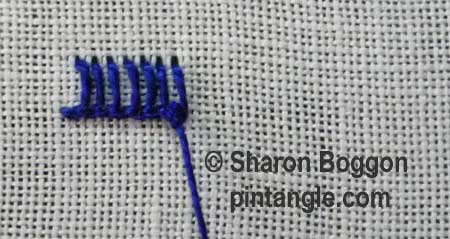 Push the knot wraps snug to the buttonhole and pull the thread through. You may need to hold the needle flat to the fabric with your thumb as you pull through.
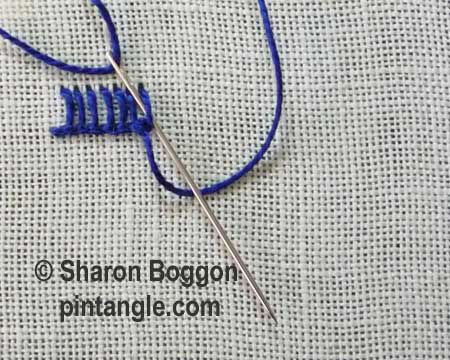 Slide your needle from left to right under the last stitch, and, keeping the thread under the needle, pull it through. If you need to push the knot up snug, do so with either your needle or thumb.
 Continue along the line working the next section of buttonhole.
Buttonhole Picot stitch version 2
This is similar, but I think easier, as the picot knot is formed with a chain stitch.
The illustration samples are worked using cotton perle # 5.
As with the previous version you space the picot knots as required along a line of buttonhole. Normally the buttonhole stitches are worked closely together as an edging stitch. For demonstration purposes, I have spaced them a little apart so you can see how the picot stitches are worked.
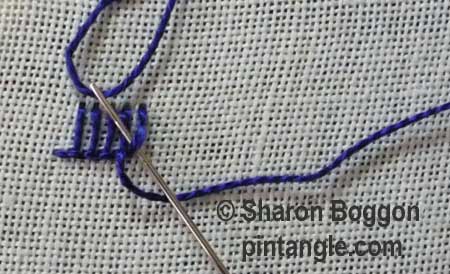 Start with buttonhole stitches. When you reach the point where you want to add a picot, slide your needle under the thread of the last buttonhole stitch but not through the fabric.
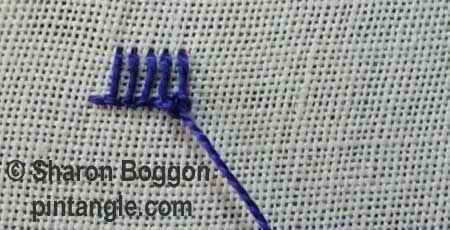 With the thread under the needle pull your needle through so that you make a little chain stitch using the buttonhole as a foundation.
 Insert your needle into the centre of the chain stitch but not through the fabric. Wrap your thread under the needle and pull your needle through to make a second chain stitch.
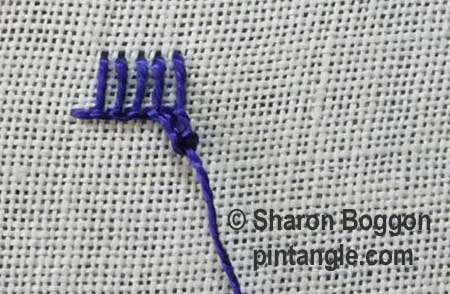 If you want a larger knot you can make a third chain.
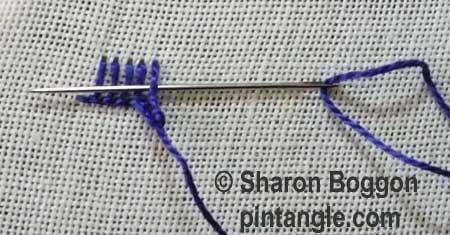 Next, slide your needle from right to left under the last stitch, and, keeping the thread under the needle, pull it through. If you need to push the knot up snug do so with either your needle or thumb.
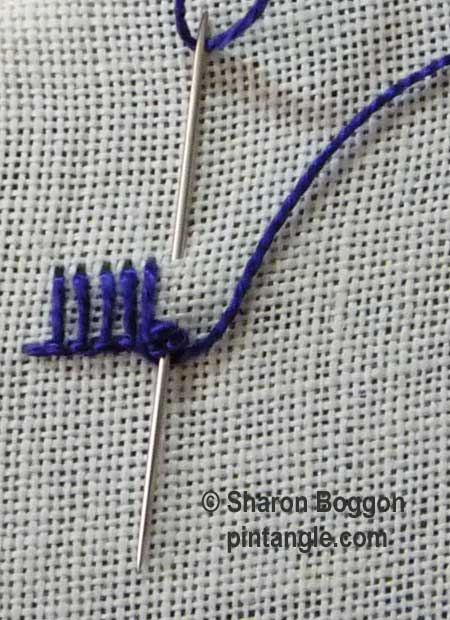 Recommence regular your buttonhole stitch and bring your needle tip out next to the picot and continue along the line working the next section of buttonhole.
As you can see, the knot stands a little proud. Personally, I always find the rhythm of the second version easier than the first. I would be interested in people’s opinion.


Whipped Wheel #11
http://mooshiestitch.blogspot.com/2013/11/take-stitch-tuesday-11-whipped-wheel.html
Here are my samples for 87 and 88, done in #5 perle. I’ve done them on the edge of the fabric so see how they might be used for edging.
http://hokkaidokudasai.blogspot.jp/2013/11/tast-87-and-88-two-versions-of.html
Thanks!
Hi Sharon,
these are some samples of picots worked with chain stitches.
http://jizee6687.wordpress.com/category/tast-2013/40-88-butonhole-picot-chain/
Thank you,
Chitra
Today I wrote about my finished garden sampler with 21 different stitches, most of them are TAST stitches.
http://fat-quarter.blogspot.nl/2013/11/garden-sampler.html
My effort is here
http://www.morecoldtea.wordpress.com
TAST #88 Buttonhole Picot version 2 (with Chain Stitches)
http://queeniepatch.blogspot.jp/2013/11/tast-88-buttonhole-picot-version-2-with.html
I tried both versions again and started to like one of them. I wrote about it here:
http://fat-quarter.blogspot.nl/2013/11/buttonhole-picot.html
TAST#87 Buttonhole Picot version 1 (with Bullion Knot):
http://queeniepatch.blogspot.jp/2013/11/tast-87-buttonhole-picot-version-1-with.html
Here are my two variants.
http://210920746822434353.weebly.com/1/post/2013/11/take-a-stitch-tuesday-2013-87-and-88.html
As much as I HATE bullion stitches, I prefer the first — at least I think I know how to do it and I don’t have a clue how to do the second. I chalk that up to trying this late at night… But neither is very well done, IMO.
This has been a disastrous month of stitching for me — only one of the stitches in October actually worked for me!
See my stitches 49 to 51 at http://todayinkenogami.blogspot.ca/2013/10/take-stitch-tuesday_31.html
Hi Sharon,
I started with the first version of buttonhole picot-
http://jizee6687.wordpress.com/category/tast-2013/buttonhole-picot1-bullion/
Thank you,
Chitra
#10 Running Stitch
http://mooshiestitch.blogspot.com/2013/10/take-stitch-tuesday-10-running-stitch.html
Thanks for the two options for instructions. I tried both and found the second one much easier.
http://princessbubblescreates.blogspot.ca/2013/10/take-stitch-tuesday-buttonhole-stitch.html
I played catch up today and made a combo of Turkman and raised cup stitch:
http://fat-quarter.blogspot.nl/2013/10/turkman-and-raised-cup-stitch.html
It’s good to have 2 weeks to try these stitches. The first time I tried them I made terrible stitches. Here’s my original post:
http://fat-quarter.blogspot.nl/2011/01/buttonhole-picots.html
Thanks for inclucing them in TAST again.