ManyCrazy quilting beginners get stumped at the hand embroidery stage of a block. I decided to write a tutorial on how to hand embroider crazy quilt seams. You do not have to be an expert stitcher to embroider a crazy quilt block. What you need to do, is develop the ability to adapt stitches and shape them to your needs. Today I will share how to use basic surface embroidery stitches to create seam decorations in your crazy quilt projects.
At the bottom of the article there is a link where you can download this tutorial as PDF and keep it as an ebook or a tablet, or you can print it out to store easily.
 This is not a tutorial on how to work the stitches. If you need tuition you will find it in my stitch dictionary it is provided free here on Pintangle.
There are also the free modules in my stitchers worksheets which cover the basic stitches as well. Go get them! They are free and none of my stuff asks you to subscribe to anything, I don’t ask you for your email or ask you to join this or that. They are a simple give away.
How to Hand Embroider Crazy Quilt Seams
Most seam embellishments used in crazy quilting consist of basic stitches combined and built row upon row on top of each other. These are the basic stitches of crazy quilting I recommend all new hands learn. The basic list is: buttonhole stitch, Chain stitch and Detached chain stitch, Cretan, Herringbone, Chevron, Stem stitch, Feather stitch , Fly stitch, French knot and Couching. Other people may add a few more stitches but if you have these you will go long way on a crazy quilt before anyone notices you are just using the basics.
Change your stitch direction, size and spacing
As you build your seams think in terms of adding variety by changing your stitches. You can so this by shifting stitch direction, and changing the size of your stitches such as going from big to small and change the spacing of your stitches from close together to wide apart. You can also work on both side of the seam or flip the stitches working alternately from side to side. All these little tricks add interest to a line of embroidery.
Think about your thread choice.
Another tip is don’t forget to change the colour, thickness and type of thread. I see lots of people simply use stranded cotton floss. This thread is fine for cross stitch work but get some cotton perle thread in sizes #8 and #5 as so many of the surface stitches look much better when worked with s thread that has a firm twist to it. There are no rules in crazy quilting so I am not being dictatorial about it but it is my tip towards creating interesting seam work on crazy quilting. Also many stitches can be threaded and laced so don’t forget that you have option too!
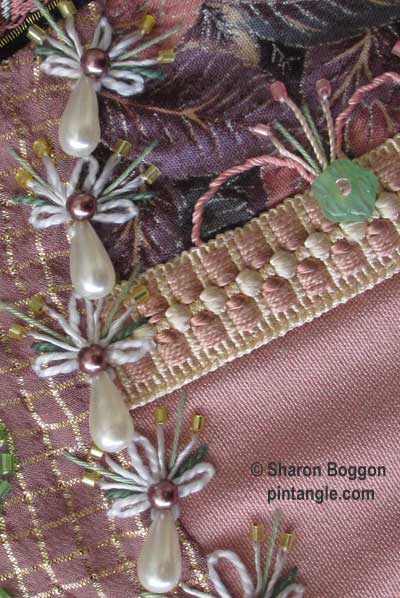
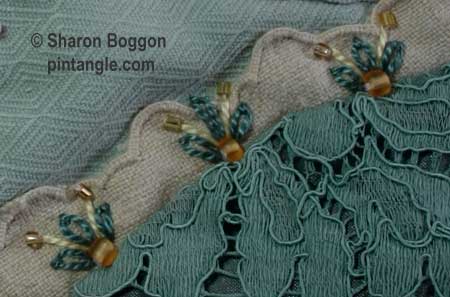 Detached Chain Stitch (or lazy daisy stitch) is quick, easy stitch that is very versatile. You can work it in all sorts of formations along a seam, along side a piece of lace or a piece of braid. A simple satisfying embellishment is to add straight stitches and a bead. You can add it to other stitches such as herringbone, or chevron stitch too.

Here is an example of working a line of stitching and by adding a few beads in the middle of the motifs it creates a bit of zest.
 You can work either side of the seam, flipping stitches from side to side.
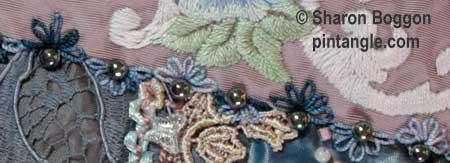 Or you can zigzag the motifs along the seam like these:
 Or zig zag them either side of lace braid or ribbon
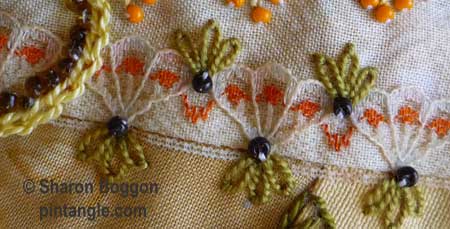 You can build little motifs up in zig zag bands

Once you have tried these techniques ie working a stitch along a line, flipping a stitch from side to side or placing it in a zig zag manner along the line, try building up more complex motifs by increasing the variety of your stitches and adding more rows of stitches.
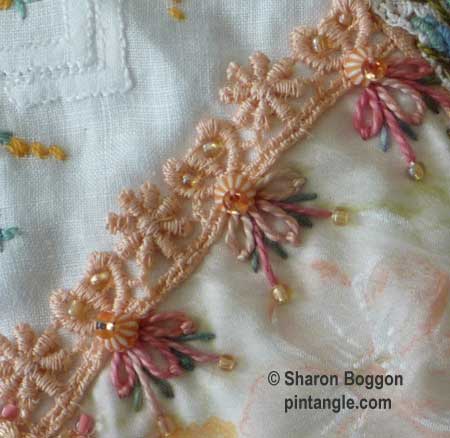 In crazy quilting your seam embellishment can be as complex, or as simple as you wish.
 These could be worked in stem stitch for the stem, detached chain for the flower and leaf and the middle could be a bead or a French knot.
 This seam pattern consists of a motif made of three detached chain stitches and two straight stitches. If you look at my work regularly, you will notice I use this combination all the time. You could finish them off with either a bead or a French knot.
 Stitches like buttonhole wheels can be worked as halves or quarters and arranged along a seam.
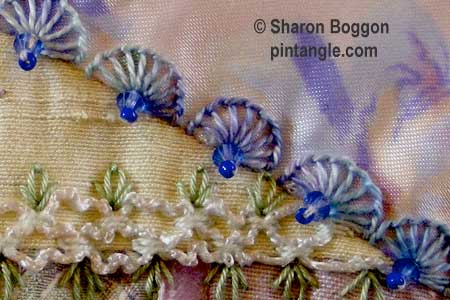 You can work them in line or turn them on their side.
 Or flip each half wheel from side to side.

Here is another way to arrange them and what they look like stitched up in a crazy quilt project.
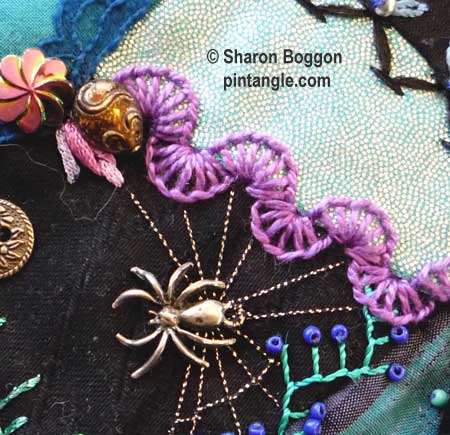 Or you can quarter the wheels and arrange them in patterns.

For instance you can flip them from side to side too!
 It is simple and effective. You can work two lines face to face.

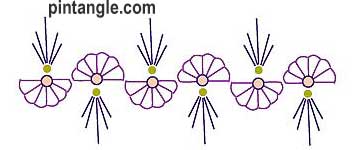
Here is another way to use buttonhole wheels which can be arranged in a different ways. These are interspersed with straight stitch arranged in a ray. French knots, sequins or beads can be placed in the middle of each wheel.
Often, the trick is to take a very basic stitch, work a row, and then add another basic stitch as a second row stacking stitches to create more interest.
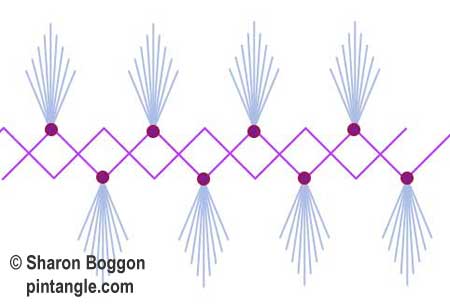 For instance, you can work two rows of straight stitches in a zig zag formation, with the second row offset to form a line a diamonds. At the peaks you can work a fan of straight stitches, add a bead and you have an attractive seam. All from one type of simple stitch!
Or you could work the foundation row of zig zag stitches using stem stitch or chain stitch. If you did this it would create a more solid line.
This type of seam embellishment where you start with a line to follow (the first zig zag line) is an instance of where Crazy Quilt templates are a very handy addition to your sewing box as you can use them to produce very even lines!
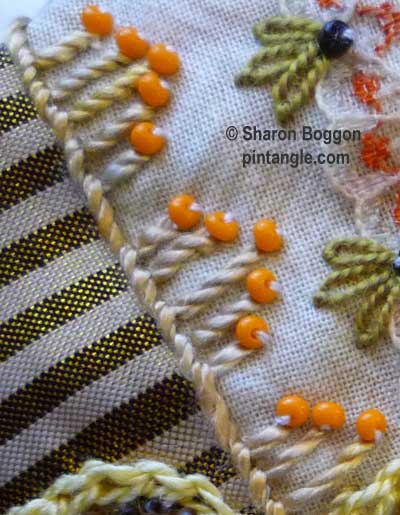 Here is another example of how to build a seam layer upon layer in a crazy quilt project.
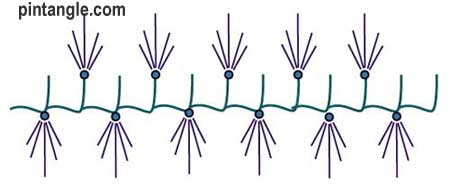 This foundation row is buttonhole stitch, which is then decorated with straight stitches and a seed bead. It is quite simple, quick to work and made up of basic stitches.
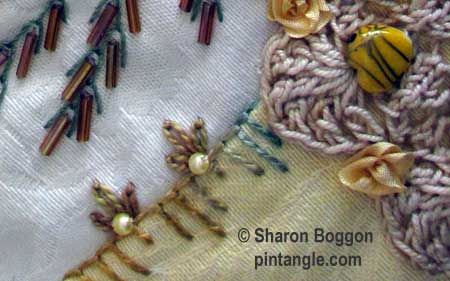 Buttonhole stitch is an extremely versatile foundation row because you can change the height of the arms to form a pattern and Buttonhole stitch will follow a curve well. For instance here we can add a fan of straight stitches to the top of the row and sequins at intervals along the bottom.
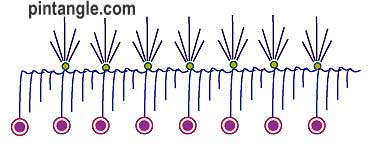 If you flip units of buttonhole stitch from side to side it leads to more interesting ways to combine stitches for your crazy quilt project.
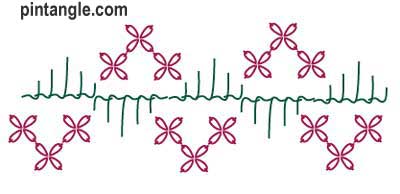 Here is an arrangement of detached chain stitches and buttonhole stitch.
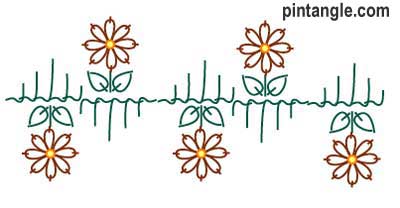 This pattern builds on the same idea and notice it is the same basic stitches which I have used. The stitches are arranged differently to create daisy motifs but they are the same basic stitch.
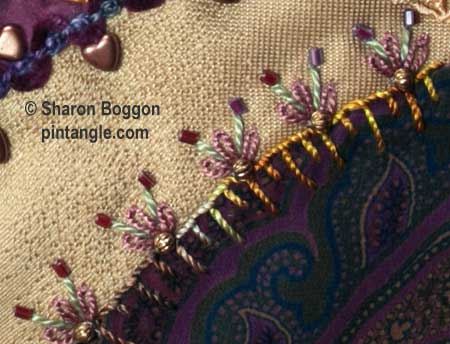 Herringbone Stitches have a zigzag like, crossed structure which means you can make all sorts of additions to a seam on the crazy quilt project.
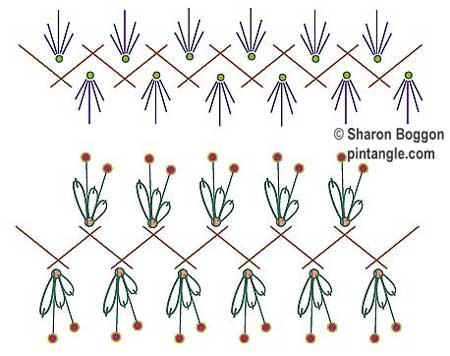 On the top row straight stitches worked in a fan and beads have been added to the spaces between the herringbone stitches. On the second line detached chain, straight stitches and beads have been tucked into the base of the cross.
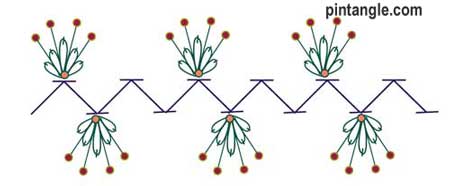 Chevron stitch is also a good foundation stitch for crazy quilters as you can add other stitches to the valleys and peaks. Straight stitches, detached chain stitches and beads have been added to the peaks of Chevron Stitch.
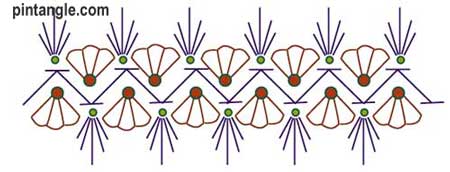 Or you can tuck extra stitches into the valleys. In this case I have added quarter buttonhole wheels.
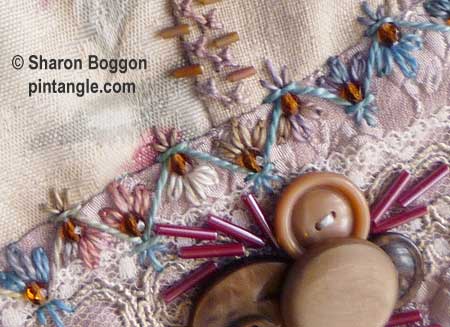 Here are some of my chevron stitch seam samples taken from my crazy quilts.


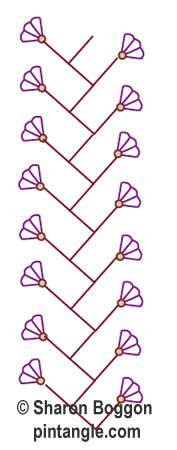
Finally, I could not write a tutorial on how to hand embroider crazy quilt seams without including one of the all time favourites for crazy quilters, which is Feather Stitch because you can add stitches to the end of each arm or tuck stitches between the arms to create lovely complex patterns.
Since feather stitch follows curves well you can create a lovely organic movement across a block using feather stitch. It is certainly one of my favourite stitches.
As you can see it is possible to build up quite complex patterns using these methods.
I hope this tutorial on how to hand embroider crazy quilt seams will give people a few ideas, and that you enjoy working and experimenting with some of them.
Other resources on Pintangle
 You can right click and download this article as PDF and keep it as an ebook on a tablet, or print it out easily.
If you need tuition on how to work embroidery stitches don’t forget my stitch dictionary which is provided free. There are also the free modules in my stitchers worksheets which cover the basic stitches. Go get them! They are free and none of my stuff asks you to subscribe to anything, or join this or that. Like the PDF for this article they are a simple give away.
If you find this tutorial on how to hand embroider crazy quilt seams useful. If you do share where you found it – feel free to print it out and share with a sewing group or friend, social media etc. Have fun with your stitching while learning something new.
Have you seen my book?
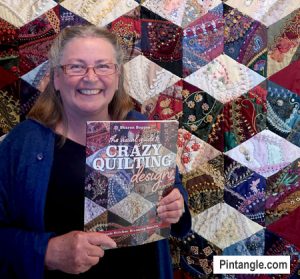
My book The Visual Guide to Crazy Quilting Design: Simple Stitches, Stunning Results shares detailed practical methods on how to design and make a crazy quilt. I cover such topics as fabric choice, tricky challenges like balancing colour, texture and pattern, and how to direct your viewers eye around the block. I cover how to stitch and build decorative seam treatments in interesting and creative ways. My book is profusely illustrated as my aim is to be practical and inspiring.
Stitchers templates
My templates aim to help you take your stitching to the next level. With them you can create hundreds of different hand embroidery patterns to embellish your seams with flair. These templates are easy to use, made of clear plastic so you can position them easily and are compact in your sewing box.
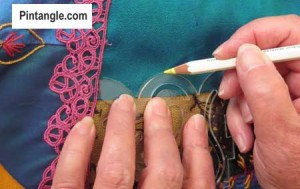 These are simple to use. You simply position the template in place and use a quilter’s pencil to trace along the edge of the template. Stitch along this line to decorate the seam. I have a free ebook of patterns to accompany each set which illustrates how they can be used.
TO ORDER your Crazy Quilt Templates see out shop


Thankyou for sharing, this is fantastic
Thanks Terri I am pleased you found it useful
Do you use a embroidery hoop when doing these stitches on the quilt or just freehand?
I’m new to his crazy quilt stuff, but I have a lot to work with.
I use a hoop. I stitch scrap material around the edge that gets trimmed off later. the scrap around the edge means I can hoop it
Sharon, how do you choose your thread colors? Do you pick up on the colors in the block? Do you pick out the threads you are going to use beforehand? Seems like I am always searching, going through all of my thread (hoard) and trying to find the right thread. How do you do it?
Beads too! Do pick them out beforehand? And do you do your beading as you embroider or at the end? Sometimes I do a nice combination, think I’m going to put a bead right there, and forget about it. Help!
Thank you.
Mary I do what works – pick up colours from the block, apply colour theory, choose threads before and during the process – everyone spends more time going through their stuff finding the right bit! One tip I store everything by colour – so all blue stuff is together – red stuff together etc that includes lace, buttons, beads etc Then I am only searching through one lot of stuff
Thank you for making it a .pdf file. I can read those on my old Kindle, too. =)
Thank you for generously sharing these wonderful ideas.
bonjour
juste pour vous demander s’il est possible d’avoir des modèle de points grazy ,explications en français .
Et si il existe un livre que l’on peux avoir en français
Merci pour votre réponse
je trouves vos réalisation super jolies j’aime beaucoup
Anne
Sorry I used Google translate to read your comment Sorry I can not provide instructions in French as dont speak French
Que fineza en sus trabajos, Dios la siga bendiciendo , con su creatividad usted nos ayudará a crear mejores trabajos, son hermosos todo lo que nos comparte, mil gracias y felicidades a su familia por tenerla a usted .
This is great I can’t wait to try it.
Thank you very much for this wonderful tutorial. I will certainly save this to print. Could you illustrate how to make a spider with beads on crazy patch.
Jan the spider is a charm I purchased from a craft store
Thank you so much for this Sharon, so helpful.
You are incredibly generous with your time, talent and knowledge Sharon. Thank you. Crazy quilting is very new to me, and with my just ordered stencils, I know I will enjoy following yours and others progress. Not game enough yet to do the hussif, but perhaps the next project. Hope your Easter was a peaceful one. Claire
Such beautiful inspiration, thank you, very encouraging.
Thank you so much, Sharon, for the abundant generosity you have always had with sharing your talent! I have learned so much from you throughout the years and continue to. I will print this out and add it to my ever growing “Sharon Boggon Encyclopedia”
Than you Sharon, I can wait to start with the course 7 may. I love this.
Gracias por un tutorial tan completo, debes de invertir muchas horas en el blog.
Hasta pronto.
Gracias por compartir
Sharon thank you so much for this wonderful tutorial. I love pintangle and have learned a wealth of stitches from you.
Thank You for the tutorial,Happy Easter to you and yours????
Wow! too beautiful. thanks for inspiration!
Is it acceptable to use wools in crazy patch?I do use them when doing needle punch such as pussy willows.they actually look & feel like the real thing once they have been trimmed.
I mean for some of the actual cp stitches.
Shirley
yes you can use any embroidery yarn in crazy quilting as there are no rules in this type of patchwork. I have even used knitting yarns – in fact I regularly do so! Use anything you can thread through the need eye!
Love it, thanks!!
Thanks so much this is such a fabulous reference. How kind of you to share
wowser !! These are great tips …Thanks so much for the info. I will pass it on
Gostei muito, obrigado e Boa Pascoa
Thank you so much for this wonderful tutorial! Easter blessings to you and yours, too!
Thanks for sharing. Happy Easter!
I am crazy about your web site. Such inspiration!
Thanks for posting. I have been practicing stitches before I even assemble my crazy quilt pieces because I know I will want to begin embellishment immediately after the piece is completed. In practicing, I’ve been using clear nylon thread for the the beading; what thread do you use when beading? Thanks for all your advice and beautiful inspiration.
Lori I use what ever thread matches the baed – or when its a beaded stitch like the Tast stitches the embroidery thread I have chosen to work in
Thank you! Happy Easter for you.
Thank you very much Sharon
Sharon, Thank you for this gift! I have been saving many of your posts of photos of stitches for nearly a year. My sister, a wonderful friend and I are beginning a small project together to learn some of these fabulous stitches for Crazy quilting. We have perused several sample books, but this lesson has finally made it click for me… as far as beginning and building, not the overwhelming finished look. I can’t wait to begin now! Sharon from Washington
Thank you so much! Your tutorial couldn’t have been posted at a better time for me. Just yesterday I finished piecing four blocks that I intend to do my first ever crazy quilt embellishing on. Right away I couldn’t decide what kind of stitch to try first. With your great suggestions for the beginner, I now have the confidence to get started. I am very excited.
Thank you for sharing !!!!
Thank you for so graciously sharing so much information with us Sharon. This mini tutorial is marvelous!
Love this! Thanks for sharing.
You are a gem. Thank you so much for the wonderful tutorial. I have printed it off and will place it in my book with my class materials. After I finish my last quilt this week for our quilt show I will be doing a redo on my crazy quilt stash by color and getting ready to get into some serious encrusting of my two blocks. Thanks so much.
Thanks so much for a great tutorial – in fact for all of the “lessons” you are giving! I am new to crazy quilting and embroidery, though I have worked with fabric and threads in other ways all of my life. Also, I have wanted to make a hussif for a while now. So this is the perfect opportunity to try out crazy quilting, learn some embroidery and make the hussif! I’m inspired now to get started laying out the fabric, then seeing how the design will evolve. Will try to post some pictures. Happy Easter to you, too!
Susie on Wednesdays I will write my usual work in progress reports about my hussif!
What a great gift you’ve given us, Sharon. I, too, will print it. So many good ideas, so many ways to get people excited about seeing what they can do. Thanks.
Thank you so much for sharing such wonderful information. It is invaluable to a beginner.
Hi Sharon,
Thank you for your generosity in sharing these treasures.
Chitra
Thank you Sharon, this is fantastic. I am not a crazy stitcher at the moment, but I love the stitches. I saved it as e-book.
Thank you for being such a sharing spirit. I have printed this out and added it my ever expanding library. I am looking forward to your next class and hopefully will be able to stay home and participate fully. Happy Easter!
Sharon, Thank you ever so much for all you do for the CQ world and always sharing your wonderful creations and talent!
Wonderful suggestions! Thanks!
Great article! I am so inspired!
Thank you for sharing this lesson. Combining stitches for seam embellishments is my personal challenge at the moment. I am enjoying it however, I sometimes get stumped as to what to add next. I am sure this will give me plenty of ideas to get over that hump and keep my seams interesting while leading eyes through my blocks. Thanks again for sharing this. Happy Easter to you.
Thanks so much Sharon!
I am always amazed at how beautiful your work is. I have been following you for many years and I do hope that it will continue for many more. You are simply wonderfully talented.
Thank you for sharing the seam treatments, Sharon. Wishing you also a Happy Easter. I have just finished a block using threads received from you in a baggie swap a few years ago, and found that they were perfect for the underwater theme of the block of blue fabrics.
Thanks for the delicious eye candy, Sharon. Hope you have a fantastic time with family and friends
Many thanks for this superb resource. So like what you did with the addition of beads
Goodness thank you very much for this I will be printing it happy Easter to you and your family
Love n hugs xo
Thank you for so generously sharing
Thank you for the added confidence you teach and the great ideas.
Sharon, thank you so much for sharing this with us!
Thanks so much, Sharon. I’m looking forward to saving this to print out later.