
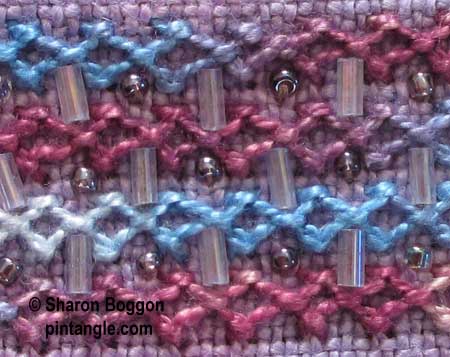

Even though Diamond Stitch is normally worked between two parallel rows, it can be stacked or worked free-form. As a stitch, it is versatile enough to produce some interesting effects, as the pattern it creates as you work it row upon row is interesting and can be further enhanced with beads or lacing.
How to work Diamond Stitch.
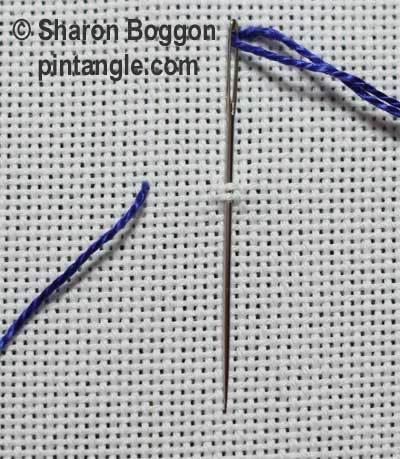
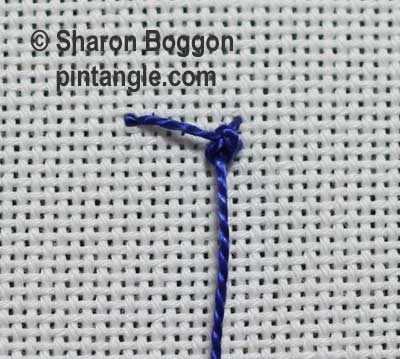
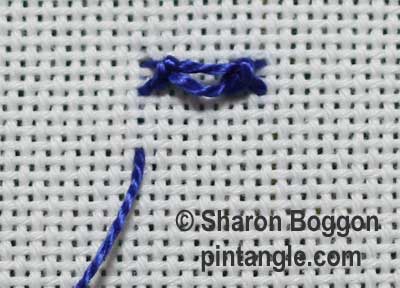
Work this stitch between two imaginary parallel lines from top to bottom.
Bring the needle to the front of the fabric and make a straight stitch across the row.
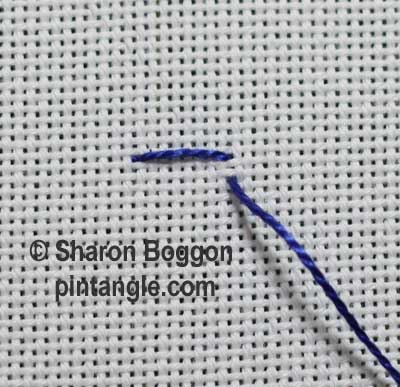
Make a small stitch down the line as illustrated.
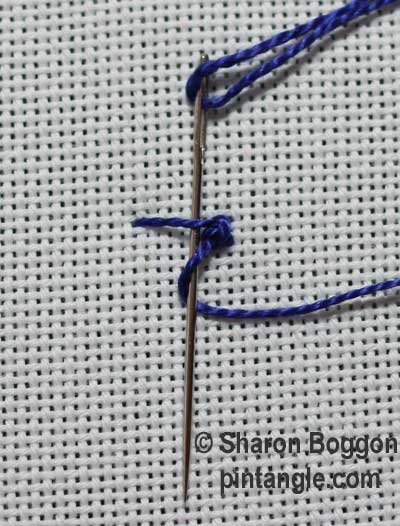
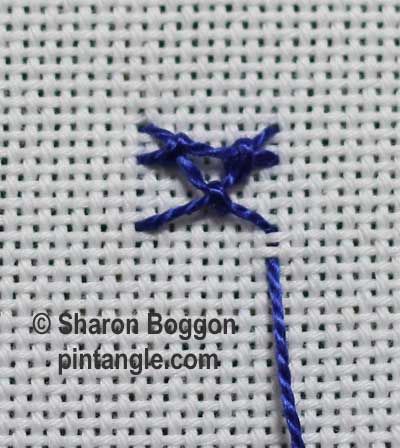
Slide the needle under the straight stitch from top to bottom.
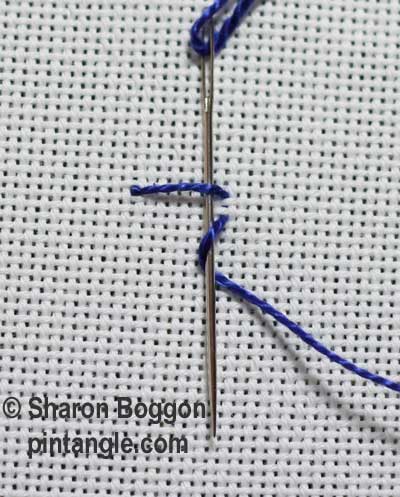
Wrap the thread over the needle, and then take it under the needle, as illustrated.
Pull the needle through the wrap. As you do this pull to the right, the loop will tighten. Pull until the loop is a snug knot.
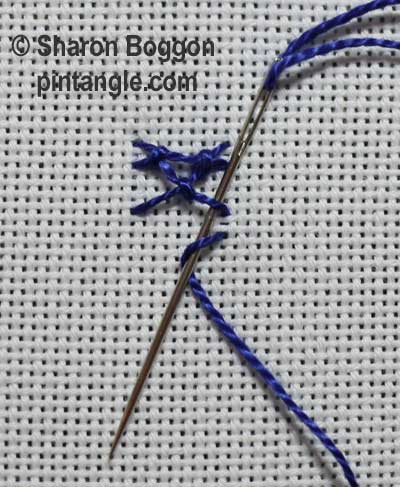
Slide the needle under the straight top bar stitch from top to bottom.
Wrap the thread over the needle, and then take it under the needle, as illustrated.
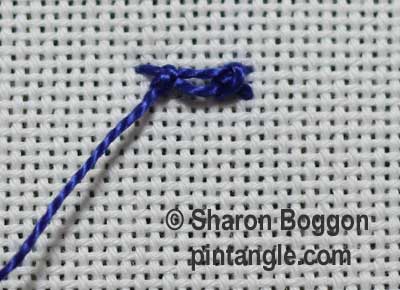
Pull the needle through the wrap, pulling to the left as the loop tightens. Pull until the loop is snug
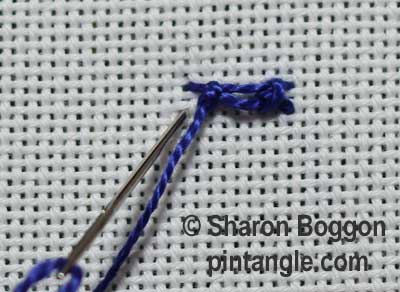
Take the needle to the back of the fabric near the knot at the point illustrated.
Have the needle emerge further down the line under the knot as illustrated.

Slide the needle under the bar you have just created.
Wrap the thread over the needle, and then take it under the needle, as illustrated.

Pull the thread through in a downward motion, tighten until a knot sits in the centre of the bar. Don’t pull too tight, just make the knot snug.
Take the needle to the back of the fabric on the right-hand line and bring the needle out a little down the line as illustrated.
Slide the needle under the last bar to start the next stitch.
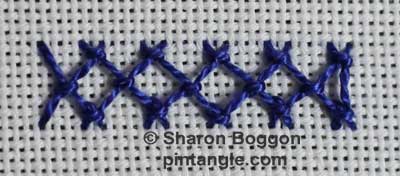
Continue this way down the line. I hope you enjoy Diamond Stitch
My New Book: Creative Stitches Volume 2 — Now Available
Explore a further 114 NEW hand embroidery stitches with clear, step-by-step photos, and practical, straightforward instructions for both left and right-handed stitchers! Try out inventive techniques, and gain confidence to play with stitches. Experiment with stitches and apply them to your own contemporary designs. My book is perfect for anyone who loves hand embroidery, crazy quilting, or slow stitching. And I have included loads of photos to inspire your creative journey.

This was little complicated when I tried initially. However, the struggle was worth the end result of this beautiful stitch.
My trials are here.
http://hobbysewing.blogspot.com/2020/09/tast-28-beyond-tast-28.html
Avec un peu de retard, ( better late than never) voici mon ” Diamond stitch”
http://carrementcrazy2.canalblog.com/archives/2013/04/16/26943272.html
Hello there – better late than never, I guess. Here is my sample.
Take care – Mary
http://theworkingneedleandpen.wordpress.com/2013/04/14/sunday-14-april-2013/ ?
Got it in by the skin of my teeth! Not much — have a nasty cold and it’s hard to focus on stitchery but… http://210920746822434353.weebly.com/1/post/2013/04/take-a-stitch-tuesday-2013-stitch-60.html
hello,
here is my work, a bit late perhaps
http://pierrespapiersciseaux.blogspot.fr/2013/04/tast-60-le-point-de-diamant.html
I am a bit late with my “take it further” challenge! For my owl I used Laced Square Herringbone, back stitch, straight stitch, chain stitch and detached chain stitch and a few French knots thrown in for fun. Thanks Sharon for throwing the challenge out there – it was fun!
http://www.flickr.com/photos/thestitchsmith/8630393668/in/photostream
‘Diamonds are forever’, or rather stitching them takes forever!
http://queeniepatch.blogspot.jp/2013/04/tast-60-diamond-stitch.html
http://stitchinfingers.ning.com/photo/tast-60-diamond-stitch?context=user
I’ve been keeping up with the stitching, more or less–sometimes pretty minimal, but I really got behind with the posting. I had so much fun with the stitch this week that I made the effort to catch up all the stitches in a post.
http://airynothing.net/Blogs/anblog/2013/04/06/a-whole-bunch-of-tast
I tried to learn stitch 59 and 60, like both stitches. Here is my post: http://fabricfusion.blogspot.com/2013/04/tast-2013-stiche-59-und-60-und-sugar.html. Thanks!
Today I shared my samples of the woven detached chain and Breton stitch on my blog:
http://fat-quarter.blogspot.nl/2013/04/woven-detached-chain-and-breton-stitch.html
my sample is here .tast58,59,60 are combined in one sample.hope you like it .Thanks Sharon for your encouragement. http://needlwork.blogspot.com/2013/04/tast-585960.html
I have just posted this weeks TAST60 on http://stitchinfingers I really enjoyed learning this st.
Thankyou Sharon.
http://stitchinfingers.ning.com/photo/tast-60-diamond-st?context=latest
I’ve started a new sampler
here it is
http://www.flickr.com/photos/36140279@N03/8622001840/in/photostream
Barbara
I didn’t have a chance to do the first extra challenge although I wanted too. I did however finish my armadillo. Yah! He features 13 of the TAST stitches. couching, running, French knot, Portuguese border, knotted cable chain, knotted feather, inverted feather, triangular feather, laced herringbone square, buttonholed herringbone, sailors, sailor’s edge, and Breton stitches.
http://playfulstitching.wordpress.com/2013/04/04/armadillo/
Thank you Sharon for providing me the opportunity to explore and play with these stitches.
Hi Sharon – I have lost track of where we should post our “take it further” challenge and can’t find the original post. I think it was due some time in early April? Many thanks
Liz
Liz leave it on the last TAST entry as then people can see it- if goes too far back no-one notices and you dont get visits! It was due on the 4th but I have not done the round up yet.
I have just posted my sample of TAST 58 on my blog, a new stitch to me.
http://linsartyblobs.blogspot.co.uk/2013/04/tast-58-painted-fabrics.html
Hi Sharon,
I have started my struggle with this stitch sampler today. the details are here-
http://jizee6687.wordpress.com/category/tast-2013/12-60-damond-stitch/
Thank you,
Chitra
Hiya Sharon, I hope you are properly well now. Here is my latest offering – Breton Stitch : http://thethreadbear.blogspot.fr/2013/04/breton-stitch.html, then there is the sailor’s edge and woven detached chain here : http://thethreadbear.blogspot.fr/2013/03/sailors-edge.html, and my attempt for the design challenge here : http://thethreadbear.blogspot.fr/2013/03/laced-herringbone-square-and-design.html.
xx Liz xx
Thanks Sharon for the instructions for this stitch. Again, another new one to me. It is good for m brain to keep learning new things!
http://princessbubblescreates.blogspot.ca/
I’ve posted my samples of TAST 60 here – http://hokkaidokudasai.blogspot.jp/2013/04/tast-60-diamond-stitch.html
Thanks!
Last month you inspired me with the diamond stitches on your band sampler. I wrote about that and other old samples in my weekly post with old diamond stitches:
http://fat-quarter.blogspot.nl/2013/04/old-diamond-stitches.html
http://yarngoddess.wordpress.com/2013/03/30/long-weekend-2/
Scroll past the first photo to see my finished sampler for the first quarter of TAST 2013. The cloth was prepared a year ago with soy milk and then earth pigment dyes. An interesting process; I may dye with mud again but perhaps with more planning ahead for the stitching I love to do.