
Open base needlewoven picot is a fun three dimensional stitch that is ideal for leaves and the like.
The method of working is very similar to Closed Base Needlewoven Picot stitch but the base is wider. You can make short or quite long or I have seen them worked in wide and stacked to form lichen type textures on motifs of trees and bark. Also if worked stacked in semi circles they make great pinecones! If you work them in a circle they form petals for flower. The ‘leaves’ stand free from the fabric in a 3D manner.
My main tip is to use a blunt tapestry needle so that as you weave the threads you do not split them by accident.
How to work an Open Base Needlewoven Picot stitch

Place a pin in your work with the pin emerging from the fabric where you want the base of your picot to be.

Bring the thread out at the base to the left of the pin. Take the thread behind the pin and back into the fabric on the right hand side as illustrated. Bring the thread out, a little to the left, at the base of where the pin emerges from the fabric.

Take the thread and wrap it behind the pin. Have the thread cross the pin so that it wraps from the right side to left as illustrated in the photograph.

Begin weaving by sliding the needle from left to right picking up the two outer threads. You do not pick up the middle thread.

Pull the thread through firmly but not too tight.

Turn the needle and continue weaving by sliding the needle from right to left picking the middle thread. The two outer threads are not picked up.

Pull your thread through and continue in this back and forth motion until you have woven to the base. As you weave use the needle to pack the picot so that it firm.
 Continue weaving until the picot is packed firmly to the base.
 Take the thread to the back and secure with two small back stitches.
 Remove the pin and you have a freestanding needle woven Picot which pops up from the fabric.
Have you seen my Stitchers Templates?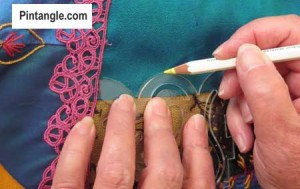
As someone who loves crazy quilting and embroidery, I designed these templates with other stitchers in mind. With my templates, you can create hundreds of different patterns to apply to your stitching and crazy quilting projects. They are easy to use, totally clear so you can position them easily. They are compact in your sewing box.
For more information, about them and the free ebook of patterns that they come with, visit the information pages in the shop where you can also purchase them.

My samples are here.
http://hobbysewing.blogspot.com/2020/12/tast-45-beyond-tast-45.html
really running behind this week but did get my sample stitching done.
i worked it into a postcard that i am making.
http://simpletosublimepapernapkinpoetry.blogspot.com/2012/11/tastopen-base-needlewoven-picot-stitch.html
🙂
libbyQ
This was another fun stitch. See my blog…. http://timeusebybernice.wordpress.com/
http://stitchinfingers.ning.com/profile/JeanneMarieMellor
I LOVE this stitch! It is just as wonderful as closed base picot and it was really nice to use it in the same piece for a variety of leaf, flower & bush shapes on a needlefelted landscape.
Thank You, Sharon!!!
Just in time for the new stitch! Here’s my woven picot flower:
http://fat-quarter.blogspot.nl/2012/11/woven-picot.html
I combined it with a design from my new book, so it was double fun.
Here’s my little dinosaur:
http://berrybakewell.blogspot.co.uk/2012/11/tast-week-45-open-base-needlewoven-picot.html
Hi Sharon,
my few samples are here-
http://jizee6687.wordpress.com/category/tast-2012/45-open-base-needle-woven-picot/
Thank you,
Chitra
http://stitchinfingers.ning.com/photo/woven-picot?context=user
Hiya Sharon, I didn’t post this yesterday cos I went past the time deadline again, well I think I did, I’m not sure at what time exactly you post your time. But I saw some others have posted late so I thought i’d add it anyway.
xx Liz xx
My blog has now been updated
http://www.therosejournal.blogspot.com
as well as photos added to Stitchngfingers
Hi Sharon & Friends, my post for the week.
Last week, I posted a work of open needle woven picot instead of closed base. Sorry ;( Thank you all!
http://embroiderland.blogspot.com.br/
You can see my post for this week here:
http://carrementcrazy2.canalblog.com/archives/2012/11/11/25556525.html
Wheee! Finally caught up! Here’s my open based needlewoven picot. Tried to make a banner/bunting but the points weren’t as sharp as I would have liked. But I think the idea is there. Will be blogging later today. Here’s the work on Flickr
http://www.flickr.com/photos/bigislandrosedesigns/8175912118/in/pool-56846286@N00
My sample this week doesn’t have lots of picots, but I didn’t have more space 😉
http://www.himade.net/?p=1829
I love stitching these picots:
http://textileexplorations.blogspot.de/2012/11/tast-2012-open-base-needlewoven-picot.html
Last week I didn’t pay attention and showed a sample of open base needle woven picot instead of closed base needle woven picot. So no needle woven picots this week.
I did catch up a few stitches though: Basque stitch with beads, knotted buttonhole stitch and pistil stitch.
http://threads-and-patches.blogspot.com/2012/11/july-block-cqjp.html
My sample for this week is here:
http://dufall.blogspot.com/2012/11/tast-picot-tisse-base-ouvert-le-point.html
You can find my post for this week here:
http://stitchinfingers.ning.com/photo/enchanted-forest-unfinished?context=user
It is not yet finished, but shows some picots.
Posted a flower and an artichoke. The latter has so many layers, I’ve included detail shots from different angles.
http://www.flickr.com/photos/playswithfibers/
thanks for proposing this interesting stich.
http://pierrespapiersciseaux.blogspot.fr/2012/11/tast-45-picot-attache.html
isabelle
Queenie’s corn from last week inspired me thinking of fruits and vegies as motifs. Had fun stitching a banana: http://fabricfusion.blogspot.co.at/2012/11/tast-week-45-cqjp-ufo.html
Thank you, Sharon for all! Cheers Claudia
My post
http://flowerkaleidoscope.blogspot.com/2012/11/tast-2012week-45-open-base-needlewoven.html
http://latha-mycreations.blogspot.in/2012/11/tast-week-45open-base-woven-picot.html
My sampler for this week’s challenge – Open base picot.
Here’s my picot flower: http://210920746822434353.weebly.com/1/post/2012/11/take-a-stitch-tuesday-2102-week-forty-five.html
I have posted this week’s sample at
http://www.flickr.com/photos/crazyqstitcher/
http://crazyqstitcher.wordpress.com/
Is there any end to how a picot can be used? A most enjoyable week.
http://queeniepatch.blogspot.jp/2012/11/tast2012-week-45.html
http://stitchinfingers.ning.com/photo/tast2012-week-45?context=user
I combined Weeks 44 and 45 together. Thanks, Sharon! http://debbiesfiberwork.blogspot.co.il/2012/11/tast-weeks-44-and-45.html
My sample is here:
http://shamiatcraft.blogspot.in/2012/11/tast-2012-week-45-needle-woven-picots.html
Just as much fun as last week’s stitch!
http://playfulstitching.wordpress.com/2012/11/06/open-base-needlewoven-picot/
I love this stitch! It really helps that it was so similar to the stitch from last week. Repetition helps me!
http://princessbubblescreates.blogspot.ca/
Here’s my weekly post with old woven picots:
http://fat-quarter.blogspot.nl/2012/11/old-woven-picots.html
Hi Sharon,
I’ve just finished my little Picot man. Not easy to build a human out of picots! But great fun. I am wondering of my little man used to live in Machu Picot :). You can view him here: http://stitchinfingers.ning.com/profile/JessicaGrimm
Have a nice day, Jessica