
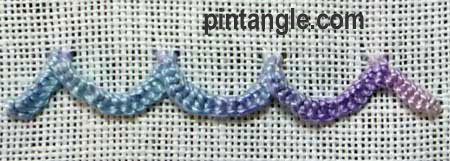
Buttonholed Herringbone is a composite stitch that I often get asked about. As the name suggests, it consists of a foundation of herringbone stitch, which is then buttonholed.
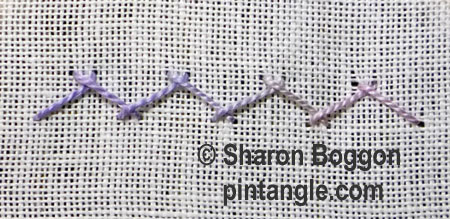
First, work a line of herringbone in a fairly solid thread such as perle 5. If you need a refresher on how to work herringbone follow the link to see a tutorial. You will also find buttonhole as well.
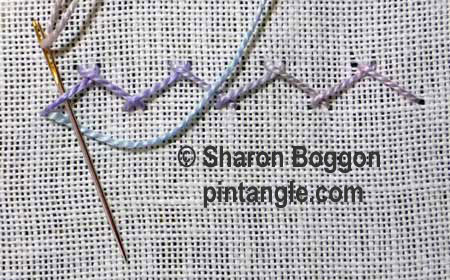
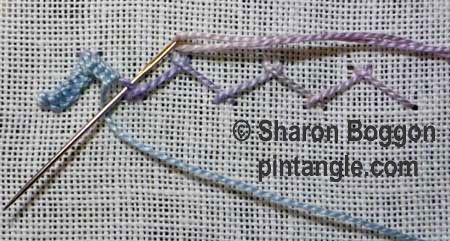
Use a blunt-ended needle for the second thread so that you do not split the foundation herringbone stitches.
Bring your needle out at the base of the row of herringbone. Then work buttonhole stitch using the herringbone stitches as the foundation.
Note: You are not passing your needle through the fabric.
Work buttonhole stitches along the bar until they are snug.
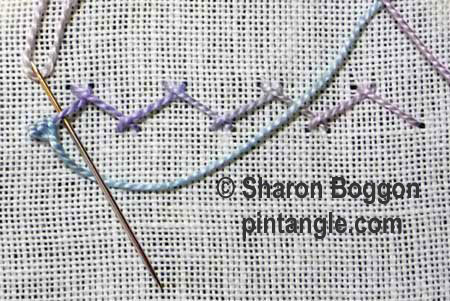
When you reach the top of the bar, pass the needle under the cross of the herringbone stitch and work a single buttonhole stitch.
Then continue on the downward bar once again, working enough buttonhole stitches until they are snug.
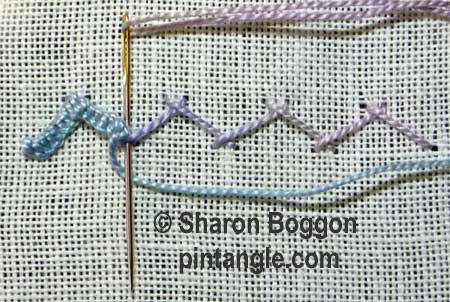
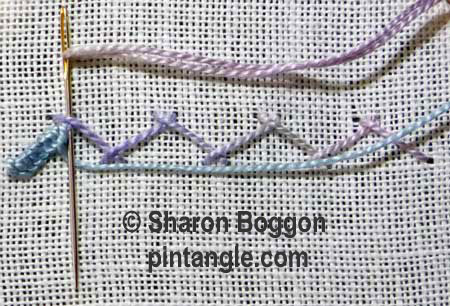
When you reach the bottom of the bar, pass the needle under the cross of the herringbone stitch and work a single buttonhole stitch.
Continue in this manner until the foundation herringbone stitches are covered in buttonhole stitches.
Have you seen my Stitchers Templates?
Create your own designs with Sharon’s easy-to-use stitchers templates. Combine shapes to create hundreds of patterns and designs to embroider. It is the ultimate mix-and-match fun for stitchers of all skill levels. I created them to be as versatile as possible. I include four multi-patterned templates in each set. You will find them easy to use, totally clear to help you position them on your work, and they are nice and compact to fit in your sewing box. Each set comes with an e-book filled with patterns and designs that you can create and use as a jumping-off spot for your own designs. They are available now in our shop here!
Happy stitching!

A new stitch for me to learn , but thoroughly enjoyed. My trials are here.
http://hobbysewing.blogspot.com/2020/09/tast-21-beyond-tast-21.html
2018 Stitch #32 – https://www.thecrafties.com/2018/12/2018-tast/
That was my last stitch! I was able to complete all of TAST in 2018! Thank you so very much Sharon. I am ever grateful for your site and putting this challenge together. I will turn my pennants into bunting and send you the final link when I get that accomplished. I’ll let my embroidery guild use it when we host tables at events as well.
My schedule is changing a bit for 2019, but I will certainly play along when I can. Happy New Year!
Beautiful Stitch
Here you can view my attempts at stitches 51 to 55:
http://debbies-doings.blogspot.ca/2013/04/stitches-51-to-55.html
Good evening,
I am a little behind everyone else. Here is my sample of Stitch 55, buttonholed herringbone.
http://theworkingneedleandpen.wordpress.com/2013/03/18/monday-18-march-2013/
More later!
Mary
Another side of my textile vase finished. This is a compilation of the tast stitches – the last being Buttonholed Herringbone.
http://www.flickr.com/photos/36140279@N03/8561689273/
Barbara
hello,
our work for this week is here http://pierrespapiersciseaux.blogspot.fr/2013/03/tast-55-point-de-chausson-festonne.html
I found this stitch to be perfect for the smoke coming out of the pipe I stitched…
http://www.flickr.com/photos/thestitchsmith/8526685744/in/photostream
This is my first attempt at TAST. My buttonholed herringbone can be seen at http://hokkaidokudasai.blogspot.jp/2013/03/tast-55.html
Hi,Sharon,here is my sample. http://needlwork.blogspot.com/2013/03/tast55.html Thank you.
Hi Sharon here is my sample
http://needlwork.blogspot.com/2013/03/tast55.html
Thank you.
Hi Sharon,
I decided to pick up my TAST-ing again, so here are a few ‘old’ stitches I finished this week. Thanks and have a nice sunday.
http://hetkabinet.blogspot.com/2013/03/tast-13-satin-stitch.html
http://hetkabinet.blogspot.com/2013/03/tast-14-stem-stitch.html
http://hetkabinet.blogspot.com/2013/03/tast-15-french-knot.html
or on Flickr: http://www.flickr.com/photos/hetkabinet/
This was the perfect stitch for my armadillo’s ears. Slowly, week by week, he is taking shape. I’ve got his head done now.
http://playfulstitching.wordpress.com/2013/03/02/buttonholed-herringbone-stitch/
hello,
here is my participation for the tast.
http://pierrespapiersciseaux.blogspot.fr/2013/03/tast-54-carre-au-point-de-chausson.html
I tested the second stitch of the previous week, and I’ll try to catch up the last week.
Sharon
Here is my sample for the last two week’s stitches.
http://shamiatcraft.blogspot.in/2013/03/tast-buttonholed-herringbone-sqaure-and.html
Hi Sharon,
It has been raining forever here, looks like yet another wet weekend. I have posted to my blog http://carorose.typepad.com/my_weblog/2013/03/tast-2013-.html
and to the Flickr group
http://www.flickr.com/photos/carorose/8518187998/in/pool-56846286@N00/
Have a good weekend
Carolyn
I’m still doing the buttonholed herringbone but I have just posted my design challenge 1 on my blog.
http://linsartyblobs.blogspot.co.uk/2013/02/tast-dc1.html
I must be doing something wrong — the stitch isn’t lying down and doesn’t make those beautiful curves you show…
http://210920746822434353.weebly.com/index.html
Carol probably your foundation stitches are too tight. Let the tension on them ease a bit then when you buttonhole them they become loops.
Hi Sharon,
I started working on this stitch today,my blog-
http://jizee6687.wordpress.com/2013/02/28/tast-2013-7-55-buttonholed-herringbone-1/
my earlier sampler is here-
http://jizee6687.wordpress.com/category/tast2/14-buttonhole-herringbone-st/
Thank you,
Chitra
Oh Sharon! I really like this stitch. It is new to me and you can see my humble attempt at
http://princessbubblescreates.blogspot.ca/
Thank you so much!
Angela
Here’s my weekly post with old buttonholed herringbone stitches:
http://fat-quarter.blogspot.nl/2013/02/old-buttonholed-herringbone-stitches.html
I love this stitch. I have used it in my january CQ bloc. Close-up view http://4.bp.blogspot.com/-m9GN22BHUNM/UOROUvnldxI/AAAAAAAAEHA/klL8864Y6HQ/s400/CQJPjanvier20136.jpg and the whole CQ bloc here http://j-en-revais.blogspot.com/2013/01/cq-bloc-de-janvier.html
It’s still Monday here and I just wrote about my triangular feather stitch experiments here:
http://fat-quarter.blogspot.nl/2013/02/triangular-feather-stitch.html
I’m planning to write my weekly post with old stitches tomorrow, I have some nice samples of the buttonholed herringbone stitch.