
Tumbling block 5 is really a tumbling block and a third. If you look where we are on the Diamonds are forever quilt you can see that this month we have a block and half to stitch. This extra diamond maintains the tumbling block pattern.
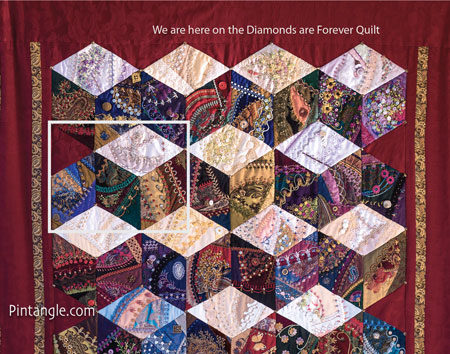
If you take a look at the quilt you will see that this extra diamond happens every second row on both the right and left side. You could do another half diamond in a light colour to make up the half top of the block if you chose. I don’t really know why I did not do this but it seemed OK at the time. If I was redoing this project I would make light coloured half diamonds but it’s up to you what you do. Either way it’s a bit more work this month. We will be back to 3 diamonds next month but with 4 diamonds to cover lets get to it!
You can download the patterns for the four diamonds that make up tumbling block 5. On the left side of Tumbling block 5 is a mid tone block you can download the pattern here. For the tumbling block, here is light tone diamond 1, mid tone diamond 2, dark tone diamond 3. The pdf file is to scale, but it has no seam allowances. Be sure to set your printer to print to the actual size. Do not use the ‘fit to page’ option as it will reduce the diamonds by half an inch or so. When you print them out, they should have 6-inch sides. I advise you to use Adobe Acrobat™ as a PDF reader (it’s free).
Tips for tumbling block 5
Many people are ask me about curved piecing. I have been point them to a tutorial written by Allison Aller. You can find Curved Foundation Piecing here
Remember there are no rules in Crazy Quilting! When embellishing your diamonds, feel free to follow what I have done, or adapt my ideas to your liking. Embellish the blocks as you see fit and have fun.
Mid toned Diamond (left side)

On the left side of Tumbling block 5 is a mid tone diamond the pdf for it is here.
The first detail on this diamond covers the seam between piece 1 and 2. This is a variation of wheatear stitch. I used oyster stitch instead of a chain stitch and then in different threads such as the black metallic thread I added more spikes. Changing threads mid stitch is a great way to add variety and interest to a seam embellishment. At the end of these spikes I added a seed bead. The next seam embellishment is a line of Detached chain stitches where I threaded a wool thread underneath each stitch before adding the disks which are actually a type of sequin. The seam between piece 7 and piece 4 was first covered with blue lace then I added a thin ribbon at the base line of the lace which I then worked Herringbone stitch over the top.
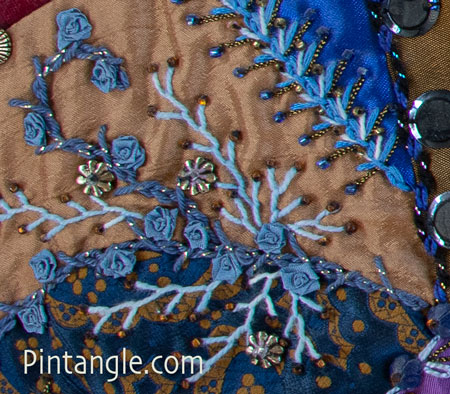
The next detail I would like to draw your attention to is the seam between piece 2 and 3. I first marked out some of the curves using my stitchers templates then covered the seam and one of the curved line with Twisted Chain stitch worked in a denim blue cotton that had a gold fleck in it. This thread is actually a crochet thread and is about the thickness of two strand of perle #5 so very thick! But I liked the look of it so I used it. Also the pale blue thread is wool. I then added the Fargo roses which you can find out how to work a fargo rose here and some beads in the shape of flowers that are made of metal.

The last two seams I would like to draw your attention are the seams along piece 5 and 6. The embroidery along stitched over the seam of piece 5 is simple Detached chain stitch with some straight stitches worked in metallic thread and topped with a seed bead. Easily missed are the vintage plastic dark blue novelty beads in the shape of flowers that are secured with a seed bead. The last seam was covered with hand dyed vintage lace. Along the edge is a series of 4 metal beads. I embroidered 3 Bullion knots arranged in a fan shape then wrapped with Detached chain stitches . Using a metallic thread, I tucked straight stitches in between the chain stitch wrapped bullion knots.
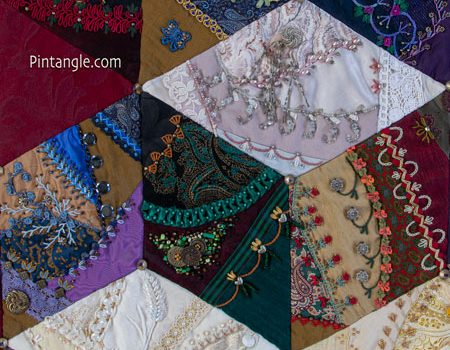
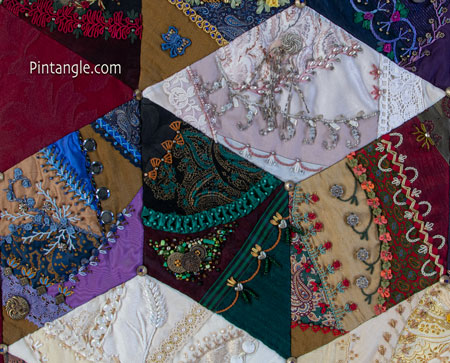
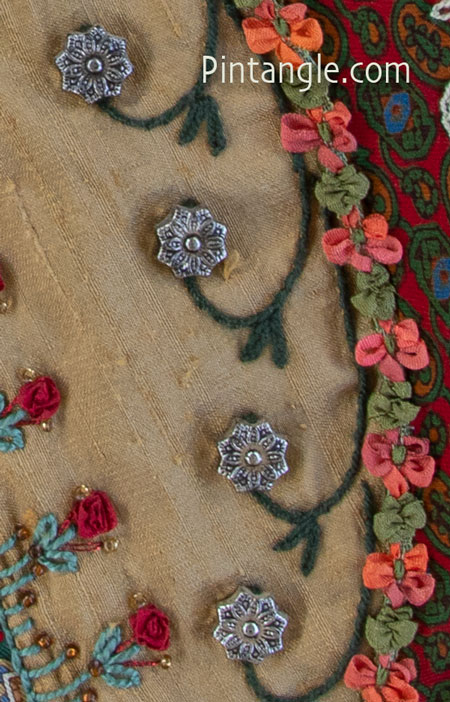
Light toned Diamond for tumbling block 5
The Pdf for the Light toned Diamond Tumbling block 5 it is here. This diamond has a few of my favourite features on it.
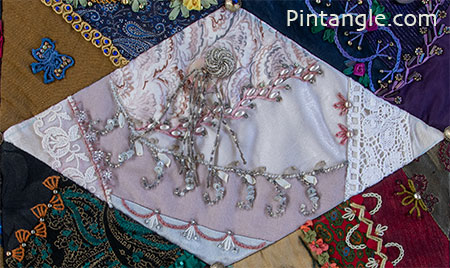
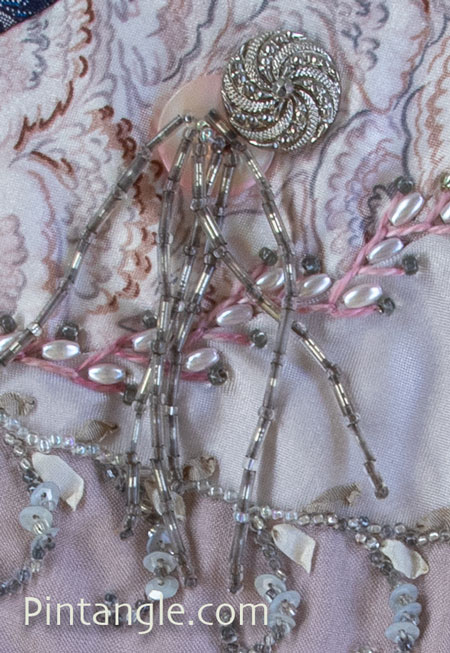
A bead tassel emerges from a button. I explain how to do this on page 139 of my book The Visual Guide to Crazy Quilting Design. Bead tassels are a lot of fun and can really add a bit of pizzazz to a block.
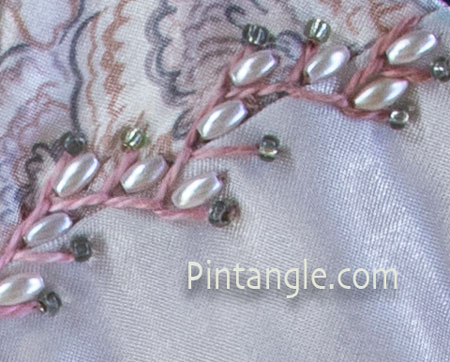
Feather stitch has to be one of all time favourite stitches. Here I added beads to enhance the pattern the stitch sets up.
The seam between piece 5 and 3 was covered with lace. Three detached chain stitches were worked using cotton perle #5. At the base I added some small pink pearls.
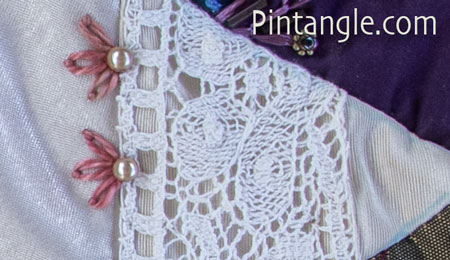
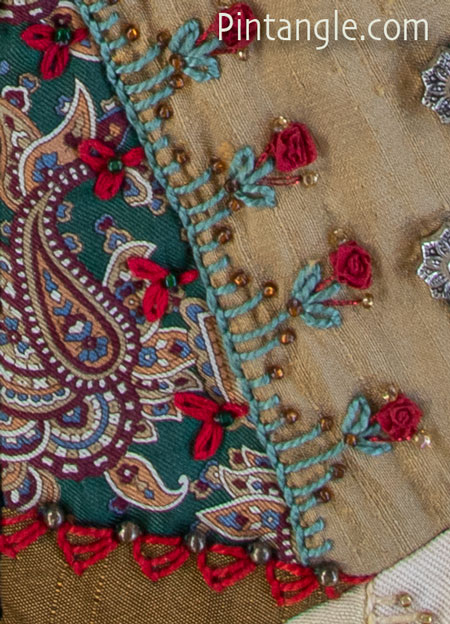
Another place where I added lace was along the edge of piece 6. Over the edge of the lace I worked a line of buttonhole stitches then added some clear plastic beads. These are cheap and look cheap but they worked on this block so I used them.
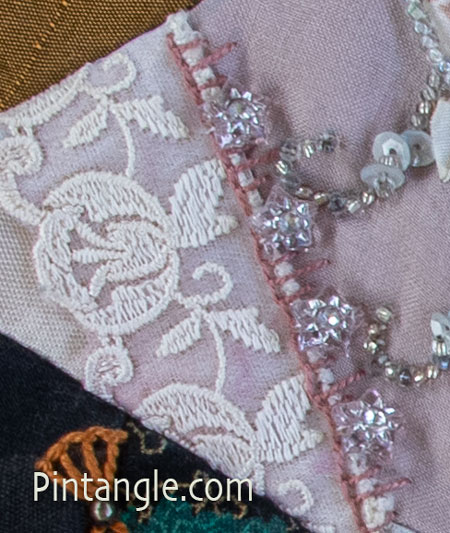
The long curved seam between piece 2 and 3 I beaded. I stitched a line of seed beads. Then using my stitchers templates marked a series of curves along the seam and beaded those lines too. At the middle of line I added 3 sequins. I also worked leaf stitch (page 133 of The Visual Guide to Crazy Quilting Design) in silk ribbon of one colour along one side and then another colour the other side.

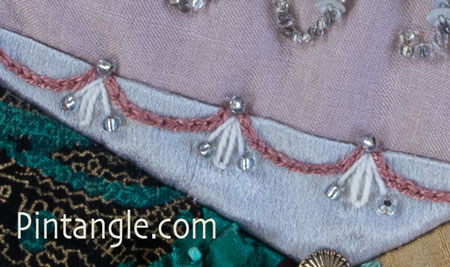
I used my stitchers templates on the last seam too. I marked out a series of scallops and worked them in chain stitch using cotton perle #8. After tucking a detached chain stitch and 2 straight stitches into the v of scallop I added seed beads.
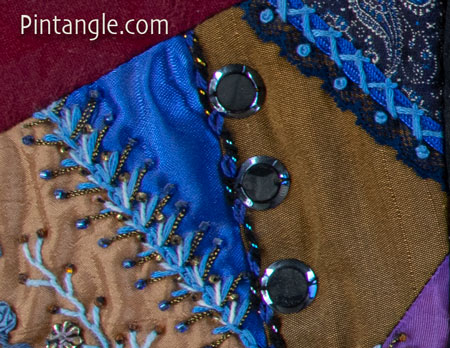
Mid toned Diamond tumbling block 5
The pdf for the Mid toned Diamond on Tumbling block 5 is here. Looking at and writing about these blocks I recall how much I enjoyed making this quilt. This diamond and the treatment of the ric-rac still gives me pleasure.
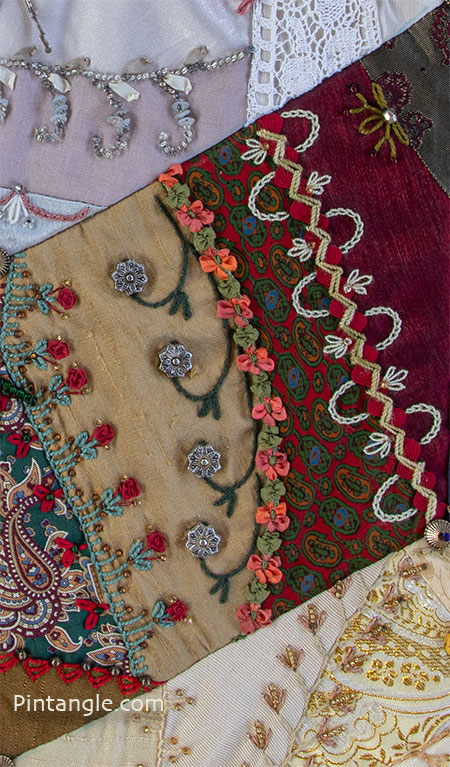
After securing the ric-rac over the seam with tiny stitches so it would not move, I worked a line of Zig-zag chain stitch over the ric-rac. I used my stitchers templates to mark out the curves that are worked either side of the ric-rac. The linear stitch I chose to work these curves is Chain stitch. In the same cotton perle #8 I worked Detached chain stitches in sets of 3 before adding a bead.

I used my stitchers templates again on the seam between piece 1 and 2. A commercial braid was used to cover the seam then I marked out the curved hook like lines along the edge of the seam. I worked the curves in Stem stitch, in dark green cotton perle #8 and added 2 Detached chain stitches before attaching a bead at the end of each of the hooks.
The last seam to draw your attention to is embroidered with a line Buttonhole stitches worked in cotton perle #5. I added Detached chain stitch to highest arms of the Buttonhole then a Fargo Rose before adding beads. On the other side of the seam I worked some detached chain stitches. The last seam you can see in the photograph is quarter Buttonhole wheels with a bead at the base.
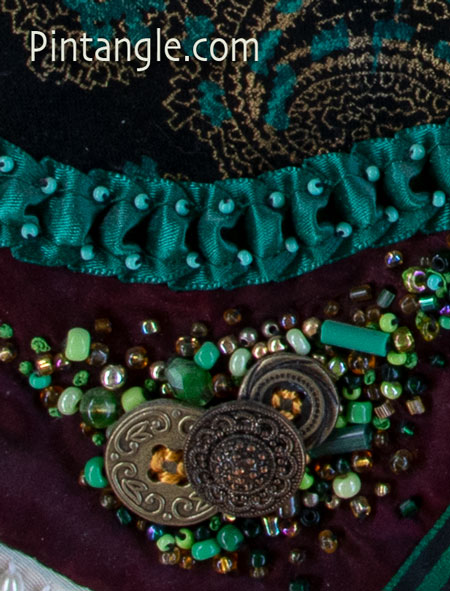
Dark toned Diamond tumbling block 5
The pdf for the Dark toned Diamond Tumbling block 5 is here.

On the seam between piece 2 and 3 I used quarter Buttonhole wheels again. These are worked in cotton perle #5.

The detail that most people notice first on this diamond is the bead cluster. It is simply a pile of beads and 3 metal buttons. The trick with these bead patches is to have the beads close together in the middle and as you move outwards spread the beads out so they look like a spill. This casual freeform spacing avoids a hard clump of beads that can look a bit too much. The ribbon above the bead cluster, is a commercially pleated ribbon that I added beads to.
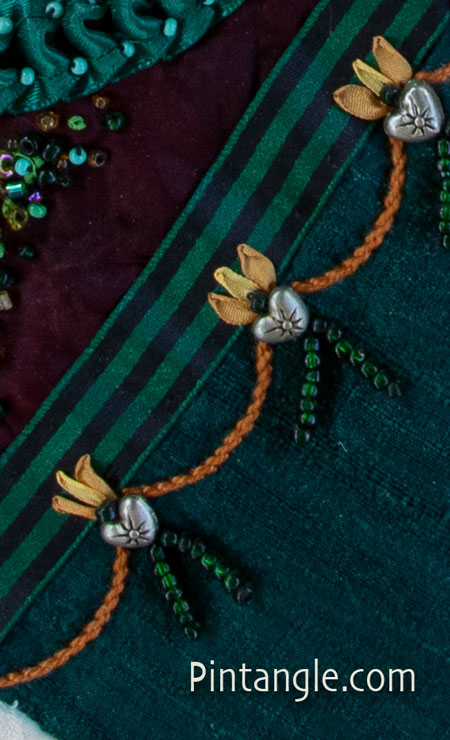
Along the edge of piece 4 I attached a striped black and green ribbon. Once again I used my stitchers templates to mark out some scallops and worked them in Stem stitch. I then added 3 silk ribbon leaf stitches (page 133 of The Visual Guide to Crazy Quilting Design) using a hand dyed silk ribbon. There is a seed bead set at the base. I added a metal bead that is in the shape of a heart. From the base of these hearts I have a small bead tassel which are not seen from a distance, but act as a little surprise for someone who looks closely at the quilt.
If you are stitching along please share what you do in either of the Crazy Quilt Divas and/or Crazy Quilt International groups on Facebook.
The quilt is on the front of two of my books: The Visual Guide to Crazy Quilting Design and my new book Crazy Quilting for Beginners Handy Pocket Guide. You do not need my books to join in on this stitch along, but I strongly recommend that you have at least the pocket guide, if not the full Visual Guide to Crazy Quilting Design.
Previous blocks in the series
Guidelines and general information about the series:
Tumbling Block 1;
Tumbling Block 2;
Tumbling Block 3;
Tumbling Block 4;
Tumbling Block 5;
Tumbling Block 6;
Tumbling Block 7;
Tumbling Block 8;
Tumbling Block 9:
Tumbling Block 10:
Tumbling Block 11:
Tumbling Block 12:
Tumbling Block 13:
Tumbling Block 14:
Tumbling Block 15:
Tumbling Block 16:
Tumbling Block 17:
Tumbling Block 18:
Tumbling Block 19:
Tumbling Block 20:
Tumbling Block 21:
Follow Pintangle and have it delivered to your inbox
You can have Pintangle delivered to your inbox — In the side bar use the Subscribe to Pintangle box or If you are on a mobile scroll to the bottom the of the page to find the Subscribe to Pintangle option. In either case type in your email address and click on the Subscribe button below. Then check your email inbox for a confirmation email and click the link to confirm your subscription. If you don’t see a confirmation email, check your spam folder — sometimes the computer puts it there.
The next tumbling block in the series will be on June 15th. (I publish a block each month on the second Thursday of the month)
Thread Twisties!
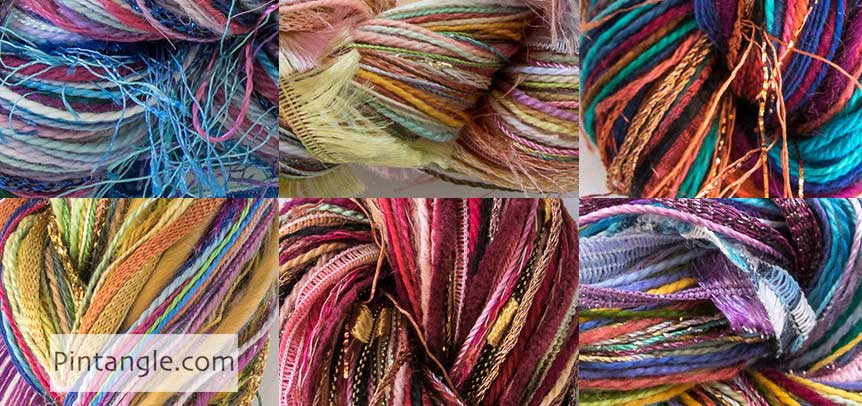
Experimenting with different threads can be expensive. You would normally have to buy a whole skein of each type of thread. My thread twisties are a combination of different threads to use in creative hand embroidery. These enable you to try out stitching with something other than stranded cotton. For the price of just a few skeins, you can experiment with a bundle of threads of luscious colours and many different textures.
These are creative embroiderers’ threads. With them, I hope to encourage you to experiment. Each Twistie is a thread bundle containing silk, cotton, rayon, and wool. Threads range from extra fine (the same thickness as 1 strand of embroidery floss) to chunky couchable textured yarns. All threads have a soft and manageable drape. Twisting them around a needle makes experimental hand embroidery an interesting journey rather than a battle. Many are hand-dyed by me. All are threads I use. You may find a similar thread twist, but no two are identical.
You will find my thread twisties in the Pintangle shop here.

Just saw this gorgeous Crazy Patch Tumbling blocks quilt at Block 5. Why had I not seen this sooner? Perfect use for all my Silk neckties that I’ve been saving for the last 30 years!
HI Zelma – many of the fabrics in this quilt are from neckties – they are great to use.
Thank you for your generosity in posting these blocks. They are wonderful. I am new to crazy quilting.
Linda I am pleased you are enjoying the series
It is beautifull what kinde of material must be use for this block’s
Jeanette – I use any fabric suitable for after five wear – in other words any of the fancy fabrics