

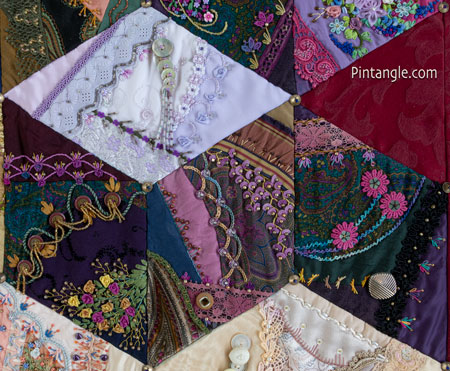
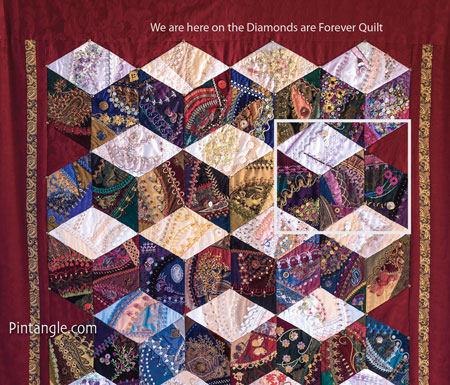
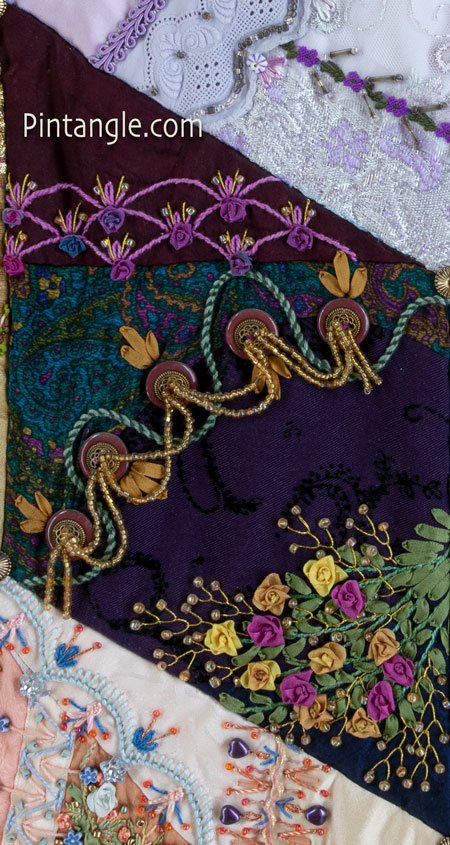
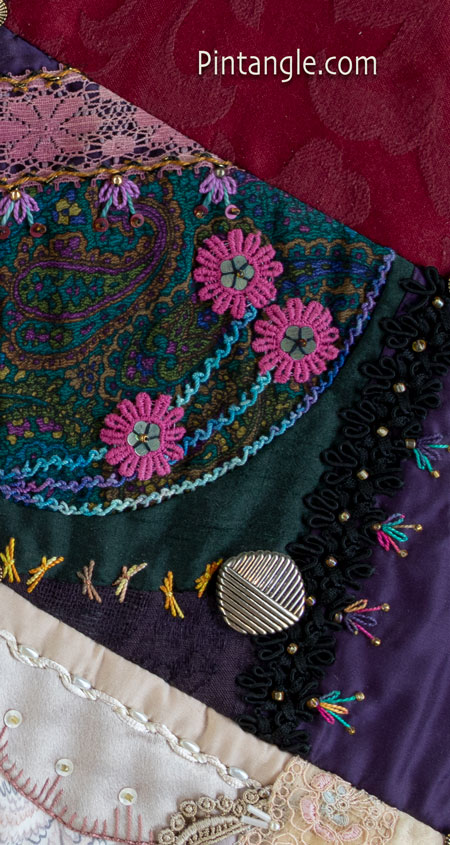
Tumbling block 7 sits on the second row, down in the right-hand side of the top section of the Diamonds are Forever quilt.
As you can see, the patterns for Tumbling block 7 are actually 1½ tumbling blocks. This means I have patterns or patch layouts for 2 dark diamonds.
You can download the patterns for the three diamonds that make up tumbling block 7. Here are patterns or patch layouts for the light tone diamond 1, the mid tone diamond 2 , the dark tone diamond 3, and the second dark diamond.
The pdfs are to scale, but have no seam allowances. Be sure to set your printer to print to the actual size. Do not use the ‘fit to page’ option as it will reduce the diamonds by half an inch or so. When you print them out, they should have 6-inch sides. I advise you to use Adobe Acrobat™ as a PDF reader (it’s free).
Tips for Tumbling block 7
If you need a tutorial on curved piecing take a look a tutorial written by Allison Aller. You can find Curved Foundation Piecing here
Remember when embellishing your diamonds, feel free to follow what I have done, or adapt my ideas to your liking. Embellish the blocks as you see fit and have fun and there are no rules in Crazy Quilting!
When foundation piecing your diamonds make sure that you don’t have a seam ending at one of the points of the diamond. When you come to piecing your diamonds into blocks you don’t want to be dealing with bulky diamond tips or corners.
Make sure you keep beads away from the edge of the diamond. When you piece the diamonds into blocks you will break your sewing machine needle if it hits anything hard.
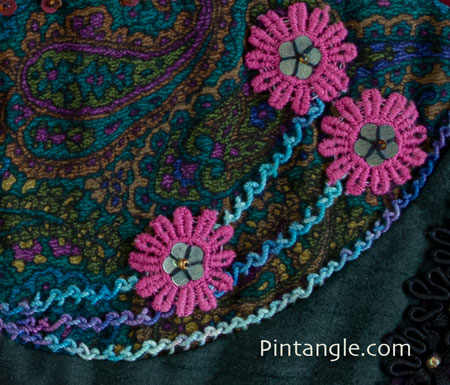
Light toned Diamond
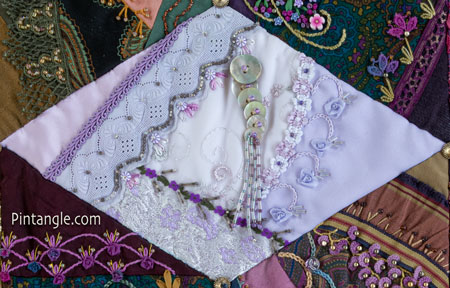
The Pdf of the patch layout for the Light toned Diamond Tumbling block 7 it is here. On this block I used quite a large strip of lace. It is about 1 and half inches wide. It almost looks like another piece of fabric but it is not. I also used some embroidered tulle (see the next photo). To do this I simply backed it with other fabric, in other words, pieced the two at once.
Embellishment notes for the Light toned Diamond
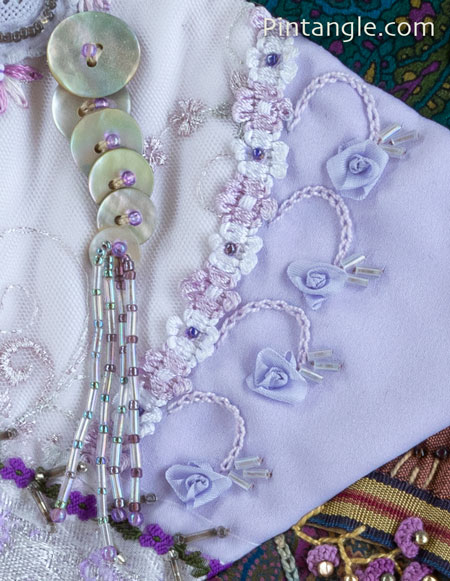
The first thing people notice about this diamond is the bead tassel emerging from the bottom of 5 mother of Pearl buttons. Instructions on how to make bead tassels are on page 139 of my book The Visual Guide to Crazy Quilting Design. I used a commercial braid to cover the seam between patch 1 and 2. Along the side of the braid used my stitchers templates to create 4 curves worked in Chain stitch. At the end of the curves I worked a Fargo rose and added some bugle beads.
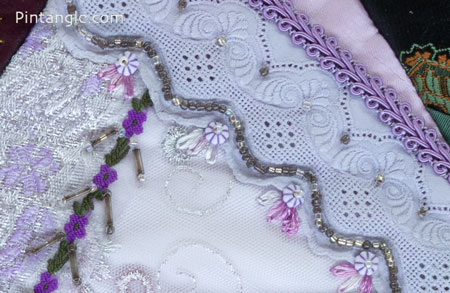
I used a commercial braid along the side of patch 3 which I decorated with bugle beads. The pale lilac lace was hand-dyed using Procion MX dyes. I ran a commercial braid along one side of the lace. With seed beads, I followed a line along the edge pattern of the lace. Tucked in the valleys I used 3 detached chain stitches arranged in a fan shape which is worked in rayon ribbon floss which was also hand dyed with procion dyes. I then stitched a bead in the middle of each.
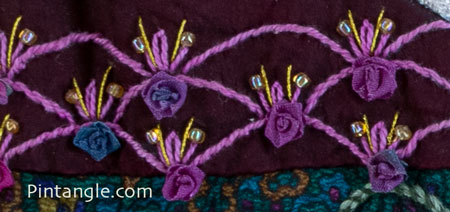
Mid toned Diamond
When this block was on its own it looked quite dull but sitting in the quilt it works. If you look at the quilt you will see what I mean. My point is that sometimes if a block is a bit flat don’t worry about it as once it is combined with others it will be OK. The pdf for the Mid toned Diamond on Tumbling block 7 is here.
Embellishment notes for the Mid toned Diamond

Between patches 1 and 3, I have a spray of cast on stitch flowers that hang off the arms of feather stitch. The flowers are worked in hand-dyed cotton that is about the same thickness as cotton perle #5. In the middle of each cast on flower I have a little gold bead. These stitches spill over onto a vintage ribbon that as you can see is slightly gathered. I added some straight stitches and seed beads to make sure it sat flat and did not catch on stuff.

Using my stitchers templates, I traced off the scallops using a water-dissolvable pen. I then worked then in Chain stitch. I used a hand-dyed cotton thread. And I then added Beads to the valley of each scallop.
Buttonhole stitch worked in cotton perle #5 which is further decorated by adding sequins and seed beads to the arms of the stitch.
A wide piece of hand-dyed lace covers patch 5. The edge of the lace has 3 detached chain stitches arranged in a fan shape. I worked these areas in hand-dyed cotton thread. It is the same thickness as cotton perle #5. Along the curved seam of patch 6, I decorated a commercial braid with seed beads before adding a vintage button to that area.
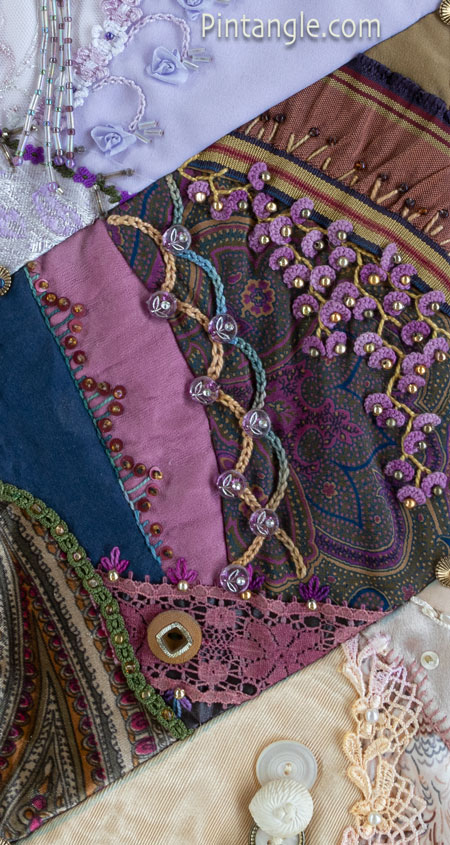
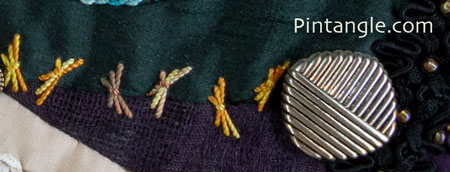
Dark toned Diamond
On the dark-toned diamond of Tumbling block 7, you will see many of the elements from the other diamonds being repeated in order to draw things together visually. The elements are similar but not exactly the same. For instance, there is a repeat of the scallop pattern. I also used another version of bead tassels. You can find the pdf for the Dark toned Diamond Tumbling block 7 here.
Embellishment notes for the Dark toned Diamond
You can find Fargo roses, Feather stitch and leaf stitch on page 133 of The Visual Guide to Crazy Quilting Design.
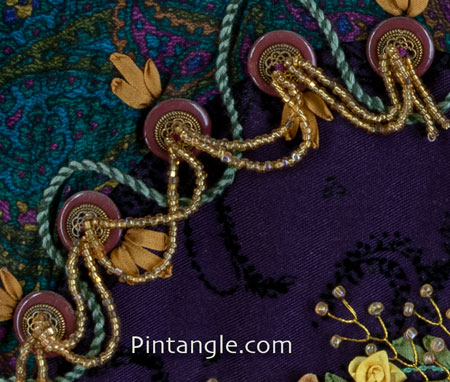
Loops of seed beads hang from the middle of a line of buttons. Then I used leaf stitch on alternating sides of the buttons. You can find the stitch on page 133 of The Visual Guide to Crazy Quilting Design.
Once again, I used my stitchers templates and traced off the scallops using a water-dissolvable pen. I then worked them in Stem Stitch before adding Fargo roses, straight stitches, detached chain stitches, and seed beads.
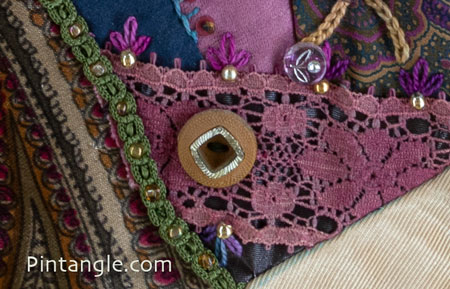
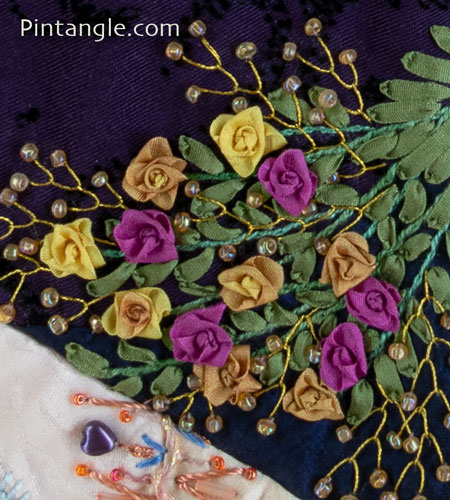
Second Dark-toned Diamond
Since we are dealing with 1 and half tumbling blocks this month we have an extra diamond. The pdf for the second Dark toned Diamond Tumbling block 7 is here. If you want to make a light triangle to fill in the space where half a light-tone diamond would go feel free to do so. On my quilt, the area is the same plain burgundy fabric that I used on the border but some people might want to continue the tumbling block pattern.
Embellishment notes for the Second dark toned Diamond
This was a quick block to stitch and it probably shows. So, if you have a CQ project and you are tiring of it, try a few of these techniques to speed up the process and get to the finishing line! The flowers are lace motifs that I added a flower-shaped sequin in the middle. You can see that the stems are a very sloppy example of Scroll stitch. I worked these in a hand-dyed crochet thread.
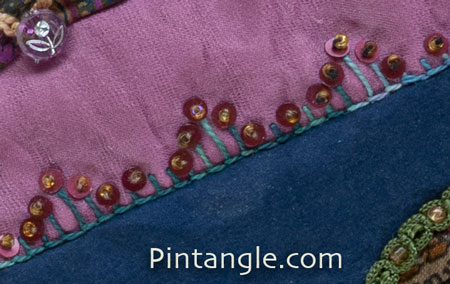
I love Sheaf stitch but always forget to use it. Then, on the seam between patches 2 and 3, I varied the height of the stitches to make them look like butterflies. The thread here is hand-dyed silk.
The last detail I want to draw your attention to, is a large braid used to cover the seam between patches 2 and 3. I used 3 detached chain stitches arranged in a fan shape worked in perle #8 thread. And I use this favourite little motif all the time.

If you are stitching along please share what you do in either of the Crazy Quilt Divas and/or Crazy Quilt International groups on Facebook.
The quilt is on the front of two of my books: The Visual Guide to Crazy Quilting Design and my new book Crazy Quilting for Beginners Handy Pocket Guide. You do not need my books to join in on this stitch along, but I strongly recommend that you have at least the pocket guide, if not the full Visual Guide to Crazy Quilting Design.
Previous blocks in the series
Guidelines and general information about the series:
Tumbling Block 1;
Tumbling Block 2;
Tumbling Block 3;
Tumbling Block 4;
Tumbling Block 5;
Tumbling Block 6;
Tumbling Block 7;
Tumbling Block 8;
Tumbling Block 9:
Tumbling Block 10:
Tumbling Block 11:
Tumbling Block 12:
Tumbling Block 13:
Tumbling Block 14:
Tumbling Block 15:
Tumbling Block 16:
Tumbling Block 17:
Tumbling Block 18:
Tumbling Block 19:
Tumbling Block 20:
Tumbling Block 21:
Follow Pintangle and have it delivered to your inbox
You can have Pintangle delivered to your inbox — In the side bar use the Subscribe to Pintangle box or If you are on a mobile scroll to the bottom the of the page to find the Subscribe to Pintangle option. In either case type in your email address and click on the Subscribe button below. Then check your email inbox for a confirmation email and click the link to confirm your subscription. If you don’t see a confirmation email, check your spam folder — sometimes the computer puts it there.
The next tumbling block in the series will be on August 10th. (I publish a block monthly, usually it’s the second Thursday of the month)
Have you seen my Stitchers Templates?
Create your own designs with Sharon’s easy-to-use stitchers templates. Combine shapes to create hundreds of patterns and designs to embroider. It is the ultimate mix-and-match fun for stitchers of all skill levels. I created them to be as versatile as possible. I include four multi-patterned templates in each set. You will find them easy to use, totally clear to help you position them on your work, and they are nice and compact to fit in your sewing box. Each set comes with an e-book filled with patterns and designs that you can create and use as a jumping-off spot for your own designs. They are available now in our shop here!
Happy stitching!
